• Home
  • About
  • Recipe Index
  • Contact
Menu

Rivka Friedman

Street Address
City, State, Zip
Phone Number

Your Custom Text Here

Rivka Friedman

  • Home
  • About
  • Recipe Index
  • Contact

Masala Dosas

March 29, 2013 Rivka
1-DSC_1284.jpg

When I was a kid, my favorite restaurant was a spot called Siddhartha, in downtown Silver Spring. Siddhartha was unfussy, inexpensive, and – at least when we started going – patronized almost exclusively by Indians. In retrospect, I suppose it’s a parent’s dream: kid loves cheap, relatively health Indian food more than pizza, chicken nuggets, whatever. But when we were at Siddhartha, chicken nuggets were off the menu. I could think of only one thing, and that was masala dosa.

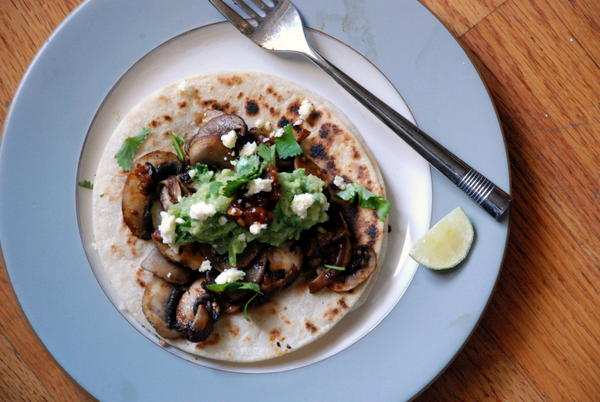
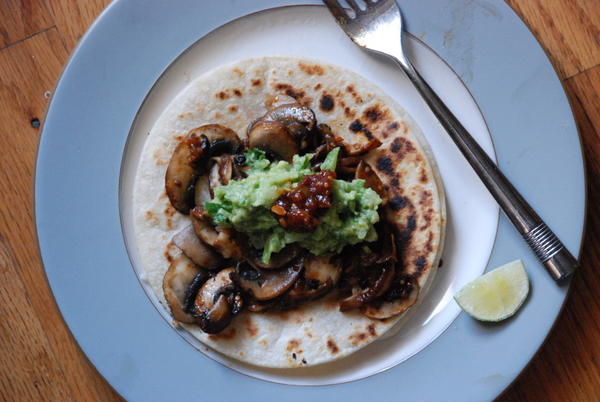
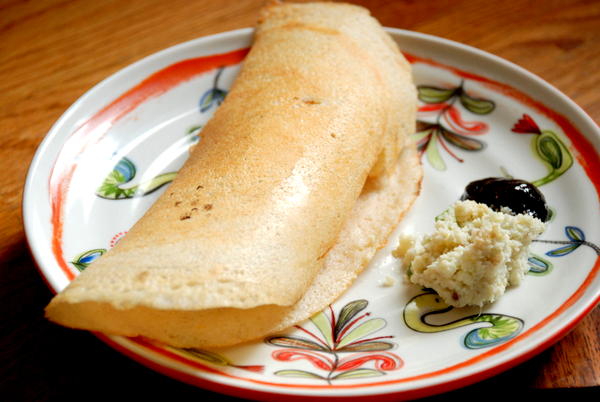
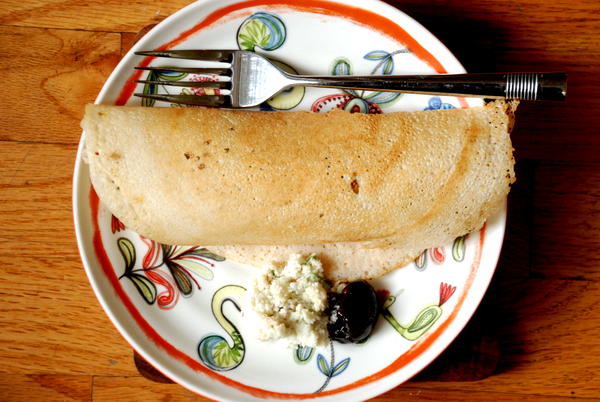
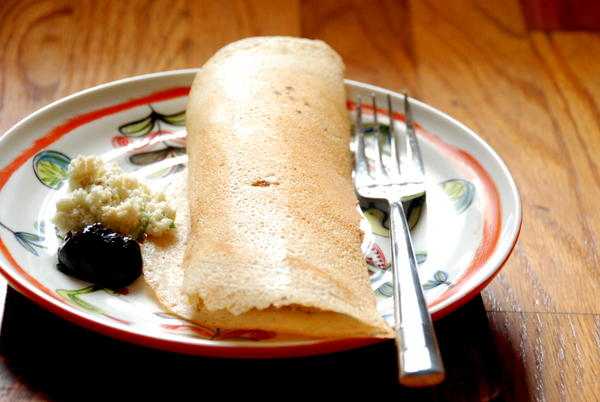
For the uninitiated, a masala dosa an Indian pancake, crisp and lacy outside but soft within. It’s cooked like a crepe, and then filled with a mixture of spiced potatoes and onions. Dosa batter is made of ground rice and lentils which have been fermented, so the pancake takes on a slightly sour, funky flavor (like sourdough bread: less sour, but equally distinctive).

1-DSC_1209.jpg
1-DSC_1261.jpg

If it isn’t clear already, I am obsessed with dosas.

If I’m being truthful, dosas fell off the map for me. There were probably 5 or 6 years when I didn’t have a single one. Looking back, that was pretty stupid. I went without because I couldn’t find a decent restaurant nearby that made them. Now I realize I could have been making them at home, all along.

1-resize.jpg

Dosas came back into my life, of all things, because of a food truck. Actually, two food trucks.

Do you know about food trucks? We’ve got them all over DC, but we’re hardly the first city to develop mobile cuisine. Austin has had them for years, and the last time I was in town, strolling down South Lamar, I stopped at the food trailer park for lunch. There, set up on the gravel, was a shiny silver truck called Nomad Dosa. Natch, choosing my lunch spot was no challenge. I had one masala dosa, returned the next day at lunch for one more, and came home thinking half-seriously about quitting my job and starting a dosa truck in DC.

1-DSC_1253.jpg

Seriously, if two Texan hippies with one trip to India under their belt could make decent dosas, why couldn’t I? Right then and there, I committed to finding and perfecting (perfecting!) the recipe.

Fortunately, I’ll be keeping my job for now. There’s a newish food truck in town, and it’s called Chatpat. If you live in DC and haven’t yet tried it, stop wasting time. Chatpat is a South Indian food truck that serves a slew of appetizers, one thali, and two dosa options every day. Not only do they park at my office two times a week – making a daily dosa a real possibility – but Mr. Chatpat worked with me, over several weeks, to perfect my dosa recipe so that it tastes like my best meals at Siddhartha.

1-DSC_1232.jpg

You guys, I am over the moon. In the past month, I’ve had dosas for breakfast, lunch, dinner, and snack. It seems I could eat nothing but dosas for weeks straight. And now, thanks to the magic of I-tested-this-recipe-1500-times , you can make them – and eat a million of them – too.

1-DSC_1269.jpg

So thank you, Mr. Chatpat! And Todd, the Nomad Dosa man, for reminding me that dosas exist and are wonderful. I’m indebted to both of you. Perhaps, one of these days, I’ll show up with a token of my gratitude: one perfectly cooked, perfectly filled dosa. My treat.

1-DSC_1286.jpg

Masala Dosas with Coconut ChutneyLoosely adapted from this, this, this, my friends Trial and Error, and tips from Mr. Chatpat

Don't be fooled by the abundance of notes and the long recipe: dosas aren't hard to make, and they require minimal active time. However, there's a learning curve when it comes to making good ones, which is where my miniature bible of notes comes in. 

Notes:

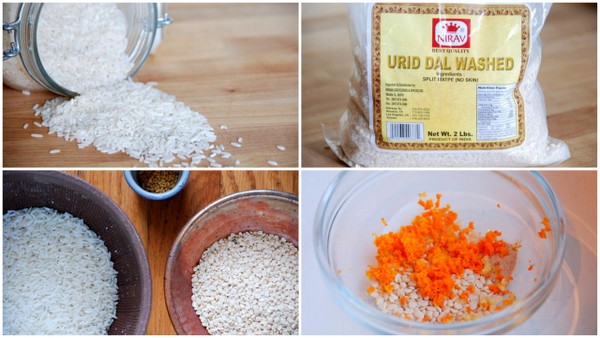
For those of you who try to avoid buying “special” ingredients, my apologies. I’ve managed to do away with the special rice some recipes call for, but you do need to buy washed urad dal and fenugreek seeds. For the urad dal, you want “hulled and split black gram.” You don’t want the flour, and you want the lentils to look pale taupe, not black. The black ones have not been hulled. Urad dal are available at Indian grocery stores, as well as Kalustyan’s and Amazon (the small bag is cheaper, but the big bag is a better value). Fenugreek seeds are also available on Amazon and Kalustyans. Lastly, to make the filling and chutney, you'll need curry leaves. Available on Amazon and at Kalustyans.

Dosa batter is made by allowing raw rice and lentils to soak and soften in water, then blending them smooth, combining them, and fermenting the combined mixture. Because rice and lentils soak up different amounts of water depending on quality and age, it is impossible to say with certainty how much water you will need for your batter. Mr. Chatpat confirmed this for me. So we’re all going to have to be comfortable with a little trial and error of our own. Here’s the good news, though – if your dosa batter is too thick, you can add water as needed, at any stage of the process. My best dosas have come from batter to which I added water by the tablespoonful as I made the dosas. Tried one, too thick, add some water, tried another, etc. You’re going for batter with a consistency somewhere between pancake batter (gloopy) and crepe batter (very runny). As your dosa skills improve, you may find you want to adjust the thickness of your batter. Again, you’ll have to play around with it.

But it’s worth it. It really is.

And if you want to be really traditional about it, make sambar and/or coconut chutney to go alongside. We also served it with purchased tamarind chutney, which certainly isn’t traditional, but it is very tasty.

Sorry, one last thing. I’m told that dosa batter is supposed to double in volume while it ferments. Mine never, ever has doubled. It has increased in volume marginally, but it’s never even come close to doubling. This may have to do with the fact that it’s cold out, or it may have to do with my tap water being DC’s finest. If you want your dosa batter to rise, use room temperature filtered water, and live somewhere warm. Jokes: I’ve got strategies for keeping your dosa batter toasty below. But I have a feeling that part will be much easier come summer. Okay, onto the recipe.

1 ½ cups regular, unfancy, long-grain rice (basmati will also work, but the former is cheaper)
½ cup urad dal
½ teaspoon methi (fenugreek) seeds
1 teaspoon salt
A few tablespoons of olive oil or ghee
Wedge of an onion, for cooking the dosas

Soak the Grains: Put the rice in a medium-large bowl, and fill with room temperature water so the water level is a couple inches above the rice. Put the lentils and fenugreek in a separate bowl, and fill it, too, well above the level of the lentils. Cover the two bowls and set on the counter to soak for at least 5 hours (no harm if it’s longer – I typically leave mine overnight). The lentils and rice both will have soaked up most of the water in the bowls, and the rice will be soft enough to break with your fingers.

Make the Batter: Strain the lentils. If you reserve the water, you can use some of it to blend the lentils; otherwise, you can just use water straight from the tap (or Brita). Pour the lentils into the bowl of a food processor (best) or blender, add 2 tablespoons of water, and turn the machine on. After 30 seconds or so, stop the machine and scrape down the sides of the container. Then recover and blend until the lentils are absolutely, positively smooth. You may need to add a few more tablespoons of water as you go.  In my food processor on high, this took about 4 minutes. You’re looking for light, fluffy clouds of whipped lentil batter. Think liquid marshmallows.

Use a spatula to scrape your whipped lentils into a large pyrex or other mixing bowl – the more insulated, the better. You’re going to want your dosa batter to stay warm as it ferments.

No need to clean the processor bowl; just strain the rice (reserving the liquid), and transfer it straight into the bowl, with 1 cup of the soaking liquid. Blend until the mixture is runny, milky white, and as smooth as possible, about 3 minutes. The mixture may feel ever so slightly gritty if you pinch some of it between your fingers, but you’re going for as smooth a mixture as possible.

Pour the rice mixture into the lentil mixture and use a spatula to gently fold them together. Keep folding as you would chocolate mousse or soufflé batter, until the mixture is totally uniform.

Ferment the Dosa Batter: Cover with a towel or with plastic wrap into which you've poked some holes. Set in an area that hovers around 80 or 90 degrees, and leave it there to ferment and (hopefully) grow in volume, 8-12 hours.

If your house is cold, you have a couple options. One is to turn your oven on to about 100 degrees, then put the dosa batter inside and turn off the oven. It won’t stay hot forever, but if you choose an insulated bowl, your dosa batter will have a couple warm hours at the start of its rest. You can also turn on the light in the oven to raise the temperature inside slightly. But best case scenario (which, note, I’ve never done) would be to ferment your dosa batter while you’re awake, so you can adjust the oven temperature from time to time.

If your kitchen is particularly cold, your dosa batter may need up to 18 hours of fermenting time, so be sure to make the batter in advance. The beautiful thing about making it in a cold house is that you can basically leave the batter out on the counter for a day or so, and it will get slightly more sour, but not too much. You’re looking for the batter to have become slightly frothy, and grown slightly in volume. However, if it’s cold, this may happen either slightly or not at all. Don’t worry about it. I’ve made great dosa from batter that looks exactly as it did when I first mixed it up.

Cook the Dosas: Keep in mind that dosas are like crepes. The first one, you will most likely throw away, and the best dosa comes with practice.

Set your largest cast iron or other very well-seasoned pan over medium-high heat. Nonstick is a second-best option here; you ideally want a pan with heft, but that won’t allow the dosas to stick. And you want the pan hot enough that when you sprinkle a couple drops of water, they immediately sizzle and disappear – but not hot enough that it smokes.

When the pan is hot, drizzle a couple drops of olive oil or ghee onto the cut side the onion wedge, spear the wedge with a fork, and rub the cut side of the wedge onto the pan to coat it ever so slightly with oil. (The onion will sizzle).

Use a ¼ cup measure or a ladle to pour a puddle of batter into the center of the pan, and then use the back of a wooden spoon or (if you have one) a crepe spreader. I don’t have one, and I’ve actually come to love my flat-bottomed metal ¼ cup as the perfect tool here. I fill it, pour it, and then use the bottom of the measuring cup to spread it.

To spread the dosa, move gently from the center of the dosa out to the edge in a fluid spiral motion. There may be spots you miss – you can always go back and correct them. Your technique the first couple times is going to suck. Be cool with it – you’ll get better as you go. If you need a confidence booster, check my first dosa photos on instagram. Not pretty.

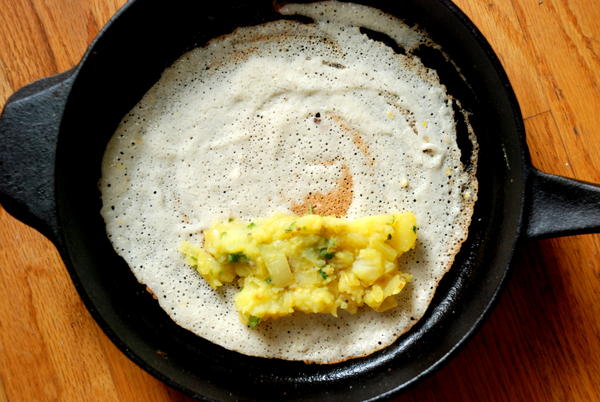
Once you’ve spread your batter around the pan, drizzle a couple more drops of olive oil or ghee over the top surface of the dosa. (At this point, if you are filling the dosas, this is when you would add a spoonful of filling either to one side of the dosa (if planning to fold in half) or along the center of the dosa (if planning to roll up).)

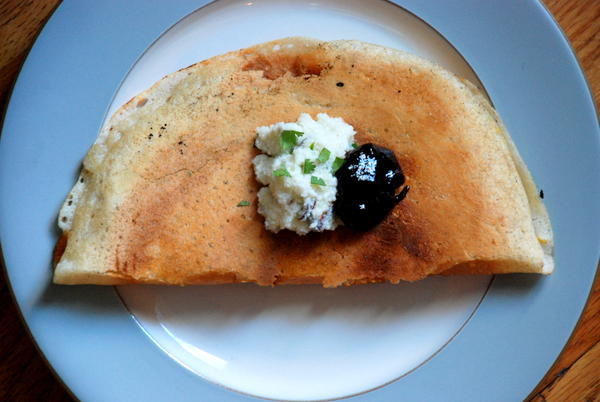
Cook over medium-high heat until the bottom of the dosa is thoroughly golden. You’ll notice that the edges of your dosa start to lift and curl slightly when the dosa is close to done. Use a wooden spatula to lift the dosa, and either fold it over itself to make a semi-circle, or gently roll it up into a cylinder.

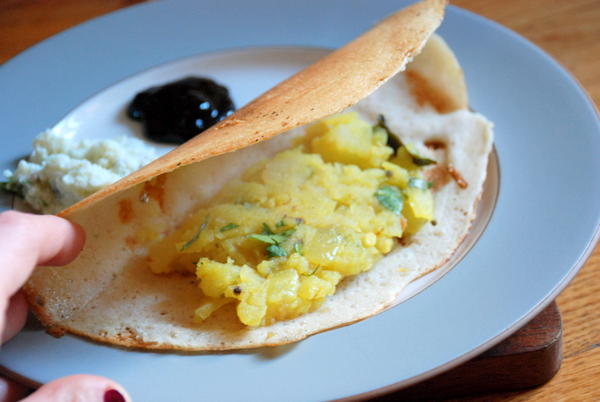
You can serve the dosas just like this, with sambar and coconut chutney (recipe below), or you can fill them with the potato masala filling (recipe also below). But unfilled, they make a fantastic snack.

The dosa batter will keep in the fridge for up to 1 week, but it needs to be brought back to room temperature before making dosas.

Potato Masala Filling

1 ½ lbs. gold (waxy) potatoes, peeled, boiled in salted water, and cooled slightly
3 tablespoons oil or ghee
½ teaspoon yellow mustard seeds
2 teaspoons urad dal
1/8 teaspoon asafetida (optional)
½ teaspoon turmeric (fresh if available, otherwise dry ground)
5 curry leaves
1 tablespoon minced or grated ginger
2 serrano or jalapeno chilies, membranes and seeds removed, diced
½ medium yellow onion, coarsely chopped
1 cup water
1 teaspoon salt
1 cup chopped cilantro

When the potatoes are just warm, cut them roughly into 1-inch cubes.

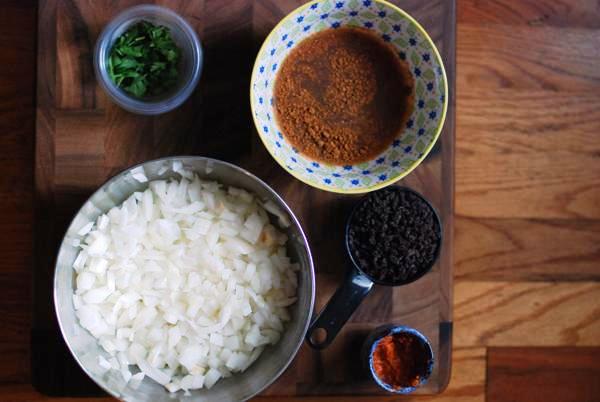
Gather all your ingredients before starting, because once the pan is hot, everything moves quickly. Put the mustard seeds in a small bowl, the urad dal, asafedita, turmeric, curry, ginger, and chilies in another medium bowl, and the onion in a third bowl. Set the bowls near the stove.

Heat a large sauté pan over medium heat and add oil or ghee. When oil shimmers, add mustard seeds and wait until they pop, about 30 seconds. Then add the contents of the second bowl (urad dal, asafedita, turmeric, curry, ginger, and chilies) and stir to coat with the oil. Cook 30 seconds more.

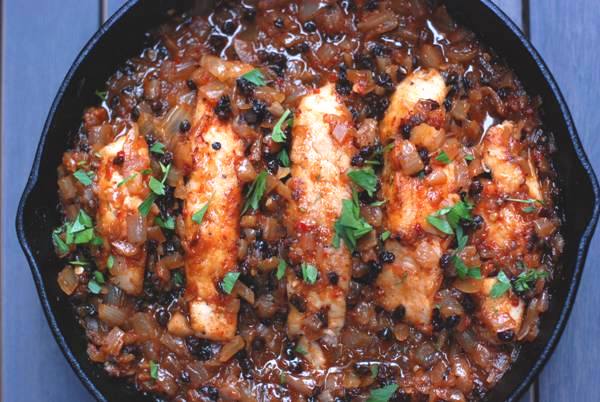
Add onions, stir to coat with spices, and cook over medium heat until they start to soften and turn translucent, about 8 minutes. Add potatoes and continue cooking another 2 minutes or so, until the potatoes start to break down.

Add the water and half a teaspoon of salt. Scrape the bottom of the pan to loosen the browned bits into the potato mixture, then turn up the heat until the water comes to a boil. Cook 5 minutes, then turn off the heat.

Use the back of a fork to lightly mash the potatoes. You still want plenty of cubes, but you also want some mashed bits.

Add the cilantro, and taste the mixture; if it isn’t salty enough, add the remaining half-teaspoon of salt.

At this point, you can use the potato masala immediately, or store covered in the fridge for up to 1 week. Be sure to bring to room temperature (or even warm slightly in a microwave or on the stove) before using to fill dosas.

Coconut Chutney

For the initial mixture: 1 cup fresh grated coconut (can susbtitute dry unsweetened coconut, but you'll need to add double the water) 2 small serrano or 1 jalapeno chile, chopped (seeds and membrane removed if you're worried about spice) 1 teaspoon grated ginger 1 tablespoon roasted chana dal or urad dal, lightly toasted in a dry skillet ½ teaspoon salt

For the tempering: 1 teaspoon ghee or flavorless oil (grapeseed, canola, etc.) ½ teaspoon yellow mustard seeds 1 red chile, crushed (or substitute 1 teaspoon chile flakes) 3 curry leaves, crushed

In a mini-prep food processor or blender, combine coconut, green chile, ginger, dal, and salt and blend with 1/4 cup water until smooth, adding more water if necessary and scraping down the sides of the canister as needed. Transfer to a bowl.

In a small skillet, heat the ghee or oil until it shimmers, then add the mustard seeds. After they pop, add the chile and curry leaves and remove from the heat immediately. Pour the flavored oil (with all the spices) into the coconut mixture and stir to combine. Serve with masala dosas or other indian dishes.

In gluten-free, main dishes, vegan, vegetarian, healthy
18 Comments

Mushroom Tacos with Tomatillo-Chipotle Sauce

February 13, 2013 Rivka
DSC_0596
DSC_0596

I've been traveling a bunch for work, which has left our fridge less packed than usual. It's a bummer to open the fridge and so few bags of produce, but D gets positively gleeful about all the open space. O.C.D Organized people just love empty fridges, am I right?

With less time at home, I'm on the lookout for quick weeknight dinners that make use of whatever precious little food I've got in the fridge. Bonus points for dishes that aren't pasta, which is a fallback too often.

This week, I barely cooked at all. I only had one night in town when I wasn't working late, and our friend Abby was visiting from NY, so we met her at El Chucho, the new Mexican restaurant in Columbia Heights. It's got a dimly lit interior, tall tables and bar stools, and lots of bearded dudes in plaid shirts walking languidly around with plastic baskets in hand. Walk in, and you feel like you've walked into Brooklyn; Abby felt right at home. The food wasn't bad, the ambiance was fun, and margaritas were on tap. Of course. I bet we'll be back soon. Meanwhile, we're copying their dishes at home.

El Chucho had tacos de calabacitas on order, made with breaded fried squash. They were so addictive, we didn't miss the meat. When the weekend rolled around, I was hungry for more Mexican food but didn't have any squash on hand (it tends to be limp and sad in wintertime). I did have a bag of mushrooms that needed using, and a handful of tomatillos left over from the previous week's dinner party. I braced myself for a bit of fussing, figuring it was worth it - a craving is a craving, yes? But much to my surprise, dinner came together quite quickly. Corn tacos were heated. The mushrooms were tossed with a quick sauce of tomatillos and canned chipotles. Everything cooked through while I mashed up an avocado's worth of guacamole and opened a jar of the salsa I made this summer. We didn't have any queso at home, so I topped the tacos with a pinch of feta cheese, which in retrospect wasn't at all necessary. Done and done: dinner on the table in 20 minutes.

DSC_0576
DSC_0576

What I like most about these mushrooms is their versatility. I can see stuffing them into burritos or enchiladas, folding them into short vermicelli for a Mexican riff on fideos, or even adding some to a handful of melty cheese, piling the mixture into a flour tortilla, and making a mean quesadilla. They can go on pretty much anything. Come to think of it, they're the sort of thing I'd make a big bowl of, then tuck in the fridge for a busy day's dinner. Cooked mushrooms are smaller than raw ones; everyone's happy.

Mushroom Tacos with Chipotle Serves 4

For the mushrooms: 2 tablespoon olive oil, divided 2 cloves garlic, smashed and chopped 1/2 lb. tomatillos, husked, rinsed, dried, and roughly chopped 1 canned chipotle, chopped, plus 1 tablespoon of the canning sauce (start with half a chipotle if you're sensitive to heat) juice of half a lime 1 lb. cremini mushrooms, wiped clean and sliced salt

For serving: a big pile of small corn tacos guacamole and salsa (purchased is fine) queso fresco or feta cheese, optional

Put a large frying pan over medium heat and add 1 tablespoon olive oil. When oil shimmers, add garlic. Stir around to distribute, and cook for 1 minute. Then add tomatillos, stir into the garlic, and cook until they break down slightly, 2 minutes. Add chopped chipotle, stir through to incorporate, and cook until the mixture softens and becomes mostly smooth, about 2-4 more minutes. Spoon the sauce into a bowl, taste, and add salt or pepper as needed.

Give the pan a rinse and wipe it dry, then return it to medium-high heat and add the other tablespoon of olive oil. When oil shimmers, add mushrooms. Toss to distribute evenly, and then let them sit there for a few minutes, until the mushrooms on the bottom of the pan develop some color. Every couple of minutes, give the pan a shake to move mushrooms from top to bottom and vice versa. After 5 minutes or so, the mushrooms will have emitted enough water to shrink slightly, and the pan will be less crowded. When this happens, spoon in the tomatillo-chipotle sauce, stir it around to coat the mushrooms, and cook 1 or 2 more minutes, until mushrooms are coated and browned. Squeeze the half a lime into the pan, stir to incorporate, and turn off the heat. Scrape the mushrooms into the bowl that held the tomatillo-chipotle sauce. Wipe the pan out a bit, and return it to the heat.

Heat corn tortillas one at a time by leaving them in the hot pan just until warmed through (or, if you're crazy as I am, until the bottom of the tortilla is a bit brown and crispy), then stack them on a plate as they finish warming. When you've warmed enough tortillas for either one or two per person (depending on preference: I like two per taco, D prefers one), put the tortillas on plates, spoon some of the mushroom mixture onto the tortillas, and top with guacamole, salsa, and/or cheese. Serve immediately.

In gluten-free, main dishes, vegetarian, easy, healthy
1 Comment

Crispy Kale Tart with Grapes

November 16, 2012 Rivka
kale and grape tart
kale and grape tart

There may be nothing better than taking the most virtuous ingredient, like kale, and making it as delicious as deep-fried potato slices. I lovekale chips.

If we're being honest about our allegiances, I'll tell you that I might like my taters au gratin even more than as chips. You get that crunchy, browned exterior, but you also get that soft, melty, creamy underbelly. And if you want to sprinkle some extra grated parmesan on top, well, don't let me stop you.

My kale repertoire boils down to three main things: chips, sauteed kale, and raw kale salad. So the greens are either very very crunchy, or totally soft. What never occurred to me -- until last week, that is -- was the idea of treating kale like potatoes au gratin, giving them soft parts and crunchy parts in the same dish. That's what I was going for with this crispy kale tart.

onions on kale tart
onions on kale tart
kale tarts before baking

It all started when I overbought kale at the market a few weeks ago, I washed and cut it up all at once, figuring I'd be more likely to use it if it were all ready to go. (This is a strategy I employ whenever I buy lettuce, green beans, cauliflower, broccoli, or any greens. Prepping them in advance makes cooking from scratch seem so much less work-intensive.) Because I know myself too well, I also halved some grapes while I was at it. Those went in the bag with the kale. So did some chopped scallions. Boom: salad.

After 4 straight days of kale-grape salad for lunch, I still had some leftover and I wanted to do something different with it. We had planned to bring dinner to friends who just had a baby, and I was thinking I'd make some sort of open-faced puff pastry tart. Opened the fridge, saw the kale, wheels started churning.

parmesan kale tart
parmesan kale tart
kale tart with goat cheese

30 minutes later, something beautiful emerged from the oven: the kale, which had been drizzled with olive oil and liberally salted, tasted like kale chips on top - but there were soft bits, too, reinforced by plenty of caramelized onions and bits of melty goat cheese. And those grapes! Why don't we cook grapes more often? The heat concentrates them; they come out looking like sparkly little gems. The tart didn't need scallions, but those grapes? The goat cheese? Amazing.

Now's the part where I admit to you that apparently, I can't come up with much else to eat. I've made this tart three times. I've eaten it 4 days this week. I probably won't stop there.

But if I do, at any point, decide to incorporate some other foods into my diet, this tart definitely will go into the regular rotation.

kale tart with grapes 2

Crispy Kale Tart and Grape Tart Makes 1 9-inch tart, enough to serve 4 as an appetizer or, with a salad, a light dinner

A few notes about this tart. First: I've made it with fresh goat cheese, which I really like. If you don't love goat cheese, try it with grated parmesan, which works equally well. Don't use aged goat cheese, though -- that combination was sort of weird. Second: use the most flavorful grapes you can find. If concord grapes are in season, use those. Otherwise, try to find unsprayed red or black grapes. Lastly: any kind of kale works here. I like curly kale best, because the leaves are very unruly, so you end up with lots of crispy bits. That said, I've tried the tart with dinosaur (lacinato) kale and even with a mix of swiss chard and collard greens (which get less crispy, but still taste good). In short, any greens will do.

1 lb. (16 ounces, 454 grams) yellow onions (about 2 medium), halved and thinly sliced 2 tablespoons butter 2 tablespoons olive oil, 1 for the onions and 1 for the kale 1 sheet puff pastry 1 tablespoon grainy or dijon mustard 3 ounces (113 grams) kale, shredded 1 cup (about 3.5 ounces, 99 grams) red or black seedless grapes, halved 2 ounces (57 grams) fresh goat cheese or parmesan cheese salt and pepper

Put 2 tablespoons butter and 1 tablespoon olive oil in a wide shallow pan that has a cover, and set over medium-low heat. When butter had melted, add onions and a healthy pinch of salt. Stir to coat, cover the pan, and turn heat to low. Cook, stirring occasionally, until onions have softened and started to caramelize, about 20 minutes.

Remove cover, turn heat to medium-low, and let the onions start to brown more, stirring at more regular intervals. Cook for 10-15 minutes more, until onions are very soft and golden brown. Set aside.

Meanwhile, set puff pastry on a flat surface, cover lightly with a dish towel, and allow to thaw enough that if it's folded, you can open it up without ripping it. I find this takes roughly 25 minutes. Alternatively, you can stick the package of puff pastry in the fridge overnight, which also does the trick. Trader Joe's puff pastry comes in a flat 9-inch square which makes thawing less important. If you make your own, well, you're fancy-pants. Ignore all of this.

Preheat the oven to 350.

When puff pastry is ready to use, unfold or roll into roughly a 9-inch square (though exact size and shape really don't matter here) on a lined baking sheet. Spread a very thin layer of mustard - 1 tablespoon total - on the puff pastry, leaving a 1/2-inch border. Distribute caramelized onions over the mustard, and then pile on the kale. Distribute halved grapes evenly over the kale, and top with little bits of goat cheese or clouds of grated parmesan.

Drizzle the remaining tablespoon of oil (ok, maybe a a tablespoon and a half) over the kale, and sprinkle with salt and pepper.

Transfer puff pastry on baking sheet into the oven, and bake for 25-30 minutes, until pastry is golden, kale is browned and crisped, and grapes are glistening. Cut the tart into 9 equal squares, and serve warm or at room temperature. You can also refrigerate the tart and then reheat it in a low (225-degree) oven for 10-15 minutes before serving.

In main dishes
1 Comment

Snapper with Harissa and Rose

November 9, 2012 Rivka
harissa snapper
harissa snapper

Jerusalem is a city of enclaves. There are Yemenites and Iranians and Bukharians, Russians and Syrians and Brazilians, Ethiopians and Venezuelans and Jordanians, Libyans and Italians, French and Americans. Each group has its own neighborhoods, its own language, its own culture, its own food. And now, there's finally a book cataloguing everything.

Yotam Ottolenghi was raised in mostly-Jewish western Jerusalem. His partner, Sami Tamimi, was raised in Muslim east Jerusalem. They now live in London, where they run restaurants - but both still think of Jerusalem as their home. The two have collaborated on a new cookbook called Jerusalem, which they claim is a self-indulgent nostalgia trip. I've been leafing through this book before bed for a couple weeks now, and I couldn't be happier to be along for the ride.

harissa snapper ingredients

If you've cooked from Plenty, you'll instantly recognize the style of recipes in Jerusalem. Lots of fresh vegetables, plenty of legumes, olive oil in every pan, generous use of eggs and yogurt. This book isn't vegetarian, but I'd say probably 85% of the recipes are. And while in Jerusalem there are 200 ways to eat meat, it's the fruit and vegetables that I (and clearly they) miss the most. They are in such abundance there that you can't not use them. You can't not top every salad with a handful of fresh herbs, chop up an Israeli salad to go with your meal, cut open as perfect a tomato as you'll find outside of Italy. This book is a celebration of all that makes Jerusalem's food life quirky and intimate and conflicted and wonderful. I can't stop reading it; and while I've only just begun to cook from it, I can tell I'll be doing that regularly from now on, too.

If you do have the book, here are a couple of recipes to make now. Make the roasted cauliflower and hazelnut salad. It looks simple, but the cinnamon and roasted hazelnuts make the cauliflower somehow more romantic. If you still have access to good tomatoes, make Na'ama's fattoush. It's not the fattoush I ate in Jerusalem, but I think that's the point. Make the kubbeh hamousta, which still is my favorite food in Jerusalem (especially if you eat it at Morduch). And then, if you want to be totally and completely wowed, suspend judgement and make this: pan-fried snapper with spicy harissa and rose.

I'm not a huge fan of rose water. I usually find the flavor too strong and perfume-y. But for some reason, this recipe spoke to me. The fish and the spicy harissa lasso the rose water into subtle submission. It lends scent and sophistication to the dish without overpowering it. The result is a line-up of firm fillets, crowned with vivid red sauce that's as spicy as you want it to be, but also sweet from currants and soft onions. And that rose water - I was as surprised as you probably are. D, too. This isn't the kind of recipe I'd put into the regular rotation, but I'm officially looking for an occasion to make it again.

harissa snapper 2
harissa snapper 2

And krantz cakes. And Muttabaq. And burnt eggplant with garlic, lemon, and pomegranate seeds.

You know where to find me.

Snapper with Harissa and RoseAdapted fromJerusalem, by Yotam Ottolenghi and Sami Tamimi

The book calls for sea bass, but sustainable sea bass isn't available where we live, so I used snapper. Make things easy by asking your fishmonger to remove the pin bones and cut the fish into 1/4-pound fillets.

Ottolenghi calls for 1/2 cup of currants, but this makes the sauce a bit too sweet. I cut the amount to 1/4 cup and was happier. He also says the cilantro is optional; I disagree. It adds an important fresh note to the finished dish.

If you're feeling fancy, you can buy edible rose petals, which Ottolenghi and Tamimi use in the book and which look gorgeous. I was feeling practical and somewhat harried; I skipped them.

2 tablespoons harissa 1 teaspoon ground cumin Four 1/4-pound fillets of any firm, fleshy white fish, skinned and with pin bones removed All-purpose flour, for dusting 2 tablespoons olive oil 1 large onion, diced 6 tablespoons red wine vinegar 1 teaspoon cinnamon 1 cup water 1 1/2 tablespoons honey 1 tablespoon rose water 1/4 cup currants 2 tablespoons chopped cilantro 2 teaspoons edible rose petals (optional) salt and pepper

Prep the fish:: Mix 1 tablespoon of harissa, the cumin, and 1/2 teaspoon of salt together and rub all over the fish. Set aside.

Heat the olive oil in a wide frying pan (preferably nonstick or castiron) over medium heat. Dust fillets with flour and shake off excess. Gently lay fillets in the pan and fry for two minutes on each side. If you're concerned about overcrowding the pan, cook the fish in batches. Remove cooked fish to a plate, leaving the oil in the pan.

Make the sauce: Add the onions and cook for about 8 minutes, stirring periodically, until soft and golden but not browned. Add the remaining harissa, vinegar, cinnamon, 1/2 teaspoon salt, and several grinds of black pepper. Pour in the water, stir to combine, lower the heat, and cook for 10 minutes, until sauce has thickened considerably.

Add the currants, rose water, and honey. Simmer for a couple more minutes. Taste and adjust the seasoning as necessary, then return the fish back to the pan, spooning some of the sauce overtop. Leave the fish to heat up in the sauce for about three minutes, adding a tablespoon or two of water if the sauce is too thick. Remove from heat, sprinkle with cilantro, and serve immediately with plain rice or crusty bread.

In fish, main dishes
2 Comments
← Newer Posts Older Posts →

Subscribe by email:

  • books (1)
  • crisps and crumbles (1)
  • frozen (1)
  • toys (2)
  • gifts (3)
  • egg whites (5)
  • fried (5)
  • how to use--- (6)
  • drinks (10)
  • menus (11)
  • travel (11)
  • fish (12)
  • kosher for passover (14)
  • thanksgiving (14)
  • vegan (20)
  • snacks (21)
  • techniques (21)
  • soup (26)
  • bread (28)
  • pies and tarts (28)
  • cake (33)
  • events (34)
  • condiments (36)
  • various and sundry (39)
  • uncategorized (42)
  • cookies and bars (46)
  • weekday lunch (47)
  • appetizers (48)
  • salad (51)
  • gluten-free (56)
  • comfort food (61)
  • breakfast and brunch (77)
  • sides (81)
  • dessert (90)
  • main dishes (100)
  • healthy (139)
  • easy (155)
  • vegetarian (180)

| LATEST |

Featured
Blue Chair Fruit's Black Raspberry Jam
Thai Grapefruit Salad
Mango Sticky Rice
Winter 2016: Odds and Ends
Povitica: The Best Babka Ever
Persimmon Walnut Bread
Sprout Chaat Salad + New Site!
Maple Walnut Squares
How to Give Thanks
Croissants (really, I made croissants) + other croissant-ish things

| hEALTHY |

Featured
Sprout Chaat Salad + New Site!
Fennel frond pesto + what to do with those pesky stalks
Asparagus Toasts with Pistachios and Mint
Eggplant-Walnut Pâté + Passover Ideas
1-DSC_0861-600x401.jpg
Lentils and Rice with Tamarind Sauce and Dukkah
Big Kale Salad with Pomegranate and Feta
Punchy Crunchy Ginger Salad

| BreakfAST |

Featured
Povitica: The Best Babka Ever
Croissants (really, I made croissants) + other croissant-ish things
Mushroom and Kale Breakfast Strata
Barley Porridge with Orange and Black Sesame
Ramps 'n' Eggs Biscuit Sandwiches
Asparagus Toasts with Pistachios and Mint
Apple-Cheddar Scones with Sage
Menemen - Turkish Eggs with Tomatoes and Peppers
You must select a collection to display.

© 2016 Rivka Friedman. All Rights Reserved.