• Home
  • About
  • Recipe Index
  • Contact
Menu

Rivka Friedman

Street Address
City, State, Zip
Phone Number

Your Custom Text Here

Rivka Friedman

  • Home
  • About
  • Recipe Index
  • Contact

Mediterranean Lentil Salad

August 30, 2011 Rivka
mediterranean lentil salad

With the plentiful tomato salads and the peach cobblers of a good East Coast summer, lentils are often forgotten, relegated to the soups, stews, and curries of colder months. Such has been the case in our home. We've plowed through pint after pint of beautiful blackberries (making just a couple of these). We've eaten our weight in red, orange, yellow, even purple cherry tomatoes (and fried our fair share of green ones; if you're clicking over, check out those vintage NDP photos! My, how far we've come...). But the lentils, they linger in the pantry, waiting for the air to grow colder.

The lentils were hiding, for sure. But last week, I peered deep into my pantry, looking for items begging to be used - the neglected cans or bags of whatever legume I felt inspired to buy, however many months ago. Blame it on the new home purchase: I'm already twitching at the thought of migrating my whole kitchen worth of stuff, so the leaner, the better. Also: last week, I was reading about Slow Food USA's $5 Challenge, a call to food lovers to "take back the value meal" by gathering friends and family and eating a meal that costs $5 a head. Lentils give some of the best bang-for-buck of any food item out there. They're inexpensive, full of protein, and easy to make. Also, easy to make taste delicious.

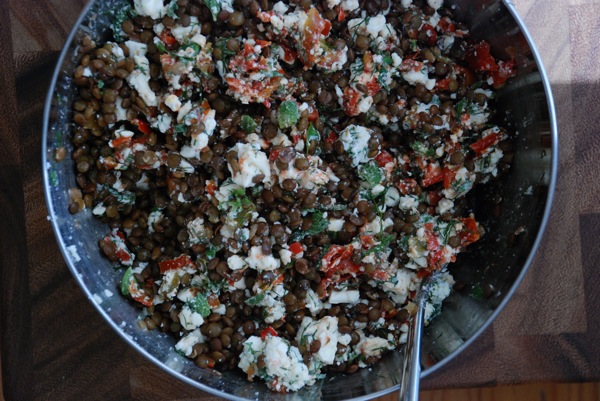
In the case of last week's one-pot wonder, lentils met up with roasted red peppers, tomatoes, parsley, plenty of feta cheese, and a zippy lemon vinaigrette. We ate it just that way for dinner on Monday, and it was great. When I packed it for lunch later in the week, I decided I wanted it to have a kick, so I added a couple tablespoons of homemade sriracha to the mix. (That's right: I finally made my own sriracha! Folks, the stuff is amazing. I'm planning meals around it. If you're at all interested in making some for yourself, I'll post my own experience soon, but the original recipe can be found here.) I liked the salad even better with the spicy sriracha mixed in. Feel free to skip it, if you prefer.

DSC_0519
DSC_0519

The best part of this dish is that it stays good for upto a week in the fridge. Make a big bowl of it in advance; a squeeze of lemon before serving makes the dish taste as good as new. I've never been so glad to pull lentils out of hibernation.

Mediterranean Lentil Salad makes 8 portions

I had a jar of oven-roasted tomatoes that I'd made earlier in the summer, so that's what I used here. If you don't have any, raw cherry tomatoes will work great. I also roasted my own peppers for this recipe, the process for which is quite simple: char over a gas stove or under the broiler until skins have blistered all over, then transfer to a large bowl, cover with plastic wrap, and let steam for 10 minutes. Remove, peel skins, and peppers are ready to use. With all that said, jarred roasted peppers are absolutely fine in this recipe. You can find them at most supermarkets.

2 cups Puy (black) lentils - you want lentils that will keep their shape when cooked 1/2 cup oven-roasted cherry tomatoes or 2/3 cup halved raw cherry tomatoes 2 roasted bell peppers, chopped 1 cup crumbled feta cheese 1/2 cup chopped parsley 1/4 cup chopped dill Juice and zest of 1 lemon 2-3 tablespoons olive oil, to taste freshly ground black pepper to taste

Bring a large pot of salted water to a boil. Add lentils, and cook, covered, for about 20 minutes, or until cooked all the way through (test a few for doneness). Strain, rinse with cold water in the strainer to cool the lentils, and transfer them to a large bowl.

Add remaining ingredients to lentils. Toss to distribute. Let sit for 10 minutes to marry the flavors, then serve immediately or refrigerate and serve later. Lentils will keep about 1 week. If serving after a few days, revive with an extra squeeze of lemon and grate of the pepper mill.

In sides, vegetarian, easy
7 Comments

Green Beans with Pesto Vinaigrette

August 23, 2011 Rivka
Green Beans with Pesto Vinaigrette

The humble green bean doesn't get enough love, I've decided. We're all so focused on bursting tomatoes and perfect peaches, sweet sweet corn and favas that take five times as long to peel as to eat (and are still totally worth it) and we totally ignore green beans. Unlike peaches, they don't get super juicy. Unlike tomatoes, they don't look any prettier at the farmers' market than they do at Safeway. And I don't know about you, but I'm so used to seeing grocery-store green beans all year round that somehow, the site of them at the market doesn't trigger that must-have-now feeling that, say, perfect baby okras inspire. (Incidentally, I got those okras. Thrice. I started this thread on Foodpickle, the only place on the web where you can ask a question and get a bunch of really smart answers, really quickly. Then I went and made this recipe. And this one. I also floured and fried a handful as an appetizer one evening. And then, with my last batch, I tried to follow my colleague's instructions for Bindi Masala but, let's face it, ended up with some strange not-quite-Indian okra curry. Still pretty good. I love okra.)

Back to the green beans, which may not have had me up at 8am as I do for tomatoes -- freaked out they'll disappear before I get some -- but did spark my attention enough that last week, I bagged a couple pounds from one of the farmers at the Dupont market. I wasn't quite sure how I'd use them, but I can tell you this: once those beans were tucked under my arm, I had no trouble at all getting excited brainstorming ways to use them.

And that's how we wound up here, with these beans. This is a simple preparation for a beautiful and underrated summer vegetable, one that'll perk up humble-looking beans and brighten any summer meal. Among the upsides of this dish: it's great served cold; it's very, very simple to make; and you can make the components a few days in advance, then combine and serve when you and your people are hungry. It's a good situation.

Most important of all, we're elevating the lowly green bean to its rightful place, situated among the finest vegetables summer has to offer.

Green Beans with Pesto Vinaigrette

1.5 lbs. green beans, ends trimmed, rinsed 1/4 cup pesto (homemade is always best, but store-bought is totally fine) juice and zest of 1 lemon 3 Tablespoons good olive oil salt and pepper to taste

Prepare the Green Beans: Fill a large pot with water and bring to a boil over high heat. Fill a large bowl with ice cubes, then with water. Set aside.

Blanch the green beans in 2 batches for about 2 minutes per batch, until beans are bright, vivid green. Use tongs to transfer beans from boiling water directly to ice bath. When beans are cooked and fully chilled, transfer from ice bath to a large bowl.

Prepare the Vinaigrette: Combine pesto and lemon juice in a medium bowl and whisk until combined. Drizzle olive oil in a slow stream, whisking constantly, until combined. Taste, and add salt and pepper as necessary.

Finish the Dish: Toss beans with pesto vinaigrette. Serve chilled, or set it out on the counter and let it come to room temperature.

In gluten-free, sides, vegetarian
3 Comments

Mushroom Turnovers

July 25, 2011 Rivka
DSC_0014-1
DSC_0014-1

Most of you regulars probably know that in the summer months, D and I operate under a cold-oven policy. Our apartment, see, it loves the heat. It clings to every last morsel of July humidity like there's some shortage (which, having spent the past week in town clinging to my vent, I can say with certainty there is not). Living in this hot, sticky mess, I'm so tired I can barely cook. We've been eating lots of salads these past few weeks, and in our near future, there's no shortage of those, either.

DSC_0013-1
DSC_0013-1

On the rare occasions that I do turn on the oven (for, say, this peach blackberry wonder), I try to maximize its utility. That's what had me making these mushroom turnovers a couple weeks back. The oven was already on, so I figured I should get as much stuff inside as I possibly could. The beauty of these triangles is that you can cook the whole batch at once, freeze them, and then pop a couple into a container any which day and call 'em lunch.

I've been making spanikopita for years, both with puff pastry and with phyllo dough, and apple turnovers are a beloved winter brunch staple. But mushroom turnovers are the newest addition to my turnover repertoire. They're easy, delicious, and appropriate for all seasons. Also, they're pretty easy to make.

DSC_0017-1
DSC_0017-1

I modeled the recipe on my stuffed mushrooms, which are inspired by the delicious stuffed mushrooms my mom makes. They're purist's mushrooms, made using the chopped up fungi, cheese, and little else. For my turnovers, I sauteed chopped mushrooms with shallots and garlic till soft and flavorful, deglazed with white wine, and cooked the whole mixture until the liquid had evaporated. Into each turnover goes a scoop of the mushrooms and a sprinkle of cheese. That's it.

If you don't make these until fall, I won't judge. It's pretty darn hot. But if you're already making that cherry pie, why toss a batch of these into the oven at the same time? That way, you can be as lazy as the heat requires for the rest of the week, and still not go hungry. A good deal, if you ask me.

Mushroom Turnovers makes 12 turnovers

1 package (24 sheets) phyllo dough (most boxes contain two packages) 3 tablespoons olive oil 6 tablespoons butter, divided 4 small to medium shallots, diced 4 garlic cloves, peeled and minced 2 lbs. mushrooms, wiped clean, trimmed and diced (including stems) salt and pepper 1/2 cup white wine 1/2 cup grated parmesan or pecorino romano cheese

Leave phyllo dough out on the counter, still wrapped, for at least 1 hour to thaw.

Meanwhile, add olive oil and 3 tablespoons butter to a large saute pan set over medium heat. When butter has melted, add shallots, garlic, and a pinch of salt. Sweat for two minutes. Add chopped mushrooms, another pinch of salt, and several gratings of pepper. Cook mushrooms, stirring every so often, until soft, fragrant, and slightly shriveled, about 15 minutes. Add white wine to the pan, and use a wooden spoon to scrape up all the caramelized bits of mushroom and shallot from the bottom of the pan. Cook about 5 minutes more, until wine has totally evaporated and mixture no longer looks moist. Remove from heat and allow to cool at least 10 minutes.

Melt remaining 3 tablespoons butter in a small bowl.

Preheat the oven to 350. Unwrap phyllo dough so that the stack of sheets lies completely flat. Cover with a kitchen towel, and keep phyllo covered with towel while making the turnovers. Line a large baking sheet with parchment paper or silpat, and take a second baking sheet to use as your workspace.

Now you have your workstation - phyllo on one side, mushroom mixture and butter next to you, lined baking sheet right nearby. Take one sheet of phyllo dough and gently place it onto the unlined baking sheet (your workspace). Brush lightly with melted butter - a 3 strokes per sheet, maximum. Place another sheet of phyllo over the first, and brush butter again. Repeat two more times, for a total of four phyllo sheets stacked one on the next. Then use a paring knife to slice this stack in two lengthwise, so you have two long strips (as in the first picture). Put 1 1/2 tablespoons of the mushroom mixture at one edge of each strip, and sprinkle about 1/2 tablespoon cheese (more, if desired) over the mushroom mixture. Then fold as you would a paper football (again, see top picture) until the mixture is completely wrapped in phyllo. Place onto lined baking sheet so the end of each strip of dough is tucked under the turnover. Repeat with remaining sheets of phyllo, until you've done these steps 6 times and made a total of 12 turnovers. Place turnovers on lined baking sheet with a bit of space between each.

Bake turnovers for 30 minutes, until golden brown. Serve immediately, or cool completely on a rack, then transfer to the freezer. Turnovers will keep frozen for several months.

In main dishes, vegetarian, weekday lunch
7 Comments

Zucchini and Snap Peas with Sesame Oil

June 29, 2011 Rivka
DSC_0001-1
DSC_0001-1

In some sense, it's hard to come up with anything insightful to say about a dish containing four ingredients, one of which is salt and the other three of which are in this post's title. On the other hand, one taste had me going on and on about how simple, how delicious, it all was. It's a dish of contradictions: complex flavor from very few ingredients, a celebration of the bounty of summer with none of the fuss involved in, say, sour cherry pie.

We're talking about zucchini and snap peas, two of summer's greatest-hit vegetables. If you've seen those very small zucchini at the market and wondered what to do with them, this is the perfect recipe for showing off their shape. (If you can't find baby zucchini, regular zucchini sliced into thick coins will work just fine.) I've spent many summers sauteing zucchini coins in butter; never once did I consider ditching the butter in favor of water. (Ditching butter? Would I ever? No.) But this is an exception: when you're dealing with summer's freshest vegetables, at the peak of the season, a little salted water is all you need.

DSC_0009-1
DSC_0009-1

I first had simple blanched baby zucchini at Blue Hill at Stone Barns. Theirs were blanched very briefly, kept still somewhat crunchy, then coated in sesame seeds and served just so, as a first course. Zucchini and sesame are a great match, and I echoed that pair here, but using sesame oil instead of the seeds. The blanched vegetables need little else: just some flaky salt to make the flavors really pop.

It's important to really drain the blanched vegetables well. By the time you're dressing them, you really want them completely dry, or else the oil will mix with the water and make a very diluted dressing at the bottom of the bowl. Usually I love that sort of delicious runoff, but here it's not welcome. You're looking for bone-dry vegetables, lightly coated in sesame oil and speckled with good, flaky salt. That is all. You will eat these on the porch, on a long summer evening. Or in the hot kitchen, off the platter, with your fingers. And then (I hope!) you will thank me.

Zucchini and Snap Peas with Sesame Oil

As I said in the post, you really want the vegetables to be completely dry before you dress them. Let them strain well for several minutes, and you'll be all set.

Also, two different ways to serve this dish. The first is to drizzle the sesame oil and sprinkle the salt over the vegetables. The second is to serve the vegetables unadorned on a platter, and give each of your guests a small bowl with a tablespoon or so of sesame oil and a sprinkling of salt. That way, they can grab a warm zucchini, dip it in the salted oil, and eat with their fingers. I think I actually prefer the second method, but both are great.

Serves 4 as a side dish

1 pound zucchini (if using baby zucchini, leave whole; if using large zucchini, slice into 1/2-inch coins) 1 pound snap peas 3-4 T sesame oil flaky salt

Put a pot of salted water over high heat and bring to a boil. Add zucchini to the pot and cook 1 minute. Add snap peas, cook 1 minute more, and drain. You're serving these vegetables warm, so no need to use an ice bath; instead, you just slightly undercook them, and they cook the rest of the way while cooling.

If using coins of large zucchini instead of whole baby zucchini, add them at the same time as the snowpeas, and cook just about 1 minute, maybe 10 seconds more.

Drain vegetables well, wiping with a towel if necessary. Transfer to a serving platter. Drizzle with sesame oil, enough so that when you give the platter a few shakes, all the vegetables look thinly coated. Then sprinkle some flaky salt over the whole dish. Taste one. Does it need more oil? More salt? Adjust seasoning accordingly. Serve now, or later. They're great at room temperature, too.

As I mentioned above, if you'd prefer, you can serve the vegetables plain on a platter, and put out the salted sesame oil in a bowl for dipping. I think I prefer the dish this way, but both work just great.

In sides, vegetarian, easy, healthy
4 Comments
← Newer Posts Older Posts →

Subscribe by email:

  • books (1)
  • crisps and crumbles (1)
  • frozen (1)
  • toys (2)
  • gifts (3)
  • egg whites (5)
  • fried (5)
  • how to use--- (6)
  • drinks (10)
  • menus (11)
  • travel (11)
  • fish (12)
  • kosher for passover (14)
  • thanksgiving (14)
  • vegan (20)
  • snacks (21)
  • techniques (21)
  • soup (26)
  • bread (28)
  • pies and tarts (28)
  • cake (33)
  • events (34)
  • condiments (36)
  • various and sundry (39)
  • uncategorized (42)
  • cookies and bars (46)
  • weekday lunch (47)
  • appetizers (48)
  • salad (51)
  • gluten-free (56)
  • comfort food (61)
  • breakfast and brunch (77)
  • sides (81)
  • dessert (90)
  • main dishes (100)
  • healthy (139)
  • easy (155)
  • vegetarian (180)

| LATEST |

Featured
Blue Chair Fruit's Black Raspberry Jam
Thai Grapefruit Salad
Mango Sticky Rice
Winter 2016: Odds and Ends
Povitica: The Best Babka Ever
Persimmon Walnut Bread
Sprout Chaat Salad + New Site!
Maple Walnut Squares
How to Give Thanks
Croissants (really, I made croissants) + other croissant-ish things

| hEALTHY |

Featured
Sprout Chaat Salad + New Site!
Fennel frond pesto + what to do with those pesky stalks
Asparagus Toasts with Pistachios and Mint
Eggplant-Walnut Pâté + Passover Ideas
1-DSC_0861-600x401.jpg
Lentils and Rice with Tamarind Sauce and Dukkah
Big Kale Salad with Pomegranate and Feta
Punchy Crunchy Ginger Salad

| BreakfAST |

Featured
Povitica: The Best Babka Ever
Croissants (really, I made croissants) + other croissant-ish things
Mushroom and Kale Breakfast Strata
Barley Porridge with Orange and Black Sesame
Ramps 'n' Eggs Biscuit Sandwiches
Asparagus Toasts with Pistachios and Mint
Apple-Cheddar Scones with Sage
Menemen - Turkish Eggs with Tomatoes and Peppers
You must select a collection to display.

© 2016 Rivka Friedman. All Rights Reserved.