Moroccan Couscous

I'll admit that I'm not such a couscous fan. When I was 15, my summer camp took us on a five-day hiking trip through the Berkshire mountains. We carried everything with us on our backs: water, tents and poles, food for five days, clothing, etc. Breakfast was PB&J or granola bars, since they were light; dinner, five days in a row, was couscous; and lunch every day was ... you guessed it: leftover couscous. I guess 10 nearly-consecutive meals of just couscous did the trick. These days, I tend to stick with rice.

Sometimes, though, I make tagine. Tagine is a moroccan stew in which, traditionally, the meat and/or vegetables are slow-cooked in a large shallow clay bowl with a tall conical top. Tagine is traditionally served atop couscous, so in a pinch, I do have a go-to couscous recipe, which I'll share here.

Couscous is very simple to make: if you buy one of those Near East boxes, it's as simple as bring the requisite amount of water to a boil, adding the couscous, covering the pot, turning off the heat, and fluffling it with a fork five minutes later. I change things around, since the last thing I want is some boring couscous for dinner. Try this with a tagine recipe, or even as an accompaniment to tonight's veggies.

Moroccan Couscous (corrections appended)

serves 6-8.

1 box couscous
1 cup dried apricots, chopped
1 cup dried raisins
1/2 cup orange juice, substituted for 1/2 cup of the water called for in the recipe.
1 tsp. salt
1 tsp. cinnamon
1/2 tsp. nutmeg
1/2 tsp. cloves
1/8 tsp. star anise (optional)
1/4 tsp. powdered ginger (optional)
1/2 tsp. turmeric
a dash of olive oil

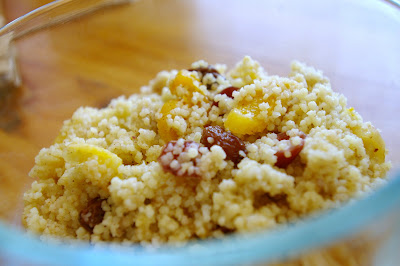
(If you don't have any of these ingredients, it's fine to go without. For example, the batch pictured above was made without anise, turmeric or cloves.)

For the fruit:

Bring 1/2 cup water to a boil. When it reaches a boil, pour it over the dried apricots and raisins in a small bowl. Allow this to sit for at least 15 minutes; this will reconstitute your fruit, making them plump and juicy. When 15 minutes have passed, do not spill out the water! Use it as part of the cooking liquid for the couscous.

For the couscous:

Bring two cups of liquid to a boil. I usually use 1/2 cup orange juice, and occasionally 1/2 cup white wine, and the rest either water or broth. Add all the other spices and ingredients to the pot as the liquid heats. When the liquid is boiling, add 2 cups of couscous. stir quickly, cover the pot, and turn off the heat. Let the couscous steam for 5 minutes, then uncover and fluff with a fork.

Add the dried apricots and raisins, and toss. Serve with almost anything.

When time is of the essence


Take this.
In ten minutes flat, you can have these cookies made. Including prep time.
Why?
Because they're from the box.
I might love to bake, but I sure as hell can't make cookies with cute pumpkins in the middle like this. Leave that to Nestle.
I don't need to point out that they're perfect for halloween...just go buy these guys. People will think you're really talented, and best of all, the cookies actually taste great.
In your grocer's freezer section!

Lemon curd raspberry tartlets

It is super-duper chilly this morning and fall is finally setting in. Crisp air in my face and the crunch of leaves beneath my feet give me a serious hankering for some pumpkin soup!

But this post is about tartlets.

Everyone makes muffins; nobody makes tartlets. Yes, they're not as quick and easy to make as muffins are, but they're so much cuter and (IMHO) more delicious. Can't compare muffins and tartlets? Yes, yes I can. I just did! Tartlets > Muffins. Make some tartlets!

Here's the good thing about the tartlets I make: they're delicious. Ok, just kidding -- they're also not as time-consuming because the steps overlap with each other, as follows:

make the dough (about 5 minutes in a food processor)
make the filling while you refrigerate the dough
make and bake the tartlet crusts while you refrigerate the filling
let the tartlet crusts cool while you get the filling ready to pipe
fill tartlets and serve

See? Not so bad.

And the lemon curd filling is really not too hard to make. It does involve some pot-watching and some vigorous whisking, but it's worth the effort; whatever extra filling you have after finishing the tartlets is wonderful eaten out of the bowl, just so.

Today's post is about the lemon tartlet in the background of the picture above; the tartlet in the front of the picture is a posting for another day.

Lemon Curd-raspberry tartlets
makes about 25 tartlets.

Tart Crust: taken from Tartelette
1 1/2 cups flour
1/2 cup powdered sugar
1 stick plus 1 Tbsp unsalted butter, chilled and cut into small pieces
1 egg yolk

Blend dry ingredients with a hand or stand mixer. Add butter and blend until mixture resembles coarse meal. Add egg yolk; blend until dough comes together. Wrap in plastic, and refrigerate while preparing ingredients for the tart.

While the dough refrigerates, prepare the curd:

zest of 2 lemons
1/2 cup lemon juice
1/2 cup sugar
2 eggs

1. Bring the zest, lemon juice and sugar to a simmer in a small saucepan.
2. Meanwhile, beat the 2 eggs until light.
3. When all the sugar has dissolved, add some of the hot lemon juice mixture to the eggs by the spoonful while beating the eggs, to temper them (in order to ensure that they don’t get scrambled.)
4. After you’ve added about 10-15 spoonfuls of the hot liquid and successfully incorporated it, pour the egg mixture into the saucepan with the rest of the lemon juice mixture, and bring to a simmer (not a boil) over medium heat until it thickens, about 5 minutes.
5. Transfer to a bowl and refrigerate until cooled completely, at least 1 – 1.5 hrs.

Back to the tarts…

After about half and hour, the tart dough should be just chilled enough that it can be worked with, but will not disintigrate. Take a walnut-sized piece of the dough in your hand, roll it gently into a ball, and, using your thumb, press it into a tartlet mold (in my case, I have a tartlet pan wth 24 molds). Try to ensure that the dough is spread evenly throughout the mold. This will make for even baking.
“Dock” the dough by spearing each tartlet a couple times with a fork – this ensures that they’ll keep their shape as they cook. Bake the empty tarts in a 350 degree oven for 10-15 minutes, until golden.

Assembly:

Scoop cooled lemon curd into a plastic bag, and cut off the very tip of the bag. Hold the bag just above the inside center of a tartlet, and squeeze, raising the bag as the tartlet fills. Repeat for each tartlet.

Top with either fresh raspberries or (as I did) frozen raspberries that I cooked down with a bit of sugar.

Enjoy!

Yellow Squash with basil and pine nuts


On last week's episode of The Splendid Table podcast, actor and writer Michael Tucker spoke of his experience living as an American in Italy. Aside from the obvious challenges adapting to a foreign language and culture, he has learned an entirely different way of cooking since moving to the small town of Umbria. Something he said about cooking really struck me: he said that his cooking trajectory has been much like a bell curve. As he learned more about food and cooking and discovered his love for all things culinary, he acquainted himself with new, often obscure ingredients. He bought many a kitchen gadget. Basically, his cooking became more and more complicated. But being in Italy changed that. In Italy, Tucker and his wife eat mostly at home and in family-owned restaurants, where food is composed entirely of local, fresh ingredients, preparations are dead simple, and nothing is more delicious. He's learned to focus less on how many ingredients go into a dish or how labor intensive the process is, and focus instead on using few but quality ingredients and precise but simple methods. The locals of Umbria, he says, consider these "rules" of good cooking nothing less than homage to long-time traditions.

I'm trying to go with the simple theme these days. It may not be evident from some of the recipes I've posted lately, which I admit are often more intricate and work-intensive than I intend. But I do usually find that simple is best; it allows me to have maximum control over what I put into my food and what it looks like when I serve it.

This was one of the dishes we served on Sunday. As I was rummaging through my vegetable drawer to make Ina Garten's vegetable torte, I saw four cute baby yellow squash from last week's CSA that I'd totally forgotten about. Never sure about how much food it takes to feed an army of guests, I figured I might as well use what I had. This squash antipasto is super quick to throw together, and as you can see, it looks really pretty.

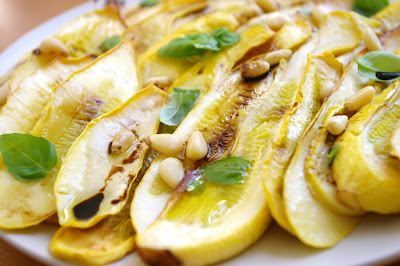
Yellow Squash with Basil and Pine Nuts

four small yellow squash
good olive oil
good balsamic vinegar*
sea salt and freshly ground pepper
a handful of pine nuts
a few sprigs of fresh basil

1. Preheat oven to 350 degrees.
2. Slice squash lengthwise into 1/4-inch slices.
3. Spread squash in a single layer on a non-stick or sprayed baking sheet. Drizzle with olive oil, and sprinkle salt and pepper overtop.
4. Roast squash for about 20 minutes, until soft and golden but not burnt.
5. Fan out squash decoratively on a small plate. Top with pine nuts and basil, another drizzle of olive oil, and several spoonfuls or balsamic vinegar.

Serve warm or at room temperature.

*a note about balsamic vinegar: I don't have the real stuff, which can cost 50 bucks for a teeny little bottle. Instead, I buy good regular balsamic from the grocery store, several bottles at a time, and then reduce it to about a third of its original volume. Real balsamic has a syrupy texture that's much less liquidy than what's sold here in grocery stores, and a balsamic reduction like the one described here mimics that thickness well. Danielle from Habeas Brulee will be the first to warn you, though -- when you do this, it makes your whole house smoky and vinegar-smelling, so do it when you're home alone!