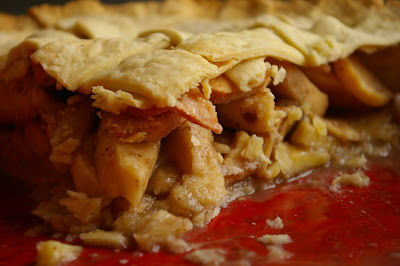
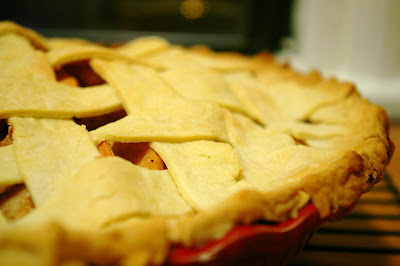
Apple Pie has been done, done, and done again. If you skim anyone's list of cookbooks or blogs, you'll find infinite declarations of how to make apple pie. Some claim to have the definitive recipe. Since I have never (to the best of my memory) actually made an apple pie, start to finish, from scratch, I'm certainly not going to promise that the results of this first attempt are worth repeating. However, I can say that I learned a great deal, and I'm positive that this post will impart at least one valuable apple-pie baking recipe (which so many others have discovered before I did): apple pies are best with regular top crusts. The lattice doesn't trap enough of the steam inside, and the apples either don't cook through, or don't get coated with that lovely apple pie sludge. Next time, I'll forgo the beautiful lattice and stick to the easier top crust. Save your lattices for berry pies and other juicy things.
 That said, the sludge that this pie produced (in my humble opinion) perfectly balanced sweet and tart. The apples were soft but still toothsome, and the syrup that oozed from each slice was delightful. By the time the pie was actually gone, the dish needed very little scrubbing, as I'd been sneaking fingerfuls of the goo all along.
Here's the info about my pie, element by element:
 The Crust
It's fashionable to avoid transfats these days. They're pretty darn bad for you, and you're definitely better off with butter. Plus, never growing up with much margarine or shortening in the house, they freak me out a bit, and I tend to associate them with spam and other such delicacies. However, Friday night dinner was meat, so I couldn't use butter in the crust, and frankly, oil is simply an unacceptable substitute in proper pie dough, so I caved and used margarine. I now understand why people use it, scary as it may be: it produces a perfectly flaky dough that's neither tough or overly dense. I'd say I'd do it again, but I won't. Hey, it was good while it lasted.
 As for the lattice top, it's really not as complicated to make as it looks. An instructional video can be found here. Basically, the methodology is as follows: cut 16 1/2-inch strips from your second disk of rolled-out dough. Lay eight of them across the pie in one direction, equidistant from each other. Now, fold every other strip back over itself almost all the way, and lay down your first crossing strip. Unfold the folded strips over, and fold the other strips over themselves (that is, every other strip, but the ones that run under the first cross strip). Now, lay the next strip down. Unfold the folded strips, fold the unfolded strips, and lay down the next cross strip. Keep alternating this way until all strips are laid, and you'll find a perfect lattice crust.
The apples
People are so particular about which apples to use in a pie. These taste better, these hold their shape better, those are just horrible in pies, etc. I say, there's no such thing as an apple that's horrible in pies. They're all pretty darn good. So I picked up the "seconds" at the farmers market: with a couple of bruises here and there, seconds run about 89 cents a pound -- not bad for farm-fresh apples. It turns out that I used a mix of braeburn, honeycrisp, jonathan, and jonagold, and I was very pleased. The verdict? Use whatever's in the fridge. Just stay away from red delicious which taste less-than-wonderful and macintosh, which get kinda mushy.

The add-ins
I'm a big fan of quinces. The little suckers will give you quite a run for your money if you dare try to peel or (gasp!) slice them up, but once chopped, sugared, and cooked, quinces elevate any old apple pie and impart an unparalleled complexity of flavor. Quinces should be sauteed before added to pie, as they take longer to cook than apples (and are quite unpleasant if undercooked). I like to boil them in a very diluted simple syrup with a bit of vanilla and cinnamon.
Basic Flaky Pie Crust
adapted from The Pie and Pastry Bible (© 1998 Cordon Rose, Inc.) by Rose Levy Beranbaum
(Pastry for a 9-inch lattice pie, a 9-inch deep-dish pie, a 10-inch pie shell, or a 12- to 14-inch free-form tart
- 9 tablespoons unsalted butter or margarine, cold
- 1 1/2 cups (dip and sweep method) bleached all-purpose flour
- 1/4 teaspoon salt
- 3 1/2 to 4 1/2 tablespoons ice water
- 1 1/2 teaspoons cider vinegar
- 1/8 teaspoon baking powder (optional, and I didn't use it; if not using, double the salt)
- Divide the butter into two parts, about two thirds to one third: 6 tablespoons and 3 tablespoons.
- Cut the butter into 3/4-inch cubes. Wrap each portion of butter with plastic wrap, refrigerate the larger amount and freeze the smaller for at least 30 minutes. Place the flour, salt, and (optional) baking powder in a reclosable gallon-size freezer bag and freeze for at least 30 minutes.
- Place the flour mixture in a food processor with the metal blade and process for a few seconds to combine. Set the bag aside.
- Add the larger amount of butter cubes to the flour and process for about 20 seconds or until the mixture resembles coarse meal. Add the remaining frozen butter cubes and pulse until all of the frozen butter is the size of peas. (Toss with a fork to see it better.)
- Add the lowest amount of the ice water and the vinegar and pulse 6 times. Pinch a small amount of the mixture together between your fingers. If it does not hold together, add half the remaining water and pulse 3 times. Try pinching the mixture again. If necessary, add the remaining water, pulsing 3 times to incorporate it. The mixture will be in particles and will not hold together without being pinched.
- Spoon the mixture into the plastic bag. (For a double-crust pie, it is easiest to divide the mixture in half at this point.)
- Holding both ends of the bag opening with you fingers, knead the mixture by alternately pressing it, from the outside of the bag, with the knuckles and heels of your hands until the mixture holds together in one piece and feels slightly stretchy when pulled.
- Wrap the dough with plastic wrap, flatten it into a disc (or discs) and refrigerate for at least 45 minutes, preferably overnight. (For a pie shell and lattice, divide it in a ratio of two thirds:one third — use about 9.5 ounces for the shell and the rest for the lattice, flattening the smaller part into a rectangle.)
- Store, refrigerated, up to 2 days; frozen, up to 3 months.
- The Pastry Bible's explanation of what's goin' on:
Pastry flour offers the most tenderness while maintaining flakiness, but it is the addition of vinegar that relaxes the dough without losing flakiness, making it easier to roll, shrink less, and be even more tender. The baking powder lifts and aerates the dough slightly without weakening it, but it makes it seem more tender.
Thes secret to success is finely incorporating about two thirds of the butter into the flour, which keeps the flour from absorbing too much water and forming gluten, which would make the crust tough. The remaining one third of the butter is incorporated in larger pieces, which serve to seperate the layers, resulting in the desired flakiness. This pie crust does not shrink or distort as much as the standard all-butter crust because there is less gluten development.
If when adding the water, you find you need more than indicated in the recipe, chances are you haven't moisture-proofed the flour adequately (you haven't used the correct amount of butter or processed it fine enough), leaving the flour free to absorb more liquid. The resulting crust will be flakier but less tender.
If you find you need less water than specified in the recipe, chances are you divided the butter incorrectly and used too much of it to moisture-proof the flour, preventing it from absorbing an adequate amount of water. The resulting crust will be more tender but not very flaky.
Flattening the newly formed dough into a disc or discs before refrigerating makes it easier to roll without cracking. The dough is refrigerated to relax the gluten, making it less elastic and easier to roll. Chilling also firms the butter, preventing sticking and the need for extra flour when rolling, which would toughen it. Dough that has rested overnight before baking shrinks less.

Apple Pie adapted from Deb at Smitten Kitchen
- 3 1/2 lbs apples (about 8)
- 1 quince
- 1 vanilla bean, split lengthwise, or one dash vanilla
- 2 cups water and 1/4 cup sugar
- 2 tablespoons juice and 1 teaspoon zest from 1 lemon
- 3/4 cups sugar
- 2 tablespoons all-purpose flour
- 1/4 teaspoon salt
- 2 teaspoons cinnamon
- 1/2 teaspoon ground nutmeg
- 1/2 teaspoon ground allspice
- Over medium heat, combine 2 cups water, 1/4 cup sugar, and vanilla. Stir until sugar dissolves. Peel and chop quince, removing the core. Add sliced quince to simple syrup and cook over medium for about 20 minutes, until quince pieces are soft-ish.
- Adjust oven rack to lowest position and heat rimmed baking sheet and oven to 500 degrees. Remove one piece of dough from refrigerator (if refrigerated longer than 1 hour, let stand at room temperature until malleable).
- Roll dough on lightly floured work surface or between two large sheets of wax paper, to about 1/2-inch thick. Fold dough in half, then over itself again into quarters, and transfer dough to pie plate, placing dough point in center of pie plate and unfolding. Working around circumference of pie plate, ease dough into pan corners by gently lifting dough edges with one hand while pressing around pan bottom with other hand. Leave dough that overhangs lip of plate in place; refrigerate dough-lined pie plate.
- Peel, core, and slice apples into about 8 slices each. Toss with lemon juice and zest. In a medium bowl, mix ¾ cup sugar, flour, salt and spices. Toss dry ingredients with apples. Add cooked quinces and toss. Turn fruit mixture, including juices, into chilled pie shell and pile heavily in center.
- Preheat oven to 425 degrees.
- Roll out second piece of dough to 1/2-inch thick disk. Slice into 16 strips, and follow the instructions above for a lattice top. Alternatively, simply lay the second disk atop the apples in the same manner as you lined the pie plate with the first disk. Trim top and bottom edges to ½-inch beyond pan lip. Tuck this rim of dough underneath itself so that folded edge is flush with pan lip. Flute edging or press with fork tines to seal. For a non-lattice top crust, cut three slits on dough top. If pie dough is very soft, place in freezer for 10 minutes.
- Place pie on baking sheet and bake until top crust is golden, about 25 minutes. Rotate pie and reduce oven temperature to 375 degrees; continue baking until juices bubble and crust is deep golden brown, 30-35 minutes longer.
- Transfer pie to wire rack; cool to room temperature, at least 4 hours.


