Cherry Almond Tea Cakes

deathmuffins3.jpg 
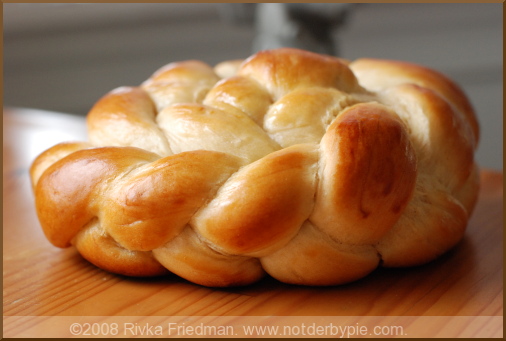
Just peek out the window and you'll know it's officially fall. The sky in Washington is a crisp blue today, and the air is breezy and cool. Knowing DC as well as I do, I was sure that the cool front would pass quickly, making way for just a little more of that lovely summer humidity that you can slice through with a knife. Classic DC to dangle fall in front of us before heading squarely toward summer weather. But so far, I'm proving wrong: it's been a week since the air changed. Summer may truly be over.

tomatosauce2.jpg

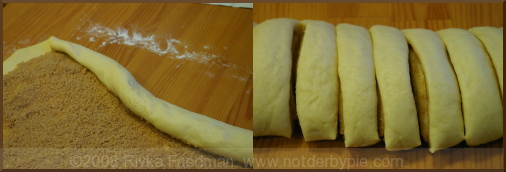
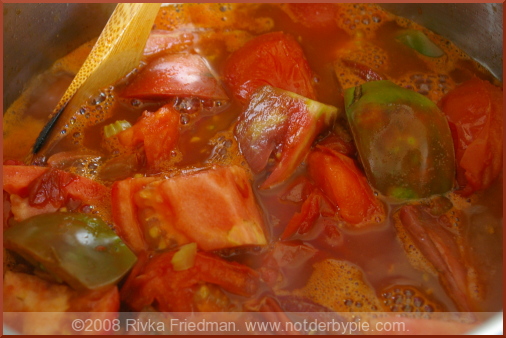
Summer produce is also starting to disappear. A couple weeks ago, I scored a fabulous box of "second" tomatoes -- about 8 pounds for a mere 2 bucks! With some olive oil, onions, garlic,salt, pepper, and a splash of wine, I transformed them into easy tomato sauce and jarred the sauce for winter.

tomatosauce3.jpg

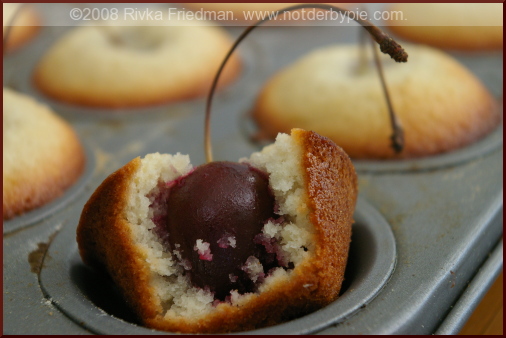
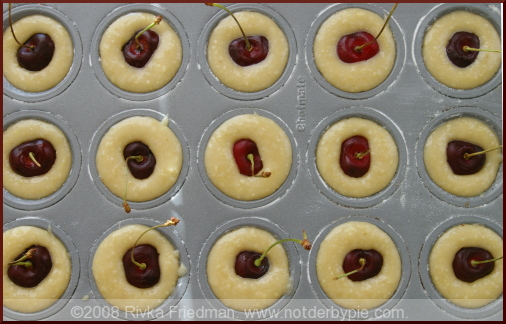
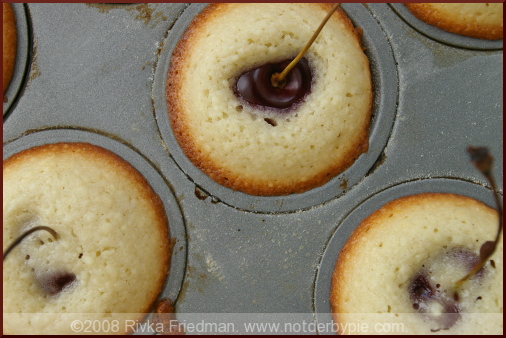
Before memories of summer fruit have completely faded, I want to share one last recipe. It's another Martha recipe -- thanks, Jana -- and it's super easy and tasty. The recipe is for tea cakes, rich and nutty from almond flour, zingy from kirsch, with a whole cherry -- pit, stem, and all -- in the center. I brought them to a poolside picnic hosted by Rebecca, Robbie and Sarina earlier this summer. I took off the foil and set them out, and Robbie looked at them suspiciously and asked what they were. When I told him, he said, "What if you accidentally swallow the pit and choke? Basically, they're like death muffins." I really wanted to title this post "death muffins" but visions of spam comments from morticians and funeral homes scared me off. deathmuffins1.jpg

Tasty as they are, these tea cakes win brownie points for presentation. They take so little effort and look absolutely adorable. I'm not recommending you make them now, since cherries are out of season and probably won't taste so hot, but stick it in the mental rolodex. When the weather gets warm again, these should definitely be high on your to-do list.

deathmuffins2.jpg

Cherry Almond Tea Cakes

* 1 1/4 sticks (10 tablespoons) unsalted butter, plus more for muffin tin * 1 cup all-purpose flour, plus more for tin * 1 1/4 cups finely ground unblanched almonds * 1 cup sugar * 1 teaspoon coarse salt * 5 large egg whites * 4 teaspoons kirsch (cherry brandy) * 30 sweet (Bing) cherries

Directions

1. Preheat oven to 400 degrees. Brush 30 cups of 2 mini-muffin tins with butter, and dust lightly with flour. 2. Melt butter in a medium skillet over medium-high heat. When it begins to sputter, reduce heat to medium. Cook, swirling skillet occasionally, until butter has lightly browned. Skim foam from top, and remove skillet from heat. 3. Whisk together flour, ground almonds, sugar, and salt in a bowl. Add egg whites, and whisk until smooth. Stir in kirsch. Pour in butter, leaving any dark-brown sediment in skillet, and whisk to combine. Let stand for 20 minutes. 4. Ladle 1 tablespoon batter into each buttered muffin cup, filling about halfway. Push a cherry into each, keeping stem end up. With a small spoon, smooth batter over cherries to cover. Bake until a toothpick comes out clean and cakes are golden brown, 12 to 15 minutes. Let cool 10 minutes. Run a knife around edges to loosen, and unmold. Cakes can be stored in airtight containers at room temperature overnight.

Shana Tova!

roundchallah1.jpg To all those celebrating the Jewish New Year (and to all of you, regardless of whether or not this happens to be the start of a New Year for you)...

May this be a year of happiness,

a year in which we take time out to enjoy the small pleasures,

a year in which we do not hesitate to try many new things,

a year in which we find new ways to love our families, friends, and significant others,

a year in which we use our strength to help those more in need than we,

and of course, a year in which we eat wonderful, wonderful food.

Shana Tova, Bria, U'Metuka: a happy, healthy, and sweet new year!

(Also, between my recent foot surgery and the upcoming holidays, I actually missed the first anniversary of NDP!! I can promise a celebratory post after all these holidays pass and my foot heals...but for now, happy blogiversary to NDP!)

roundchallah2.jpg

Ima's Challah link to recipe On Rosh Hashana, the Jewish New Year, we have a custom of making the challot round, to symbolize the cycle of the year that renews on this day. Braid each loaf extra long, then, starting at one end, wrap the braid around itself, lifting the braid slightly on top of itself as you go. Tuck the end under, brush with eggwash, and bake as normal.

roundchallah3.jpg

Cordon Rose Banana Cake

bananacake1.jpg When I was a kid, my dad ate bananas a lot. He bought them when they were green, ate them when they were yellow and even when they had lots of brown spots, and when the rest of us finally managed to convince him that the last of the bunch was really way to overripe to eat, he'd freeze it until he had enough to make banana bread. My mom, clearly the more sane parent in this respect, ate bananas only when they were green. Yes, that's right -- totally and completely underripe. Once they were yellow, they were banana bread to her.

If I remember correctly, my brother ate bananas when they were yellow, and if pushed, he'd begrudgingly eat one with a couple spots, but he drew the line way before my dad did. And I? No, I don't eat bananas. Never liked'em. Just not really my thing. No surprise, then, that I've never really associated bananas with elegance or delicacy. Before this weekend, I'd have been hard pressed to believe that a couple bananas could produce not only your usual dense and very banana-y banana bread, but a moist and rich, yet light and delicate, cake as well. bananacake2.jpg

I owe Mandy for this discovery. When D and I went over to the Masseys for dinner a few weeks ago, Mandy served a banana cake for dessert. The kids raved about the cake all evening -- "ohhh my gosh, it's just soooo good, you'll lovvvve it!" Ever the skeptic, I nodded, smiled, and said, "D, you must be so excited -- banana cake" while planning to politely request just a sliver for myself.

But you know me too well! I never pass up dessert. Not even banana-flavored dessert. And in this case, my bigger-than-stomach eyes served my mouth oh, so well. Tasting much more mildly of banana and wonderfully tart from sour cream and lemon zest, the Cordon Rose Banana Cake couldn't be further from run-of-the-mill banana bread. It's seriously delicate -- confusingly delicate, considering its main ingredient -- and very fragrant, from both the zest and a healthy dose of vanilla.

bananacake3.jpg

But that's not the end. In a stroke of genius, Mandy iced the cake with a quick caramel frosting. The frosting has lots of confectioners' sugar in it, so it's poured over the cake while still warm. As it solidifies, it develops a nice thin crust. The caramel is truly a perfect topping to this cake -- especially lovely if you use half salted butter in it. However, for all you purists out there, here's something I thought I'd never say: Cordon Rose Banana Cake is fantastic, absolutely fantastic, all by itself.

Cordon Rose Banana Cake From Rose Levy Beranbaum’s The Cake Bible

For the cake: 2 cups sifted cake flour ¾ cup plus 2 Tbs sugar (I used fine-grained unrefined cane sugar, which worked fine) 1 tsp baking soda ¾ tsp baking powder ½ tsp salt 2 large ripe bananas (about 225 grams, peeled) ½ cup sour cream (not low- or non-fat) 2 large eggs 1 ½ tsp pure vanilla extract 10 Tbs unsalted butter, at room temperature 2 tsp grated lemon zest (orange zest will also work)

For the frosting: 1 stick salted butter (if using unsalted, add 1/2 tsp of salt) 1/2 cup packed light brown sugar 1/2 cup packed dark brown sugar 1/4 cup whole milk 2 cups confectioners sugar, must be sifted! 1 tsp. vanilla

Preheat the oven to 350 degrees Fahrenheit. Spray a 9-inch round springform pan with cooking spray, line the base with a round of parchment paper, and spray the parchment paper.

In a large bowl, whisk together the flour, sugar, baking soda, baking powder, and salt. Set aside.

In a food processor, purée the banana and sour cream until completely smooth. Add the eggs and vanilla, and process briefly to combine. The puréed mixture will be light yellow and quite loose.

Add the softened butter and about ½ of the puréed mixture to the dry ingredients in the bowl. Beat to combine on low speed; then increase the speed and beat for about 90 seconds to aerate the cake structure. Scrape down the sides of the bowl with a rubber spatula, and add the rest of the purée, beating to combine well. The batter will be light tan in color and should be smooth and creamy.

Pour and scrape the batter into the prepared pan. Bake for 35-45 minutes, until the cake is golden and a toothpick inserted in the center comes out clean and dry. Remove the cake from the oven, let cool for 10 minutes while you make the frosting (below), and then remove the rim of the pan. Invert the cake onto a wire rack, and carefully remove the base of the pan and the parchment paper. Turn onto a cake platter.

For the frosting: Heat butter and brown sugars over medium until the mixture comes to a boil about 2 minutes. Add the milk, stir, and bring the mixture back to a boil, then remove the pan from the heat. Add the confectioners' sugar and vanilla. Beat with a wooden spoon or whisk until smooth. Use immediately, while it and cake are still warm, and spread quickly before cool.

Allow the cake to sit at room temperature for at least a half hour before serving.

Sticky, Gooey Cinnamon Buns

cinnabuns3.jpg If you've gone this long without making cinnamon buns (which, shockingly, I have), it's likely not because you're skeptical that they'll be worth it. What other foods smell ridiculously appetizing, even when what you smell is usually a corporate chain version loaded with high fructose corn syrup and other delicacies? No doubt they taste fantastic and are worth the effort, so that's not the cause of hesitation. More likely, you're just a bit daunted by the task. To me, cinnamon buns have always sounded like a very work-intensive, time-intensive project, possible only for those with half a day to devote to the task. I just figured that with a project as seemingly complex as cinnamon buns, I should hold off until I had an occasion to do them. Perhaps you did, too.

Such an occasion arrived last Sunday, when a bunch of us threw a bridal shower for our friend D, who's getting married in November. D's not so into the gush-gush-rip-the-wrapping-paper-ohh-ahh stuff, so when B suggested a book shower, D readily agreed. It's really right up her alley. We pitched the shower as a chance to get D a book that belongs on every shelf, a book you especially love, or a book that you thought D would love -- and, considering we got lots of oohs and ahhs and no doubles, I think it was a success! cinnabuns1.jpg

Anyway, B suggested that we make cinnamon buns for the shower (yes, she's full of good ideas, that B!) and I'd been meaning to make them for a while, so I jumped at the chance. We both just assumed they'd take a while, so I started them early at my house, the plan being that I'd bring the risen dough over to her place and we'd fill, roll, and bake them together.

Well, I started a little earlier than planned, and before I knew it, it was time to roll out the buns but it wasn't time to go over to B's. Sorry, B -- I owe you cinnamon-bun-round-two! Needless to say, I managed on my own. In fact, I more than managed -- I practically cranked out the buns with little to no effort, and they looked totally gorgeous, if I dare say so myself. Let my experience demystify this ostensibly massive undertaking. It's no biggie, small beans, piece-a-cake. Get my drift? Time does most of the work -- all you really need is enough patience to not jump out of your chair before they're ready.

cinnabuns2.jpg

B made the cream cheese glaze. Her report: so easy, and it took only 2 minutes. What are you waiting for?? And in case it's not screamingly obvious: the cream cheese glaze is the best part. By far. If you're like me, always worried that you won't get enough of the goo on your cinnamon bun, don't fret: this recipe made enough for me to really slather it on and still have some left over to lick. mmmm.

cinnabun4.jpg

Cinnamon Rolls with Cream Cheese Glaze from Bon Appetit

Dough: 1 cup whole milk 3 tablespoons unsalted butter 3 1/2 cups (or more) unbleached all purpose flour, divided 1/2 cup sugar 1 large egg 2 1/4 teaspoons rapid-rise yeast (from 2 envelopes yeast) 1 teaspoon salt Nonstick vegetable oil spray

Filling: 3/4 cup (packed) golden brown sugar 2 tablespoons ground cinnamon 1/4 cup (1/2 stick) unsalted butter, room temperature Glaze: 4 ounces cream cheese, room temperature 1 cup powdered sugar 1/4 cup (1/2 stick) unsalted butter, room temperature 1/2 teaspoon vanilla extract

For dough: Combine milk and butter in glass measuring cup. Microwave on high until butter melts and mixture is just warmed to 120°F to 130°F, 30 to 45 seconds. Pour into bowl of stand mixer fitted with paddle attachment. Add 1 cup flour, sugar, egg, yeast, and salt. Beat on low speed 3 minutes, stopping occasionally to scrape down sides of bowl. Add 21/2 cups flour. Beat on low until flour is absorbed and dough is sticky, scraping down sides of bowl. If dough is very sticky, add more flour by tablespoonfuls until dough begins to form ball and pulls away from sides of bowl. Turn dough out onto lightly floured work surface. Knead until smooth and elastic, adding more flour if sticky, about 8 minutes. Form into ball.

Lightly oil large bowl with nonstick spray. Transfer dough to bowl, turning to coat. Cover bowl with plastic wrap, then kitchen towel. Let dough rise in warm draft-free area until doubled in volume, about 2 hours.

For filling: Mix brown sugar and cinnamon in medium bowl.

Punch down dough. Transfer to floured work surface. Roll out to 15x11-inch rectangle. Spread butter over dough, leaving 1/2-inch border. Sprinkle cinnamon sugar evenly over butter. Starting at 1 long side, roll dough into log, pinching gently to keep it rolled up. With seam side down, cut dough crosswise with thin sharp knife into 18 equal slices (each about 1/2 to 3/4 inch wide).

Spray two 9-inch square glass baking dishes with nonstick spray. Divide rolls between baking dishes, arranging cut side up (there will be almost no space between rolls). Cover baking dishes with plastic wrap, then kitchen towel. Let dough rise in warm draft-free area until almost doubled in volume, 40 to 45 minutes.

Position rack in center of oven and preheat to 375°F. Bake rolls until tops are golden, about 20 minutes. Remove from oven and invert immediately onto rack. Cool 10 minutes. Turn rolls right side up.

For glaze: Combine cream cheese, powdered sugar, butter, and vanilla in medium bowl. Using electric mixer, beat until smooth. Spread glaze on rolls. Serve warm or at room temperature.