• Home
  • About
  • Recipe Index
  • Contact
Menu

Rivka Friedman

Street Address
City, State, Zip
Phone Number

Your Custom Text Here

Rivka Friedman

  • Home
  • About
  • Recipe Index
  • Contact

Summer Squash Quesadillas

June 6, 2012 Rivka
squash quesadillas4
squash quesadillas4

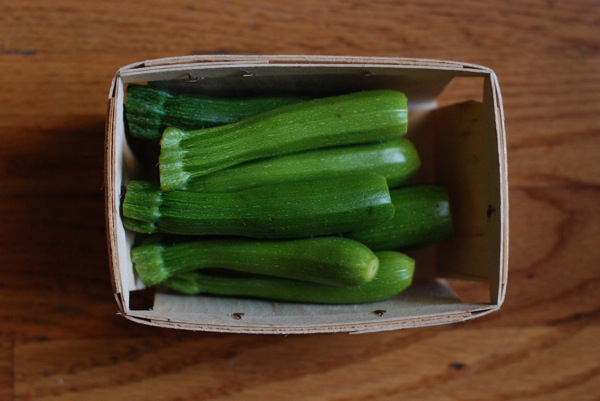
Summer squash season is in full swing. As anyone with enough sunlight to grow the stuff will tell you, it grows like a weed. One plant is more than enough to feed two people for the whole summer. Folks with more zucs than they can eat often tell these not-quite-sad stories about struggling to use up their summer squash quickly enough. It's hard to feel bad for them when one little basket of zucchini costs $4 at the market, but I count my blessings - among them, a beautiful herb garden that's got enough chives for omelets all summer long, and three different kinds of mint, all growing at record pace.

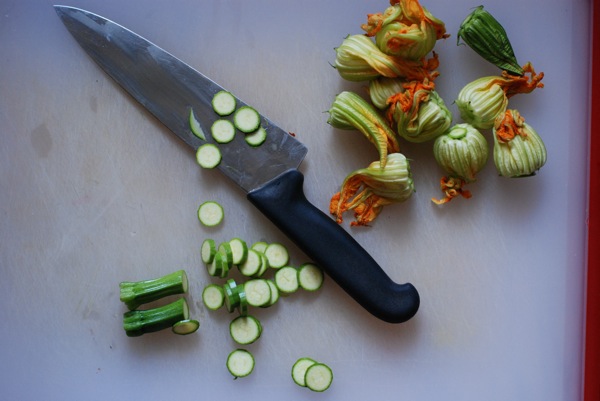
Last week at the market, I bought a basket of baby summer squash with the blossoms still attached. Generally, I'd snip off the blossoms, coat them in batter, and fry'em up, but I'd gone to boot camp - people, this boot camp is serious - and I was feeling virtuous. So instead, I chopped them, tossed them with some mexican cheese and slices of the zucchini, and stuffed them into quesadillas.

squash quesadillas9
squash quesadillas9

The recipe is simple, and open to endless riffs and interpretations. We're talking two flour tortillas, whatever fillings you want, and heat. That's it. I've added mushrooms, fresh corn, roasted poblano peppers, cherry tomatoes, you name it.

squash quesadillas5
squash quesadillas5

As I write this, I'm in Austin for work. I'm quite sure the city famous for its migas would frown upon my very yuppified version of a quesadilla, but if I'm going to eat what essentially amounts to two pieces of bread and a bunch of cheese for dinner, I'd like to supplement it with some green. So there you have it.

squash quesadillas1
squash quesadillas1

I was serious about the countless riffs. I've eliminated the mexican cheese entirely, in favor of fresh chevre. It's a totally different thing, but good in its own right. Another option - especially if you're eating this for breakfast, which I would heartily encourage - is to fry an egg into your quesadilla. Here's how it works: scramble an egg. when the pan is hot, pour the egg in, let it spread, and promptly place a flour tortilla over the egg, covering its surface entirely. Pile your toppings onto the tortilla, and depending on how hungry you are, either leave it open-face or put another tortilla overtop. Eggy deliciousness. Or, if you want the eggs inside the quesadilla, scramble them separately and pile them on before adding the second tortilla.

I told you, lots of riffs. I'll stop now - but you shouldn't. These are meant to be a vehicle for whatever is in your fridge. Go crazy.

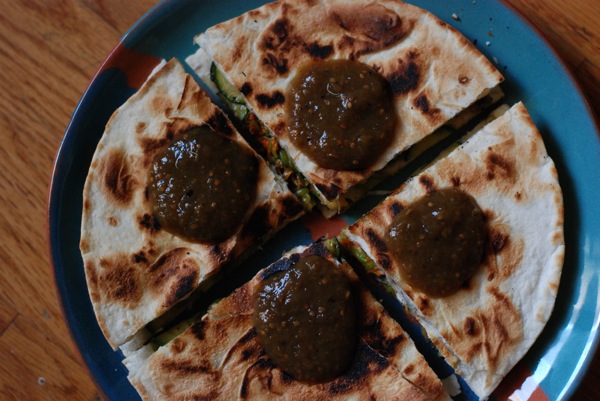
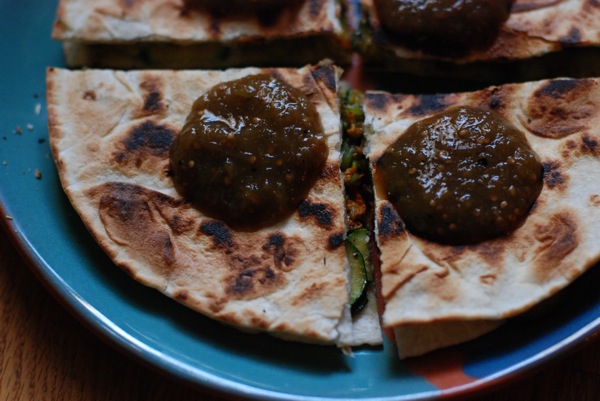
Summer Squash Quesadillasserves 2, easily doubled

4 flour tortillas 2 small or 1 large summer squash, sliced into coins 1 tablespoon butter or oil a handful of squash blossoms, roughly chopped (if you don't have these, simply add some extra squash) 2 scallions, sliced 1/2 teaspoon smoked paprika 1/2 cup shredded Mexican or pepperjack cheese (or substitute fresh chevre)

salsa or salsa verde, for serving

Set an 8-inch pan over medium heat and add butter or oil. When butter has melted or oil starts to shimmer, add summer squash in a single layer. Add smoked paprika and cook squash coins until lightly browned on one side. Flip or turn coins, add scallions, and cook about 2 more minutes, until the other side is brown. Transfer squash to a plate and set aside.

Put one tortilla down in the pan (no need to add more fat - they shouldn't stick). Add your toppings - first the cheese, then the still-warm squash - and top with a second tortilla. Cook about 3 minutes, until the bottom tortillas is well-browned. Press down on the top tortilla to make sure everything is sticking together, then flip the whole thing so the top tortilla is now on the bottom. Cook 3 more minutes, then transfer to a plate, cut into quarters, and repeat to make the second quesadilla.

Serve with salsa or salsa verde.

In appetizers, main dishes, vegetarian, easy
Comment

A Pair of Gorgeous Yogurt Soups

May 26, 2012 Rivka
cold yogurt soups4
cold yogurt soups4

A couple weekends ago, the near-constant downpour we've had in DC subsided.  The break was only temporary, but as the proud owner of a new herb garden, I'm telling myself it's good for the plants. With things breezy and clear for a couple days in a row, we decided to have some of our most favorite people over for Saturday lunch on the deck. I'd planned a low-maintenance menu of dishes I could prep in advance, then pull together relatively quickly when we got home from synagogue on Saturday. Macaroni salad with ramp pesto and pre-blanched asparagus. Chilled baked salmon (which I'll be telling you about soon, because it was delicious). And, of course, cold soup.

I'm quite fond of cold soup as a concept. You make it, pour it into a jar, and then you wait. Wait until you need a weekday lunch; wait till friends come over and you want to serve them a little something; wait until, I dunno, you're hungry. You pretty much can't go wrong with a cup of cold, smooth soup on a warm day.

If we're talking about soups with dairy in them, and if we're being particular, I prefer yogurt- and buttermilk-based soups to those finished with cream. I love how sweet pea soup become tangy and bright when you blend in some yogurt just before serving. And I love the bewitching flavor of this white gazpacho, which gets its tang from buttermilk. That weekend, I put yogurt to work in a serious way, whipping up two cold soups to serve at lunch. One was a pureed beet-yogurt soup, with dill, mint, and a pinch of cumin. The other was a curried yellow squash soup, also blended smooth.

cold yogurt soups6
cold yogurt soups6
cold yogurt soups5
cold yogurt soups5

I'd planned to give folks a choice of either soup, but when I set them next to each other on the counter, the color contrast was so striking that I decided to serve them side by side in the same bowl. As you can see, the gemlike fuchsia  beet looked just gorgeous next to the bright mustardy yellow squash soup. Conveniently, their flavors also complement each other. The beet soup is a bit sweet and very herbal, while the squash soup is deeper and slightly saltier. They're a perfect pair.

cold yogurt soups2
cold yogurt soups2

Make one, make both. Store them in jars in the fridge until hunger strikes. I've found that they keep at least a week with no problem, maybe more. If you're feeling fancy, top the bowls with a cut of fresh chives or even a dollop of - yep - yogurt.

cold yogurt soups1
cold yogurt soups1

Hope everyone has a wonderful long weekend. I'll see you back here next week.

Cold Herbed Beet-Yogurt SoupAdapted from Saveur Serves 2-4

1 lb. beets 1 1/4 cup plain yogurt 2 tablespoons fresh dill 2 tablespoons fresh mint 1 teaspoon ground cumin (freshly ground is best) 1/4 cup. lemon juice 1/2 tsp. salt, more to taste

Cook beets unpeeled, wrapped in foil, for 50-75 minutes in a 350-degree oven until a knife pierces easily through the flesh. Cool completely, then remove their skins. I find it's easiest to do this either under running water or - more environmentally friendly - submerged in a large bowl of cold water. A bit of rubbing, and their skins should slip off. Some may take more elbow grease than others; if the skin really insists on staying put, you can always use a peeler.

Cut beets into chunks, and transfer to a blender. Add remaining ingredients, and puree until completely smooth. Transfer to a jar and refrigerate until ready to serve.

Cold Curried Summer Squash SoupAdapted from Saveur Serves 2-4

2 tablespoons unsalted butter 1 white onion, diced 1 teaspoon curry powder 1 teaspoon ground cumin (fresh is best) 1/2 teaspoon salt 1/2 teaspoon turmeric 1/4 teaspoon cayenne 2 medium yellow summer squash, cut into 1-inch cubes (no need to peel them) 1/2 cup plain yogurt (either Greek or regular) 2 tablespoons Thai basil leaves

Put the butter in a large pot and set over medium heat. When butter has melted, add onion, curry, cumin, salt, tumeric, and cayenne, and cook until onions have just begun to soften and spices are fragrant, about 5 minutes. Stir in squash and cook an additional 5 minutes, until squash has softened. Add 1 cup water, reduce heat to medium-low, cover, and let simmer until squash is fully soft, about 10 minutes. Let cool completely.

Add squash mixture, yogurt, and basil leaves to a blender and puree until completely smooth. Transfer to a jar and refrigerate until ready to serve.

If planning to serve both soups together, simply hold 1 jar in each hand, and pour into the bowl simultaneously. The soups should fill the bowl at the same time, forming neat semicircles in the bowl with a clean equator. If not, no stress. You might even take a knife and make circular motions in the bowl to give the soups a spiraled, swirled effect.

In appetizers, soup
4 Comments

Pulled Jerk Chicken Sandwiches

May 22, 2012 Rivka
jerk chicken 1
jerk chicken 1

D will tell you - if somewhat tiredly - that I am loath to make the same dish twice. Maintaining this site means constantly searching for new recipes to tell you about, and returning to an old favorite means passing up the opportunity for a new dish, which, if we love it, means a new post. Aside from re-testing recipes I'm planning to blog, I've settled into a somewhat maddening pattern of behavior: I make a recipe, love it, rave about it, promise to add it into the rotation, and then blithely move on to something unfamiliar, leaving the old-new favorite on the (overloaded) back burner for eternity. If I could break that habit just once, it'd be for these jerk chicken sandwiches.

It started the way no other jerk chicken story has ever started: with rolls. Before jetting out of the house on Friday morning, I glanced in the fridge and probably uttered an expletive as I realized I'd forgotten that I'd put up pizza dough the previous day, hoping to make pizza when I got home from work. I didn't get home till 9, and neither did D, making pizza night unrealistic. But the dough had fully risen in the fridge, and I'd have hated to waste it. So I threw caution to the wind, punched it down, and formed it into rolls. Rolls that turned out seriously, honestly, delicious. They were so good, I made a second batch.

The good thing about serving rolls for dinner is that you don't need to make challah. Sometimes, there just isn't enough time for that. Having crossed that off my list, I started brainstorming what our guests might like to eat on/in their rolls. That's when I remembered this jerk chicken recipe I've wanted to make for ages. Sure enough, you could make it in the crock pot - easy! - and you were meant to eat it atop crusty French rolls, which by some miracle I now had.

Done.

Friday was so busy and involved so much running around that I actually showered twice. To say I threw this dinner together somewhat haphazardly would be an understatement. I tossed some asparagus and cauliflower under the broiler as the rolls baked, and made one dressing to use on both. I made the easiest cake ever. And I made this jerk chicken, which - if you use boneless chicken thighs - involves little more than browning chicken, mixing together a bunch of things you probably already have, and then letting them get to know each other for a few hours in the crock pot. In a pinch, you can even skip the browning.

jerk chicken 2
jerk chicken 2

I told you I made my own rolls, and I've included the (very easy) recipe for those below. But you can definitely buy the rolls instead. That'd bring this dinner within reach for a weeknight. And since I don't think our work lives will be getting less busy anytime soon, I just might put some jerk chicken in the crock pot tomorrow night. If I were in town for Memorial Day weekend, I'd definitely do it again then. I told you, it's a recipe you'll want to make again and again.

jerk chicken 3
jerk chicken 3

Pulled Jerk Chicken Sandwichesadapted from Chow.com

As I said above, this recipe does have two steps - browning the chicken and braising it in the marinade - but the browning can be skipped in a pinch. If you do skip the browning, simply add the rub ingredients to the crock pot along with the rest of the marinade ingredients.

Another note about cooking this recipe: it can be made either in a crockpot or in a dutch oven. If making in a crockpot, turn the crockpot onto warm before starting on the chicken, so that it'll be hot by the time the chicken is browned. In that case, you can use whatever pan you'd like to brown the chicken: stainless steel and cast iron both work.

If making the chicken in a dutch oven, you can do both the browning and braising in that same pot.

For the chicken: 1 tablespoon ground cinnamon 2 teaspoons ground allspice 2 teaspoons kosher salt 1 1/2 teaspoons ground nutmeg 4 pounds dark-meat chicken (I liked a mix of drumsticks and boneless thighs) 2 tablespoons vegetable oil

For the marinade: 1/2 cup freshly squeezed lemon juice 1/2 cup molasses 1/3 cup distilled white vinegar 1/3 cup freshly squeezed orange juice 1/3 cup soy sauce 10 peppercorns 5 garlic cloves, smashed 3 scallions, trimmed and thinly sliced 1 1/2 cups cilantro (about 1 bunch), coarsely chopped 1 tablespoon finely chopped fresh thyme leaves 1 (3-inch) piece fresh ginger, sliced into 1/4-inch coins 1 Scotch bonnet or habanero pepper, sliced into rounds

Brown the chicken: Combine spices in a small bowl. Sprinkle over chicken and rub in to coat all over. Set aside. If using a slow cooker, turn on "warm" setting.

Pour 2 tablespoons vegetable oil in either a heavy-bottomed metal pan or a dutch oven (see headnote) and turn heat to medium-high. When pan is hot, place chicken in pan in a single layer - you'll likely do this in batches - and cook until underside is golden brown. Flip and repeat with the other side. When both sides have browned, remove chicken to a plate (if doing the braising in that dutch oven) or to your slow cooker. Chicken will still be raw inside. Repeat with remaining pieces of chicken.

Combine marinade ingredients in dutch oven or slow cooker, and stir chicken and marinade together. Set dutch oven over lowest heat and cover, or cover slow cooker (set to "warm"), and cook chicken until falling off the bone or shredding when prodded with a fork, 5-8 hours. (Drumsticks are especially forgiving on cooking time, which is why I like them, but thighs - even boneless thighs - will do just fine.)

When the chicken is ready, remove bones and shred meat into small strips. Return shredded chicken to pot or slow cooker with sauce until ready to serve.

Serve on halved crusty rolls (recipe below) with plenty of napkins.

Crusty Rollsadapted from Jim Lahey

3 3/4 cups flour 2 1/2 teaspoons instant or other active dry yeast 3/4 teaspoon salt 3/4 teaspoon sugar 1 1/3 cup room-temperature water

In a medium bowl, stir together the flour, yeast, salt, and sugar. Add the water and use a large fork or your hand to mix until blended, at least 30 seconds. The dough will be stiff, not wet and sticky. Cover the bowl and let sit at room temperature until the dough has more than doubled in volume, about 2 hours. Divide the dough in half, and divide each half into 4. Shape each ball into a roll by gently tucking the edges under and into a point at the center of the roll on its bottom. (There are several videos online explaining how to shape dinner rolls, if you'd like more detailed instruction, but it isn't a particularly fussy process.) At this point, rolls can be placed into oiled plastic bags and frozen, or refrigerated the same way for upto 1 day.

When ready to bake the rolls, preheat oven to 450°.

Put balls on a lined baking sheet, leaving a good 2 inches of space on either side of each roll if you want them to come out round and with fully crisp crusts. (For rolls more square in shape and with crusts only on top, you can put them closer together on the baking sheet, and they'll bake up more like pull-apart rolls. Again, your choice.) While the oven preheats, proof the rolls for about 45 minutes. Then bake 40-45 minutes, until tops are golden brown and rolls sound hollow when tapped.

Let cool completely, then slice in half, top with chicken and a ladleful of sauce, and serve.

In main dishes, weekday lunch
3 Comments

Caramelized White Chocolate Rhubarb Bars

May 17, 2012 Rivka
caramelized white chocolate rhubarb bars04

DC may not have local lemons. It may not have a growing season nearly as long as its sub-Mason-Dixon-Line location would suggest. But it does have beautiful spring produce, and it's out in all its glory for one precious month. (Isn’t it ironic, then, that just last week I discovered a great new way to prepare beets, and can’t stop, despite this being the moment to obsess over asparagus? Sigh. Beet recipe to come.) In last week's three-market crawl, I saw beautiful asparagus, but also ramps and strawberries, and even some first-of-the-season tomatoes. And of course, I also saw plenty of beautiful, red rhubarb.

Suspend your disbelief that that the reddest rhubarb I found was $7/lb. That’s an obscene price. And no, I don’t think there’s anything wrong with being appalled at the price of farmers’ market produce; I’m not looking for $5 brisket, but just because it’s local and sustainable doesn’t mean I need to spend $20 to buy enough rhubarb for one pie. Off the soapbox: there are more reasonably priced stalks to be had. Last week I bought a big bunch from Dupont - I think from New Morning Farm – at roughly $4/lb, and earlier this week proceeded to make what is most certainly my new favorite way to use the stalks. I'm sure you're as surprised as I am that it involves like half a pound of butter. Sometimes, the world is cruel that way. A few extra laps at boot camp, and all that jazz. These bars are worth it.

Let’s put a finer point on this. It's probably not surprising that when you combine a buttery shortbread crust, shards of good white chocolate, rhubarb cooked with whiskey, (yes, whiskey)and crunchy crumb topping, you end up with something you'd happily scarf by the pound if it had any nutritional value probably be willing to make again.

caramelized white chocolate rhubarb bars06
caramelized white chocolate rhubarb bars05

But there is something surprising about these bars. It’s that white chocolate. See, it isn’t white. Not even close. More like deep camel-brown. That’s what happens when you stick it in the oven, stirring intermittently, for the better part of an hour. What was an innocent bar of sweet cocoa solids becomes creamy and smooth, deeply colored and textured, and nutty in fragrance and in taste – almost like really, really good almond butter. But way better. People, this stuff is liquid gold.

Ever since discovering the recipe for caramelized white chocolate via David Lebovitz, I’ve not stopped playing with the stuff. I’ve added it to cakes (as has he), spread it on toast, and eaten more than I care to admit straight out of the bowl. But this latest experiment really put it over the top. It’s a match made in heaven: the chocolate smoothes out rhubarb’s rough edges and deepens its flavor. It also conveniently insulates the shortbread crust from softening too much. The resulting recipe is something of a project, but worth the elbow grease and patience involved.

Speaking of elbow grease: When you first remove the chocolate from the oven, especially at the later stages, it will look a bit crusty. Please don't fret. Just start stirring it, slowly but surely, and it will evolve from crystallized and chunky to ever-so-smooth. Just look at the photos below.

caramelized white chocolate rhubarb bars11
caramelized white chocolate rhubarb bars10
caramelized white chocolate rhubarb bars09
caramelized white chocolate rhubarb bars07
caramelized white chocolate rhubarb bars08

If you’ve ever made and/or experimented with caramelized white chocolate, do share in the comments: what have you made? What’s been super delicious? What should I make next? I’ve got a little bowl of the stuff dangerously sitting around, and if I don’t act fast, well… you know what’ll happen.

caramelized white chocolate rhubarb bars02

Caramelized White Chocolate Rhubarb BarsDeveloped using adaptations of recipes by David Lebovitz, Martha Stewart, The Joy of Baking, and Bon Appetit

As I said, this recipe is a bit of a project, with so many different components. If you're not up for 4 different steps, feel free to skip caramelizing the white chocolate. One source of the idea to combine these flavors was a Bon Appetit recipe for a white chocolate rhubarb tart, and there, the white chocolate is just straight-up. I've no doubt the result will still be delicious.

For the Crust: 1 cup all-purpose flour 1/4 cup powdered sugar 1/4 teaspoon salt 8 tablespoons very cold unsalted butter, cut into small pieces

For the filling: 1/2 pound white chocolate

5 cups (about 1 1/2 pounds) 1-inch pieces rhubarb 1/3 cup plus 1 tablespoon sugar 2 tablespoons whiskey

For the crumb topping: 6 tablespoons unsalted butter, melted, plus room-temperature butter for pan 1 cup all-purpose flour, (spooned and leveled), plus more for pan 1/2 cup packed light-brown sugar 1/4 teaspoon salt

First, caramelize the white chocolate: I have found David Lebovitz's recipe to be pretty much fail-safe. He has you preheat the oven to 250°, put the chopped chocolate in a single layer on a baking sheet, and cook it for anywhere from 30-60 minutes, removing it at 10-minute intervals and stirring/spreading it around to redistribute the chocolate. Here's the link to the full recipe.

That said, the last couple of times, I've actually done this on the stove. It's quite a bit riskier, because the chocolate can burn easily if you look away for even a second. That said, it takes only about 15 minutes to achieve thoroughly-caramelized chocolate, and there's something adrenaline-pumping about steering clear of the scorch while caramelizing something as delicate as white chocolate.

If you want to try it, you'll need a heavy-bottomed metal pan, a fork, and a silicon spatula. Heat the stove to medium-low, and melt the chocolate. Now, begin stirring. Start with the spatula, but as the chocolate fully melts, then begins to caramelize, you'll need to switch to the fork. Stir regularly, scraping little bits from the side as you would if you were caramelizing sugar. You don't want any of the chocolate to touch the bottom of the pan for too long, or it'll scorch. I told you, it's risky. But fun!

When your chocolate gets really stiff and/or begins to seize, remove it from the heat and stir vigorously. It'll calm down, and eventually, it'll return to its melty, delicious self. Repeat this on-off cycle for about 15 minutes, and eventually, you'll be rewarded with dark, caramelized white chocolate. Or just do it the fail safe way in the oven. Up to you.

Caramelized white chocolate behaves like regular melted chocolate: it'll harden as it sits, but it can easily be reheated in a microwave or over low heat.

Next, make the shortbread: Preheat the oven to 350°. In the bowl of a food processor or a stand mixer, combine flour, sugar, and salt, and blitz a couple times to combine. Add butter, and mix or process until dough comes together. Turn dough onto a lightly floured work surface, and using a light hand, turn it a few times to incorporate any errant bits.

Line an 8x8 pan with parchment paper, and press the tart dough into the lined pan. Aim for a uniformly flat square; you don't want the dough to creep up the sides. Anchor the dough by poking it in several places with a fork, then bake it for about 20 minutes, until lightly golden. Remove from the oven and allow to cool.

While the crust bakes, make the rhubarb filling: Combine rhubarb, sugar, and whiskey in a shallow saucepan and heat over medium until it starts to hiss. Cover pan and cook 6-8 minutes, until rhubarb is fully softened. Remove lid, raise heat to medium-high, and cook an additional minute or so, until juices evaporate. Stir rhubarb to break apart the individual pieces. You want the fruit to look uniformly blended, though it'll still have bits and strands in it, so it won't look smooth like a puree.

Make the crumb topping: Combine all ingredients in a small bowl, and use your fingers to mix them together.

Assemble and bake the bars: Spread the white chocolate over the shortbread crust, reheating it if it has solidified. Spread the rhubarb mixture over the chocolate, and sprinkle the crumb topping overtop.

Bake for 50 minutes, until crumb topping is golden and rhubarb is sizzling underneath. Let cool at least 1 hour before slicing and serving.

In cookies and bars
5 Comments
← Newer Posts Older Posts →

Subscribe by email:

  • books (1)
  • crisps and crumbles (1)
  • frozen (1)
  • toys (2)
  • gifts (3)
  • egg whites (5)
  • fried (5)
  • how to use--- (6)
  • drinks (10)
  • menus (11)
  • travel (11)
  • fish (12)
  • kosher for passover (14)
  • thanksgiving (14)
  • vegan (20)
  • snacks (21)
  • techniques (21)
  • soup (26)
  • bread (28)
  • pies and tarts (28)
  • cake (33)
  • events (34)
  • condiments (36)
  • various and sundry (39)
  • uncategorized (42)
  • cookies and bars (46)
  • weekday lunch (47)
  • appetizers (48)
  • salad (51)
  • gluten-free (56)
  • comfort food (61)
  • breakfast and brunch (77)
  • sides (81)
  • dessert (90)
  • main dishes (100)
  • healthy (139)
  • easy (155)
  • vegetarian (180)

| LATEST |

Featured
Blue Chair Fruit's Black Raspberry Jam
Thai Grapefruit Salad
Mango Sticky Rice
Winter 2016: Odds and Ends
Povitica: The Best Babka Ever
Persimmon Walnut Bread
Sprout Chaat Salad + New Site!
Maple Walnut Squares
How to Give Thanks
Croissants (really, I made croissants) + other croissant-ish things

| hEALTHY |

Featured
Sprout Chaat Salad + New Site!
Fennel frond pesto + what to do with those pesky stalks
Asparagus Toasts with Pistachios and Mint
Eggplant-Walnut Pâté + Passover Ideas
1-DSC_0861-600x401.jpg
Lentils and Rice with Tamarind Sauce and Dukkah
Big Kale Salad with Pomegranate and Feta
Punchy Crunchy Ginger Salad

| BreakfAST |

Featured
Povitica: The Best Babka Ever
Croissants (really, I made croissants) + other croissant-ish things
Mushroom and Kale Breakfast Strata
Barley Porridge with Orange and Black Sesame
Ramps 'n' Eggs Biscuit Sandwiches
Asparagus Toasts with Pistachios and Mint
Apple-Cheddar Scones with Sage
Menemen - Turkish Eggs with Tomatoes and Peppers
You must select a collection to display.

© 2016 Rivka Friedman. All Rights Reserved.