• Home
  • About
  • Recipe Index
  • Contact
Menu

Rivka Friedman

Street Address
City, State, Zip
Phone Number

Your Custom Text Here

Rivka Friedman

  • Home
  • About
  • Recipe Index
  • Contact

Cinnamon Brown Sugar Pull-Apart Bread

September 3, 2013 Rivka
1-DSC_0742
1-DSC_0742

Ask my colleagues what I did this weekend, and they'll tell you what I told them: relax, relax, relax.

And truly, that's what I intended to do. It's been an intense month at work, and I've been looking forward to this labor-day-without-weddings weekend for a long time. I had my sites set on the couch, a couple of movies downloaded on my ipad, and a bag of fantastic coffee beans ready for some pour-over action.

Turns out, I'm not so good at relaxing in the traditional sense. Sitting on the couch too long makes me twitch. I start poking around at the tomatoes on the counter, seeing if any is particularly soft and needs cutting. The second peaches in the fridge call my name and I'm up, flipping through cookbooks for that brown-butter cobbler recipe I've been meaning to try. And I can't even blame it all on the last glorious produce of summer. Partly, I'm just a mad woman. At 8 am I'm reading The Kitchn on my ipad, and at 8:15 I'm in the kitchen, mixing up dough.

1-DSC_0641
1-DSC_0641
1-DSC_0666
1-DSC_0666
1-DSC_0665
1-DSC_0665

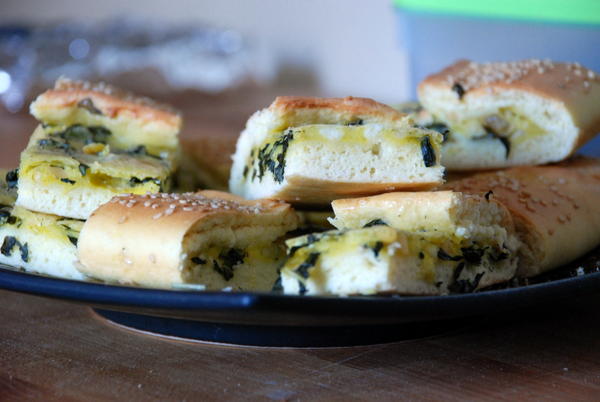
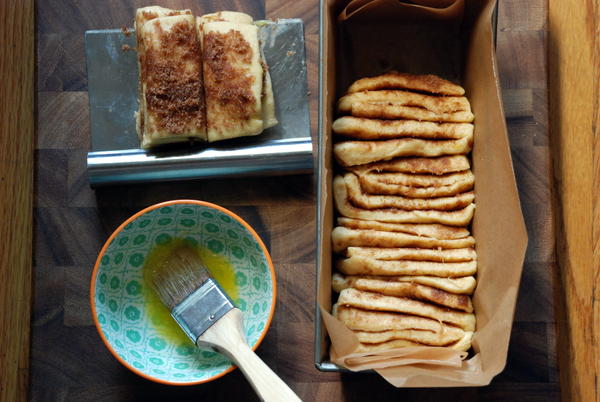
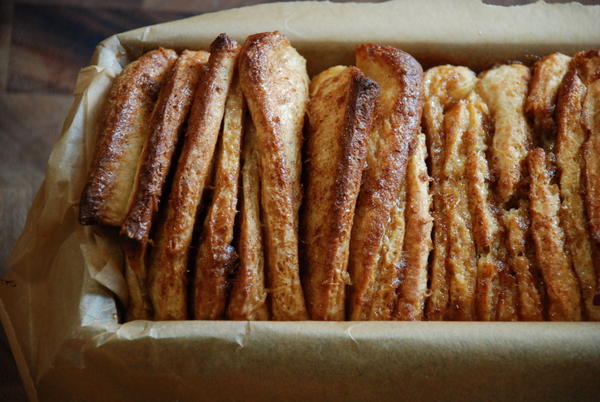
I've been eyeing a version of this loaf for over a year. Leite's Culinaria first posted a recipe for lemon pull-apart bread by Flo Braker, she of best tea cookies on the planet-fame. Those cookies are so good, I'll try pretty much any other recipe she writes. Lemon pull-apart loaf looked like cinnamon buns, minus the cinnamon, minus the bun, if you know what I mean. Doesn't that sound delicious and totally self-explanatory? Lemme try again: it's cinnamon bun dough, cut into squares, brushed with melted butter, sprinkled with lemon delicious stuff, and stacked into a loaf pan. As it bakes, the strips rise up and fan out, so the edges crisp and the sugar and butter caramelize. Now then: delicious, am I right?

1-DSC_0672
1-DSC_0672
1-DSC_0686
1-DSC_0686
1-DSC_0695
1-DSC_0695

I made the loaf a couple weeks ago, and I added some chopped rosemary to the lemon-sugar mixture. Definitely a winner.

But then I made it again, and this time, I added a bit of cinnamon. Lemon and cinnamon work together to make fruit crisps sing; I figured they'd make a great pair in this bread.

Spoiler alert: Not so much. The lemon-cinnamon bread was 100% mediocre. 

1-DSC_0699
1-DSC_0699

Turns out that what I really craved was the old faithful, cinnamon pull-apart bread. So on try #3, that's what I made.

1-DSC_0707
1-DSC_0707
1-DSC_0716
1-DSC_0716
1-DSC_0722
1-DSC_0722

It's every bit as good as it should be, and, if you can believe this to possibly be the case, it doesn't even need the cream cheese frosting. Not that that should stop you.

1-DSC_0750
1-DSC_0750

Cinnamon Brown Sugar Pull Apart Bread or Lemon-Rosemary Pull-Apart BreadAdapted from Leite's Culinaria

For the dough: 2 3/4 cups (12 1/4 ounces) all-purpose flour 1/4 cup (1 3/4 ounces) granulated sugar 2 1/4 teaspoons (1 packet) instant yeast 1/2 teaspoon salt 1/3 cup whole milk 4 tablespoons (2 ounces) unsalted butter 1/4 cup water 1 1/2 teaspoons vanilla extract 2 large eggs

Pick your filling...

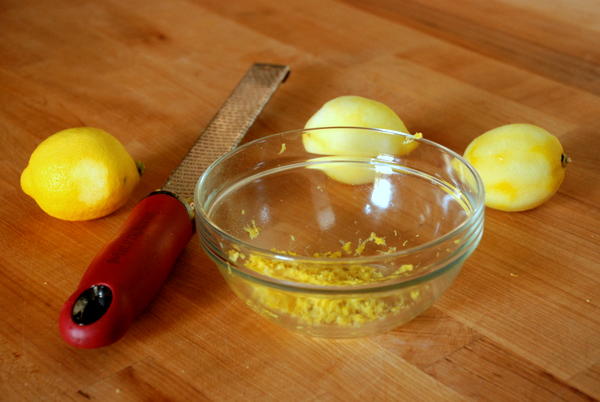
For lemon filling: 1/2 cup (3 1/2 ounces) granulated sugar 3 tablespoons finely grated lemon zest (from 2 to 3 lemons, preferably organic) 1 tablespoons finely grated orange zest, preferably organic 2 tablespoons (1 ounce) unsalted butter, melted

For cinnamon-brown sugar filling: 1/2 cup brown sugar 2 tablespoons cinnamon 2 tablespoons (1 ounce) salted butter, melted

For the cream cheese frosting: 3 ounces cream cheese, softened 1/3 cup (1 1/4 ounces) confectioners’ sugar 1 tablespoon whole milk 1 tablespoon freshly squeezed lemon juice, only if using lemon filling

Make the sweet dough:Stir together 2 cups (9 ounces) of the flour, sugar, yeast, and salt in the bowl of a stand mixer. In a small saucepan, heat the milk and butter over low heat just until the butter is melted. (You can also do this in a pyrex bowl in the microwave; the mixture needed about 1 minute in mine.) Remove from the heat, add the water, and set aside until warm, about 1 minute. Add the vanilla extract.
Pour the milk mixture over the flour-yeast mixture and mix on low speed until the dry ingredients are evenly moistened. With the mixer still on low speed, add the eggs, 1 at a time, mixing just until incorporated after each addition. Stop the mixer, add 1/2 cup (2 1/4 ounces) flour, and resume mixing on low speed until the dough is smooth, 30 to 45 seconds. Add 2 more tablespoons flour and mix on medium speed until the dough is smooth, soft, and slightly sticky, about 45 seconds.
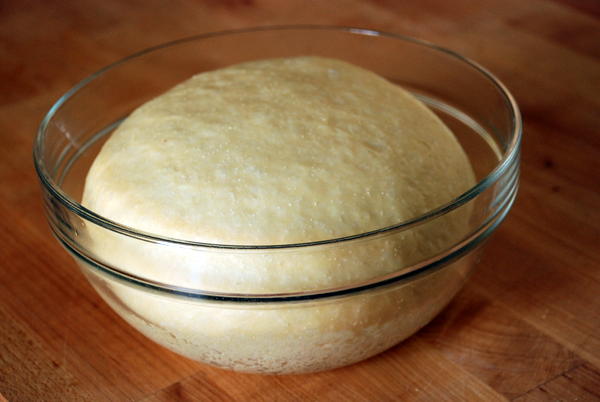
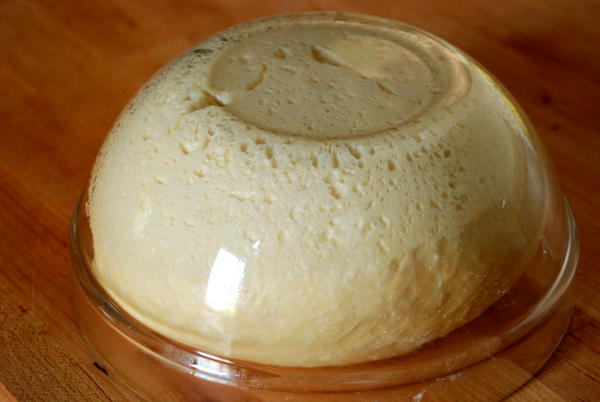
Sprinkle a work surface with 1 tablespoon flour and turn the dough onto the flour. Knead gently until the dough is smooth and no longer sticky, about 1 minute, adding an additional 1 to 2 tablespoons flour only if the dough is unworkably sticky. Place the dough in a large bowl, cover the bowl tightly with plastic wrap, and let the dough rise in a warm place (about 70°F) until doubled in size, 45 to 60 minutes. Press the dough gently with a fingertip. If the indentation remains, the dough is ready for the next step.
Make the filling: While the dough is rising, mix together in a small bowl either the sugar, lemon zest, and orange zest, or the cinnamon and brown sugar. Set aside.
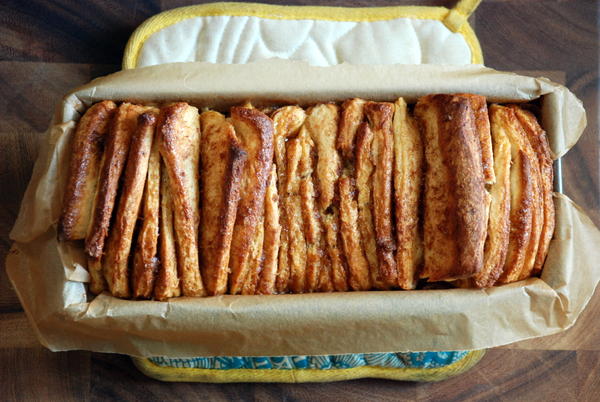
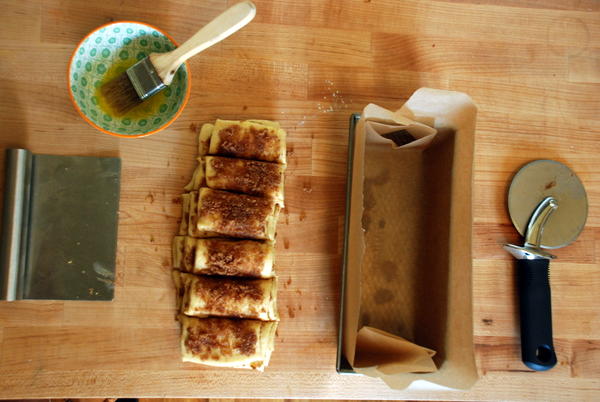
Assemble and bake the cake: Adjust the oven rack to the center position and preheat the oven to 350°F. Line a 9-by-5-by-3-inch loaf pan with parchment using this awesome trick from Alice Medrich: wrap the outside of the pan as if you were wrapping a gift, then take the folded parchment and ease it into the pan. Brilliant!
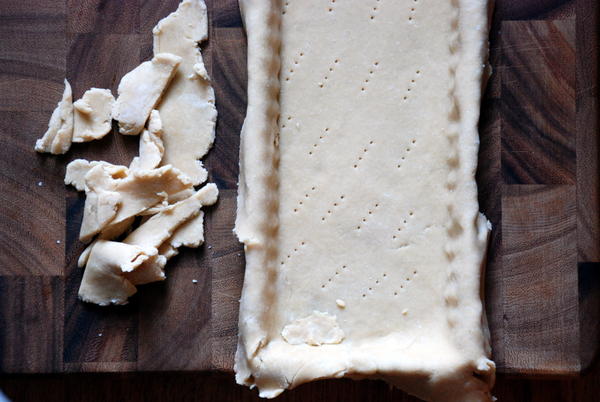
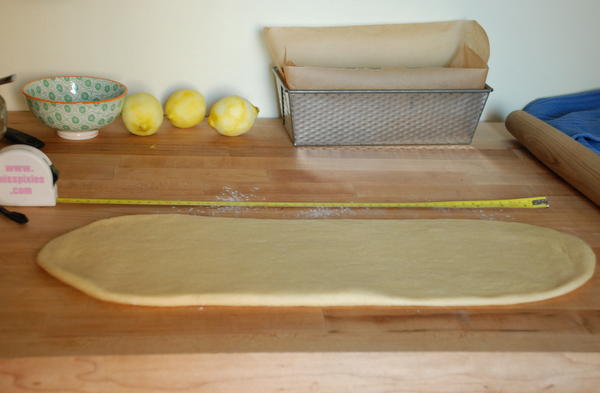
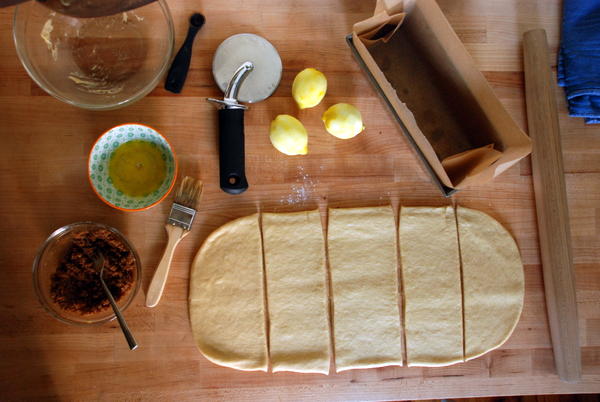
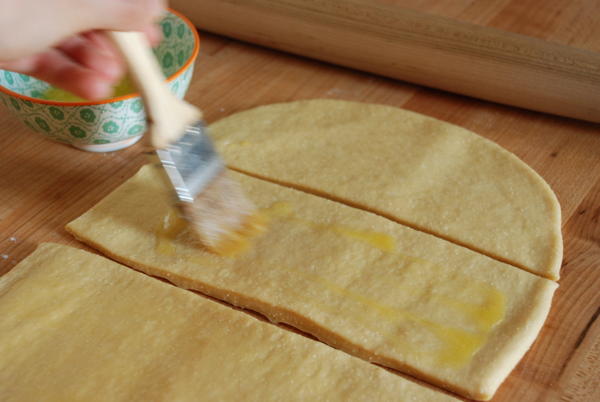
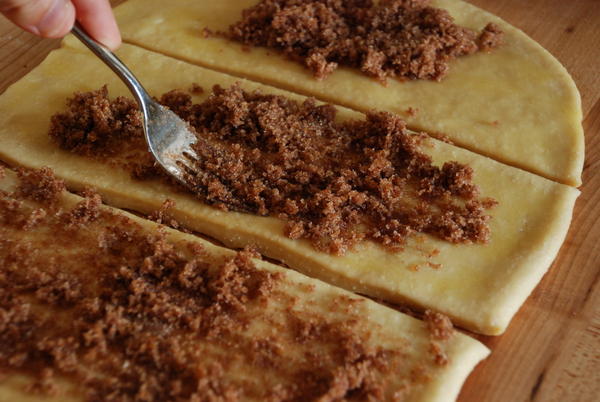
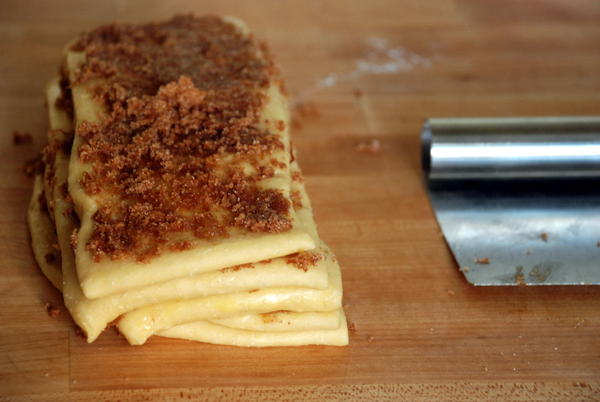
On a lightly floured work surface, roll out the dough into a 20-by-12-inch rectangle. Cut the dough crosswise into 5 strips, each about 12 by 4 inches. (A pizza cutter is helpful here.) Using a pastry brush, spread the melted butter generously over each strip of dough. Sprinkle 1 1/2 tablespoons of the filling over each rectangle. Then stack the 5 rectangles on top of each other. Work carefully when adding the crumbly zest filling, or it will fall off when you have to lift the stacked pastry later.
Slice crosswise through the 5-layer stack to create 6 equal strips, each about 4 by 2 inches. Fit these layered strips into the prepared loaf pan, cut edges up and side by side. (Flo Braker recommends fitting the pieces widthwise in the pan, which creates a taller loaf with lots of room on either side. I opted to stack them widthwise, which was quite tight but rose into a shape I liked more. Your choice.) Loosely cover the pan with plastic wrap and let the dough rise in a warm place (70 °F) until puffy and almost doubled in size, 30 to 50 minutes.  Bake the coffee cake until the top is golden brown, 30 to 35 minutes. Transfer to a wire rack and let cool in the pan for 10 to 15 minutes, then remove from the pan.
Frost the cake (optional): Combine cream cheese and sugar, and mash/whisk with a fork until fully incorporated. Add milk (and lemon juice, if making lemon bread), and mix vigorously with fork or electric mixer until very smooth. Set cake on the sheet of parchment used for baking, and drizzle with glaze using a fork or brush using a pastry brush. Serve warm.
Word to the wise: day-old slices of this bread could use a spin in the toaster, but boy are they amazing post-toast.
In bread, breakfast and brunch, cake, dessert
2 Comments

Asparagus-Sweet Potato Hash

June 14, 2013 Rivka
1-DSC_0841
1-DSC_0841

On a business trip last week, I drove back, forth, and back again (don't ask) through the farmlands of the Fingerlakes. Upstate New York was still sort of chilly, and spring hadn't quite sprung yet. At least, not the way it had in DC, where it feels like we're teetering on the last little edge of asparagus, peas, and chives, about to tip over into full-fledged tomato season. Don't mistake me for complaining about red orbs and stone fruit. I'm excited, really, I am. They make the hot, sticky weather bearable! But I'm not quite through with my beloved asparagus for the year, and sadly, DC is almost done with the 'gus growing season.

Fortunately for me and a saving grace of an otherwise ho-hum business trip, upstate NY had as many strawberry patches as could fit on a one-lane stretch of interstate, and one roadside farm actually had asparagus for sale. Yeah, you know me too well. I tucked a bundle in my suitcase.

Truth is, I've made this asparagus hash more than once this spring. It's an easy breakfast or brunch, and with a little practice and a grill pan, you can make it for company. I've made it with potatoes, because that's the obvious choice. But -- don't judge me -- on a recent Sunday, I discovered a single sweet potato languishing at the bottom of my vegetable bowl, probably leftover from like three days before, when it was still really cold out. Fresh out of potatoes, I used the sweet 'tater instead, and you guys, it was something of a revelation, that strange mix of winter and spring. The hash was sweeter and softer, but with a little patience the cubes of potatoes still got plenty of exterior crust. It's a simple recipe and with a little gumption, you can shape it to suit your mood and whims. I see it as a celebration of spring, and as such, I trick it out with the works: scallions, chives, ramps, et cetera. If you've got other stuff you feel like using, please be my guest. Before you know it, summer will be here. Maybe it's already here. Let's enjoy the last remnants of spring while we can.

Asparagus-Sweet Potato Hash Serves 4 4 tablespoons butter, olive oil, or half and half 2 sweet potatoes (or substitute yukon gold potatoes), cut into a half-inch dice 1 lb. asparagus, diced 2 ramps or spring onions salt and pepper to taste 4 eggs

Heat 2 tablespoons of butter in a cast-iron skillet. When the butter is foamy and nice and hot, add the potatoes in a single layer (or as close as you can get) and leave them alone. Let them brown and crisp for at least 3 minutes before starting to fuss at all. From there, you want to start turning the cubes on their other sides, to give pale, raw parts a chance to brown and cook through. The whole process should take around 8-10 minutes. Not every side will be browned; that's okay. Sprinkle with salt and pepper.

After the potatoes are mostly browned, push them to the side of the pan and add the asparagus with half a tablespoon of butter or olive oil. Give them a chance to brown a bit themselves; cook them for about 3 minutes. Then add the scallions, cook 2 minutes more, and toss them together with the now-browned-and-toasty potatoes. Remove the hash to a plate (though if you're using a different pan to cook the eggs, you can leave the hash where it is).

If you've got a grill pan, preheat it and add the remaining butter. Otherwise, you'll have to fry your eggs one at a time. Add a generous tab of butter to the cast-iron pan you used to make the hash, and then proceed to make your perfect version of the fried egg. In my house, here's how that goes: I turn the stove to medium, crack an egg into a bowl, and separate the yolk from the white. When the tab of butter in my pan is sizzling, I add the white and let it form a complete base before setting the yolk on top. I find that just those five seconds help prevent the yolk from overcooking on the bottom. Two minutes uncovered, 2 minutes covered, a sprinkle of salt and a few grinds of pepper, and my egg is perfect. You'll have to play around a bit to find your ideal version.

A flat-top grill pan makes eggs for company easy, but I don't have one, so I just fry them up one by one -- or, if I'm feeling more hurried, I'll set two pans up and fry two at a time. This hash is good enough that folks will be willing to wait.

In breakfast and brunch
3 Comments

Cypriot Greens and Cheese Pie

May 9, 2013 Rivka
1-DSC_0666
1-DSC_0666

Sometimes, when I really want to share a recipe with you, I go a little nuts with the testing and tweaking. The recipes I get most jazzed about are the ones I want to be most perfect. So I make the thing 5 or 6 times, fussing with quantities and baking times and potential extra ingredients, all so that when you make it yourself, it's not almost perfect, it's actually perfect.

This recipe had me at hello. I made it once, and immediately knew how I'd change it for posting. Chick-chock, were headed straight for primetime. Amazing!

I sat down in front of my computer and opened up a blank page. Now then: what to call it?

Uh.

Guys, I made this in March. Only now, practically mid-May, do I finally have a title that's clear enough to tell you what you're making. And I feel like if I just explain what's actually in this thing-I-decided-to-call-a-pie, you'll see why it was so hard to figure out what it actually should be called - and you won't think I'm a total nutcase. But you will make it, yes you will, because it really is fantastic. So here goes.

The pie started with a recipe from The Traveler's Lunchbox for flaounes, Greek Easter pastries. Right, I don't celebrate Easter. But flaounes looked really really good, so they've been in my to-make folder ever since Melissa posted about them in 2010. In typical "I have too many recipes in my inbox" fashion, it took me until March to make them. The savory, triangular pastries seemed like the perfect companion to the hamentaschen I was already making for Purim. They were a big hit among friends.

But they were kind of fussy, with all the rolling and cutting and folding and pinching. And triangle pastries are a tough sell for a main course at a dinner party - they feel more like a snack. Between you and me, I don't need cheese-filled dough lying around at snacktime. So on my next attempt, I went for a big slab pie. One piece of dough, rolled into a half sheet pan, filled with all the good stuff, and bam: lunch.

1-DSC_0691
1-DSC_0691

And a really good lunch at that. It reminded me a bit of those British "lunch dishes" that Nigella Lawson and others have written about: simple dough, stuffed with meat or cheese, baked till bubbly, then sliced and served just in time for the hunger pangs to strike. This was that. Incidentally, the leftovers kept quite well in the fridge. A 300-degree oven for 10 minutes did the trick in reheating, but once I even tried popping a slice in the toaster, which was quicker and more energy efficient.

1-DSC_0715
1-DSC_0715

Now then: what to call the flaounes-turned-pie? Flaounes probably means about as much to me as it does to you, which is to say, very little. I wanted you to know that this thing is loaded with greens and cheese. But let's be honest: it's not really a pie. Pie signals buttery, crumbly crust, which isn't what you'll get here. Instead, you'll be making something more like a bread dough. It rises and puffs in the oven, and its exterior develops a sheen not unlike brioche or challah.  I thought about casserole, but that didn't seem right, either. Maybe "cheesy bread?

1-DSC_0727
1-DSC_0727

So forgive the slightly misleading name. Maybe let's just call this lunch.

Cypriot Greens and Cheese Pieadapted from The Traveler's Lunchbox

I baked my pie lunch dish in a half-sheet pan, which is 13" x 18". If you don't have a half-sheet pan, you can easily divide your dough in half and make two pies in two quarter-sheet (9" x 18") pans.

The mastic and machleb are quite distinctive, and they're what give the dough its unique flavor. They're available on Amazon (each linked appropriately0 but also on Kalustyans. As good as they are, though, you can skip them and still end up with a delicious dish.

For the dough: 5 cups (700g) all-purpose flour 1 1/2 teaspoons instant yeast 1 1/2 teaspoons salt 1 teaspoon mastic, ground in a mortar (optional; also called mastica) 1/2 teaspoon ground mahleb, (optional; also called mechlepi) 1 tablespoon sugar 3 large eggs 1/2 cup (125ml) milk 1/2 cup (125g) butter, melted and cooled 1/4-1/2 cup (60-125ml) lukewarm water, or as needed vegetable oil, for greasing bowl and work surface

For the filling
: 1 lb 2 oz (500g) halloumi, kashkaval, pecorino, manchego, or a mixture of these cheeses, grated 1 1/2 tablespoons flour 7 large eggs; save a bit of one of the eggs for brushing on the dough 2 tablespoons dried mint 1/2 cup (50g) raisins or currants 8 oz. kale, chard, or other greens, shredded 1 teaspoon baking powder

1/3 cup sesame seeds

In a large mixing bowl, mix the flour, yeast, salt, mastic, mahleb, and sugar. In a separate bowl, whisk together the eggs, milk and butter and add this to the flour. Add as much water as needed to get a soft but kneadable dough (I needed only 1/4 cup plus 1 tablespoon). If it's too sticky to knead, add additional flour by the spoonful until you can knead it with clean hands without it sticking to your fingers. Turn the dough out onto a lightly oiled surface and knead until the dough is smooth and springy, about 5 minutes. Form the dough into a ball. Wash out the bowl, pour about a teaspoon of oil into the bottom, and put the dough in, rolling it around to coat it with the oil. Cover the bowl with a cloth and leave for about an hour, or until doubled in size. Fold the dough over itself a couple of times to deflate, cover the bowl with plastic wrap and refrigerate for at least 2 hours, or up to 24.

Meanwhile, mix all the filling ingredients except the baking powder (and a bit of one of the eggs, for brushing) and set aside. If refrigerating the dough overnight, cover and refrigerate the filling too.

Line your rimmed half-sheet pan or two rimmed quarter-sheet pans with parchment paper that extends beyond the edges of your pan(s). Set the dough on a lightly floured workspace and roll out into a roughly 16" x 21" rectangle (if using a half sheet pan) or two 12" x "16" rectangles (if using 2 quarter-sheet pans). The exact shape of your dough doesn't matter - you're just going to fold the edges over the filling anyway, so don't sweat it. Just make sure the dough comes up past the edges of your sheet pan(s).

Pour the filling into the pan(s), and fold the edges of the dough over the filling. The dough edges won't even come close to covering the filling, and that's okay. You should wind up with a sort of funky looking half-crust, half-topping. See my photos above.

Brush the folded-over part of the crust with the reserved egg, and sprinkle sesame seeds onto the crust.

Let the pie rise on the counter for about 30 minutes. Halfway into the rise, preheat the oven to 375 degrees and set a rack in the center of the oven.

Bake the pie for 35-40 minutes, until the center is firm and the top of the crust is golden brown. Set the pan on a rack to cool for 10 minutes, then serve.

Pie can be reheated a 300-degree oven for 10-15 minutes, or by popping slices in a toaster.

In breakfast and brunch, main dishes, pies and tarts, vegetarian
4 Comments

Asparagus and Tarragon Tart

May 3, 2013 Rivka
1-DSC_0944
1-DSC_0944

Guys, it's my favorite time of year. Nevermind that May has decided to be about as cold as November and my sad spring dresses are still hanging in the back of the closet: asparagus have arrived! I've already downed 4 bunches myself; there's no stopping me now.

You didn't know I loved asparagus? Can't be. The evidence is all right here. There's risotto and bulgur salad and even just plain sauteed asparagus, which actually are my favorite.

1-DSC_0871
1-DSC_0871

And then there's this tart, which, to be honest, defies logic in that it contains tarragon, my least favorite of herbs, and yet I absolutely adore it. Perhaps this is because the tarragon is used sparingly, to just barely tint the creamy custard with that sweet, anise flavor. Another thing I love about this tart is that it isn't too eggy. There's just the right balance of eggs and cream so that the center is still quivery, hours after the tart leaves the oven.

1-DSC_0980
1-DSC_0980

I imagine this gracing the table of your weekend brunch, or perhaps your Derby Day celebration. And if you are celebrating Derby Day, don't forget the pie.

If you're looking for still other ways to use asparagus, I've got more up my sleeve. This Monday, I'll be sharing 5 more ways to use asparagus for Food52's Halfway to Dinner column. I'll let you know when that's live.

1-DSC_0963
1-DSC_0963

Happy weekend!

Asparagus and Tarragon TartAdapted from Nigel Slater's

Tender

My only adaptations were using 100% white whole wheat flour for the crust (worked great) and using a rectangular pan instead of a round one. I had a few extra scraps of pie crust, but otherwise, the quantities worked perfectly.

For the Pastry:

7 tablespoons butter 1 1/4 cups (150 g) flour (either white, white whole wheat, or whole wheat pastry flour, or a mixture) 1 egg yolk

For the filling:

1 bunch of asparagus (about 12 spears) 1 1/4 cups heavy cream 2 eggs 4 or 5 tarragon leaves (more if desired), chopped 3 tablespoons grated pecorino cheese

Cut the butter into small chunks and use either your fingers or a pastry blender to cut the butter into the flour until the mixture is the size of peas. Then add the egg yolk and 1-2 tablespoons of cold water, and use either your fingers or a fork to bring the mixture together. If the dough feels too crumbly, add up to 1 tablespoon more water.

Roll the dough into an 11-inch disk (for a 9-inch round pan) or a 16" x 6" rectangle (for a rectangular pan) and fit it carefully into the pan, leaving the overhang in place for now. Prick the dough with a fork, then stick in the fridge for half an hour or so to rest (this ensures that the dough won't shrink when baked. The overhang helps with this, too; I cut it off after the tart was done.) Meanwhile, preheat the oven to  400°F. Put crust on a flat baking sheet and blind bake the crust for 15 minutes, then reduce the oven temperature to 350°F. Leave the tart on the baking sheet.

Bring a large pot of water to a boil, then drop in asparagus and cook just until tender, about 5 minutes. (Slater says longer, but I can't bare to overcook a batch of perfect 'gus.) Remove the asparagus and set aside.

Combine eggs and milk in a medium bowl and whisk to combine. Add the tarragon to the cream mixture along with a pinch or two of salt and pepper.

Lay the asparagus in the tart crust. (Slater recommends you cut them into shorter lengths, but I think the full spears look elegant in the finished tart.) Pour the cream mixture over the asparagus, taking care to fill in the tart evenly. Transfer the tart, on its baking sheet, into the oven and bake for 40 minutes, until the filling is golden and quivers only slightly when moved. Serve warm.

In breakfast and brunch, pies and tarts
1 Comment
← Newer Posts Older Posts →

Subscribe by email:

  • books (1)
  • crisps and crumbles (1)
  • frozen (1)
  • toys (2)
  • gifts (3)
  • egg whites (5)
  • fried (5)
  • how to use--- (6)
  • drinks (10)
  • menus (11)
  • travel (11)
  • fish (12)
  • kosher for passover (14)
  • thanksgiving (14)
  • vegan (20)
  • snacks (21)
  • techniques (21)
  • soup (26)
  • bread (28)
  • pies and tarts (28)
  • cake (33)
  • events (34)
  • condiments (36)
  • various and sundry (39)
  • uncategorized (42)
  • cookies and bars (46)
  • weekday lunch (47)
  • appetizers (48)
  • salad (51)
  • gluten-free (56)
  • comfort food (61)
  • breakfast and brunch (77)
  • sides (81)
  • dessert (90)
  • main dishes (100)
  • healthy (139)
  • easy (155)
  • vegetarian (180)

| LATEST |

Featured
Blue Chair Fruit's Black Raspberry Jam
Thai Grapefruit Salad
Mango Sticky Rice
Winter 2016: Odds and Ends
Povitica: The Best Babka Ever
Persimmon Walnut Bread
Sprout Chaat Salad + New Site!
Maple Walnut Squares
How to Give Thanks
Croissants (really, I made croissants) + other croissant-ish things

| hEALTHY |

Featured
Sprout Chaat Salad + New Site!
Fennel frond pesto + what to do with those pesky stalks
Asparagus Toasts with Pistachios and Mint
Eggplant-Walnut Pâté + Passover Ideas
1-DSC_0861-600x401.jpg
Lentils and Rice with Tamarind Sauce and Dukkah
Big Kale Salad with Pomegranate and Feta
Punchy Crunchy Ginger Salad

| BreakfAST |

Featured
Povitica: The Best Babka Ever
Croissants (really, I made croissants) + other croissant-ish things
Mushroom and Kale Breakfast Strata
Barley Porridge with Orange and Black Sesame
Ramps 'n' Eggs Biscuit Sandwiches
Asparagus Toasts with Pistachios and Mint
Apple-Cheddar Scones with Sage
Menemen - Turkish Eggs with Tomatoes and Peppers
You must select a collection to display.

© 2016 Rivka Friedman. All Rights Reserved.