• Home
  • About
  • Recipe Index
  • Contact
Menu

Rivka Friedman

Street Address
City, State, Zip
Phone Number

Your Custom Text Here

Rivka Friedman

  • Home
  • About
  • Recipe Index
  • Contact

The Best Way to Caramelize Onions

May 14, 2013 Rivka
DSC_0395
DSC_0395

One of my favorite food-related articles from 2012 came from Slate. It was called, "Why do recipe writers lie and lie and lie about how long it takes to caramelize onions?" and it spoke the truth: caramelizing onions is a matter of patience. Doing it properly takes at least 40 minutes, and the recipes that tell you you'll have soft, brown onions in five or ten minutes are straight-up lying.

So, do I have some sort of trick to shorten your wait? Not exactly. But let's be honest: we see caramelized onions in a recipe, and we let out a sigh. There goes any hope of getting dinner on the table quickly. And friends, that's a problem I can solve.

The trick? Caramelize onions in bulk. Onions keep for a really long time; onions in lots of oil keep even longer. These will keep in the fridge for easily a week (actually longer, but if you're nervous about storing them for so long, top them with a hefty drizzle of olive oil). If you make a big ole' batch on a lazy Sunday, you'll have enough caramelized onions to get you through a week's worth of frittatas, tarts and more tarts, Mujaddara, and more.

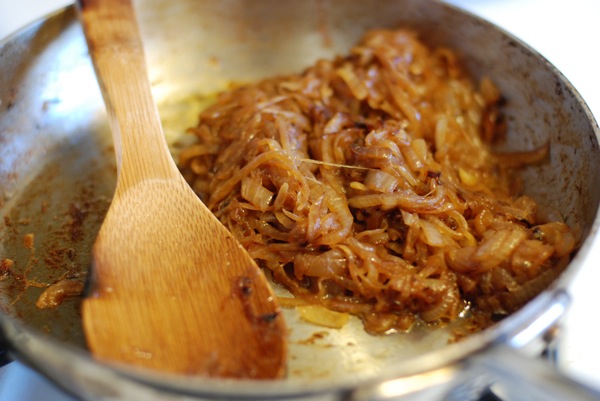
And anyway, I find that it's easier to caramelize onions in bulk. Pile 'em into a big pan, turn the heat very low, and cover. Then walk away. It's pretty much that easy, and with no stress about how long they take, the promise of silky, soft, golden onions isn't too much to hope for.

Let's do this thing.

Best Caramelized Onions

5 large yellow onions 5 tablespoons butter, olive oil, or a mix (I like 3 and 2) 1 teaspoon salt

Peel onions, halve them from pole to pole, and slice into thin half-rings.

Pile the onions into the largest shallow skillet you have. If your largest shallow skillet doesn't fit them, put them into a wide pot. Make sure whatever pot or pan you're using has a lid.

Turn the heat to medium and add the butter/oil and salt. When the onions start making those wonderful sizzling noises, give the onions a good stir, reduce the heat to low, and cover the pot/pan.

After 20 minutes, check the onions. They should have sweated down considerably to the point where they are very soft and possibly turning tan. Spend the next 20-30 minutes cooking the onions uncovered, with the top off, and stirring occasionally to prevent sticking and ensure even cooking.

After 50-60 minutes, the onions should be very soft and deep golden brown. Store in a sealed container topped with a hefty drizzle of olive oil. Onions will keep for over a week.

Troubleshooting: If the onions look too dry, add water by the tablespoon and stir to incorporate with the onions. You can also add a bit more olive oil or butter if the onions aren't glistening enough.

If you have one of those amazingly powerful stoves where "low" is still pretty high (lucky you), you'll want to keep a closer eye on the onions to avoid burning them. Adding water and constant stirring are pretty good insurance policies there.

Finally, depending on how firm your onions are when you start out, they can soften quickly or very, very slowly. If your onions feel particularly soft, in 20 minutes of covered cooking they'll probably have "melted" - meaning, they'll be super soft and almost have lost their shape. Firmer onions will keep their shape in 20 minutes, so if you're hoping for super melty onions, you may want to leave them covered on the heat for a bit longer.

Here's to big batches of delicious ingredients. More to come.

In condiments, vegan, vegetarian Tags components of a meal, cooking economically
5 Comments

Chive Compound Butter

June 18, 2012 Rivka
chive butter13
chive butter13

Some people burn everything. Others forget to add salt. Me? My pasta water always boils over. But my biggest achilles heel in cooking is the constant temptation to add too many ingredients.

It starts simply enough: asparagus with miso. But then I shake in a few dashes of soy sauce, and maybe some mirin, and wouldn't some rice vinegar be nice? Oh, and sesame oil too. Before I know it, I've created a murky mess.

I didn't make a list of kitchen resolutions this year. At least not formally. But one commitment I made a while back that I've been trying to keep is to stay simple whenever possible. If I can make something delicious with five ingredients instead of seven, or three instead of five, I do. Especially now that summer has rolled around and the farmers' markets are juicily bursting with fresh favas and eggplants and peas and peaches and oh, tomatoes, I'm trying to celebrate these ingredients more simply. Tomatoes, salt, olive oil. No kitchen sink.

It was this impulse that led me to the garden last week to pick some chives. The chives are doing beautifully, by the way; they started as two little bunches of skinny green spears, but now those spears are plump, and there are many more of them. Enough that you can't even tell where I snipped a few off the bunch.

chive butter17
chive butter17

I had a few chives with flowers attached leftover from my CSA, and I wanted to find a way to celebrate my most favorite herb. Typically, I dice chives finely and sprinkle them onto eggs, toast, and fresh chevre. Simple enough. But this time, I went for something even simpler, and I fell hard. Chive butter.

It's simple. Really, dead simple. Chives, butter, salt. That's it. If you're feeling the urge to make things more complicated, you might grate some parmesan cheese into the mix. I sat on my hands and resisted that urge, and friends, I have absolutely no regrets about the decision. Chives and butter are a match made in heaven. Aside from a little salt to wake up the palate, they need absolutely nothing else.

chive butter05
chive butter05

The tricky thing about recipes as simple as this one is that the quality of each ingredient really matters. In a sauce with 18 ingredients, you'd hardly notice. But here, you need good butter, fresh chives, quality salt. Trust me: you'll taste the difference.

So what should you do with this magical butter you've just made? First, before you do anything else: spread it on warm bread. Faint from happiness.

Now compose yourself: there's more to do. You might finish a piece of grilled or roasted salmon with it. Or brush it on asparagus before broiling or grilling them. I bet it would be wonderful on halved, grilled or roasted tomatoes as well. And if finishing a steak or roasting a chicken with butter is your thing, well - don't let me stop you here.

To serve the compound butter as a condiment, you've got a couple options. The first is to pack it into a pretty cup or dish and put it on the table, just so. If you've made a small batch, that should work perfectly.

If you want to serve the butter on two or more separate occasions, I've provided instructions below. Just be sure to bring butter back to room temperature before serving.

Simplicity at its best: that's pretty much the story.

chive butter02
chive butter02

Chive Compound Butter

4 tablespoons unsalted butter, softened 3 tablespoons finely chopped chives 1/2 teaspoon big, flaky salt

Combine all ingredients in a medium bowl and mix together with a fork until fully incorporated.

Pack into a small dish or cup, and either serve immediately, or wrap in plastic and refrigerate for up to 1 week. To store for longer, wrap cup or dish tightly in plastic and freeze. Butter will keep this way for a couple months.

Alternatively, butter can be refrigerated or frozen in smaller servings for use as needed. To do this, refrigerate butter for about 30 minutes - maybe less - until it's stiff enough to hold its shape. Then, set out a piece of wax or parchment paper on a flat surface, spoon the butter in a big clump onto the paper, and wrap the long edge of the paper around the butter, gently rolling it into a log. Use the short edges of the paper to pack in the ends of the log, and then wrap it up and stick it back in the fridge until completely solid. At this point, you can slice it into two shorter logs, or you can make individual disks of butter to use or serve whenever you feel the urge. Just be sure to let the butter come to room temperature before serving if you intend to spread it on bread.

In condiments
4 Comments

Sour Cherry Vanilla Jam

June 12, 2012 Rivka
cherry vanilla jam
cherry vanilla jam

This was one busy weekend. Saturday, D and I drove down to Charlottesville for a R. and S.'s wedding. The couple are Indian, and their wedding officiant said theirs was the most traditional South-Indian wedding he'd ever done. Everything - from the chairs, to the umbrellas protecting against the sun, to the guests' saris - was vibrantly colorful. The bride, decked in red, gold, and loaded with jewelry, henna, and fresh flowers, was breathtaking. Between various prayers, customs, and games (yes, games! Like, see how quickly the bride and groom can throw rice on each other...beyond fun), the ceremony alone was over three hours; fortunately, it's customary to mill about. Guests roamed the grounds, and eventually moved their chairs to the shade on the periphery of the ceremony. The whole thing was wonderfully informal. Plus, there was an endless supply of fresh juice set up in back - we're talking guava, mango and spicy green mango, watermelon, you name it - and, of course, plenty of chai tea. The wedding took place at Castle Hill Cider, a winery with a gorgeous barn overlooking hills and a pond. There are many worse things to do than roam those beautiful grounds, drink fresh juice and chai, and watch a happy couple get married. It was a memorable day.

Sunday morning, bright and early, I headed out to the 'burbs with my dad and our friends J. and B.'s kid A. to pick some berries. It was sweltering - especially in those strawberry fields, which get absolutely no shade - but we stuck it out, and I came home with 3 pounds of sour cherries, 3 of strawberries, and a big tupperware of beautiful, sweet blueberries.

The blueberries were the easiest to pick by far. There were plenty of them, and they grew on bushes about waist height. Every bush was loaded with plump, ripe specimens, which we happily popped into our buckets.

Cherries were harder: most of the trees were picked over. Fortunately, they had a ladder in one of the fields, so we climbed into the trees and picked beautiful, gem-red cherries from the top branches.

By the time we rolled around to strawberries, we were pretty beat. But the berries - wow. They tasted like hot jam. We nibbled a couple, drank a lot of water, and soldiered on. The spoils were worth every minute.

iphone 904
iphone 904

The produce are well on their way to deliciousness. I did manage to keep a few strawberries and a few cherries for pie, but that's it. Between 8 jars of various jams and plenty of nibbles while I was cooking, most of the berries have been used. Over the next couple weeks, I'll be sharing a few of my favorite recipes from this round of preserving. First up: cherry vanilla jam.

I think this jam is my favorite of today's projects. I've been folding it into yogurt, shmearing it on toast, and -- let's be honest - eating it with a spoon. Just three ingredients produce a jam with surprising complexity, and the whole thing is done in under an hour.

cherry vanilla jam 2
cherry vanilla jam 3

Now that the day is done, the A/C is high, and I'm showered and clean, I'm so thankful to have all those jars popping away on the counter. They'll be a welcome burst of summer sunshine when it gets cold again.

Sour Cherry Vanilla Jam

Note: The recipe here is scaled for an urban kitchen: 2 pints of cherries yield roughly 1 1/2 pints of jam, which I preserve in three half-pint jars. Perfect for a small household. If your jam doesn't quite fill that third jar, that's okay. Don't process it; just stick it in the fridge and use it first.

2 pounds (2 pints) sour cherries, rinsed and pitted 2 vanilla beans 1 1/4 cups sugar

Put the cherries in a medium-large pot (stainless steel, cast iron, and enamel all work). Use your hands to mash and squish the cherries, breaking up the fruit and releasing their juice.

Slit vanilla beans lengthwise and use the back of a knife to scrape the vanilla seeds out of the beans. Put the seeds into the pot with the cherries. Halve the beans crosswise (so they fit in the half-pint jars) and add them as well.

Add the sugar to the cherries, stir to combine, and set over medium-high heat. When the cherries begin to bubble, reduce heat to medium low. Cook until jam reaches 220 degrees. If you don't have a thermometer, you're looking for big, syrupy bubbles and for most of the liquid to have evaporated. If you want to be sure you've achieved the proper texture, tuck a plate into the freezer when you start the jam. To check for doneness, put a few drops of the jam onto the plate, wait 1 minute, and taste. If the jam has firmed up somewhat, it's done.

At this point, you can transfer the finished jam into jars and refrigerate them, or you can process them for shelf storage. To process jam, sterilize your jars and lids in a large pot of boiling water for 10 minutes. Remove with tongs. Use a funnel to fill the jars most of the way with jam, leaving at least 1/4 inch of headspace. Top with the lids and a screw cap. Return to the pot of boiling water, making sure jars are completely submerged with water when standing upright. When water returns to a boil after jars are added, set a timer for 10 minutes. After 10 minutes, jars are finished processing. Turn off heat, let cool for about 10 minutes more, then carefully remove jars with tongs. Set on the countertop and leave untouched until all jars' lids have snapped into a vacuum seal (you'll hear a little "pop!" when that happens). If any jars didn't seal, you can either reprocess them within 24 hours, or store in the fridge and eat first.

In condiments Tags summer
3 Comments

Sour Cherry Compote

June 26, 2011 Rivka
DSC_0499
DSC_0499

It seems my latest attempt to test the temper of this bearable summertime weather has, gleefully, been ignored. DC persists in being comfortable. In June! No, I'm not complaining.

Instead, I'm reveling in the joy of walking down to the farmers' market on Sunday mornings after a workout, all hot and prepared to stay that way, only to encounter 80-degree breezes and precious little humidity. Sacks full of produce, I can walk home without needing the day to recover. Call it the tyranny of low expectations, but it's quite a thrill.

The nice (for summer) weather makes the bounty of East Coast produce an even greater bonus. To wit: I turned on my oven this week to make sour cherry hand pies, and guess what? No one fainted. Success. I'll have a recipe for that soon.

For now, there's this lovely compote, which you should make not next week, not tomorrow, but right now, before sour cherries vanish. It all happens so quickly, and I don't want you to miss out. The beauty of this compote is that it's a cinch to make, and it'll keep in your fridge for weeks, extending the fleeting season of my favorite summer fruit.

DSC_0477
DSC_0477

You might wonder when you'll have occasion to use a compote, but trust me: if it's in your fridge, you'll suddenly find ample uses. Over scones or pancakes; alongside grilled meats; swirled into yogurt; spooned over vanilla ice cream. If those possibilities aren't sufficient, you could eat it straight from the jar. Or use it in these wonderfully sloppy sour cherry pies. Think of fruit compote as a headstart to all other desserts. Crumbles, pies, muffins, ice creams -- all of these would benefit from some compote mixed in.

DSC_0453
DSC_0453
DSC_0486
DSC_0486

Sour Cherry Compoteadapted from Karen DeMasco's The Craft of Baking

4 cups (1 lb.) stemmed, pitted sour cherries (fresh or frozen) 3/4 cup sugar juice of 1 lime (or lemon)

Set a strainer over a metal bowl.

Combine cherries, sugar, and lime juice in a small saucepan and set over medium high heat. Cook -- watching carefully, because it will inevitably bubble over the minute you turn away -- until mixture bubbles and starts to foam, and cherries are soft, about 7 minutes. Pour mixture into strainer set over bowl; cherries will separate from syrup. Pour syrup back into sauce pan, and transfer cherries to the metal bowl.

Cook syrup over medium-low heat (you're looking for a simmer here) until reduced by half, about 10 minutes. Remove from heat and cool about 10 minutes more.

Put cherries into a glass jar, and pour syrup over cherries. Refrigerate. Compote will keep in the fridge for a few weeks, if it lasts that long.

In condiments, dessert, easy
7 Comments
← Newer Posts Older Posts →

Subscribe by email:

  • books (1)
  • crisps and crumbles (1)
  • frozen (1)
  • toys (2)
  • gifts (3)
  • egg whites (5)
  • fried (5)
  • how to use--- (6)
  • drinks (10)
  • menus (11)
  • travel (11)
  • fish (12)
  • kosher for passover (14)
  • thanksgiving (14)
  • vegan (20)
  • snacks (21)
  • techniques (21)
  • soup (26)
  • bread (28)
  • pies and tarts (28)
  • cake (33)
  • events (34)
  • condiments (36)
  • various and sundry (39)
  • uncategorized (42)
  • cookies and bars (46)
  • weekday lunch (47)
  • appetizers (48)
  • salad (51)
  • gluten-free (56)
  • comfort food (61)
  • breakfast and brunch (77)
  • sides (81)
  • dessert (90)
  • main dishes (100)
  • healthy (139)
  • easy (155)
  • vegetarian (180)

| LATEST |

Featured
Blue Chair Fruit's Black Raspberry Jam
Thai Grapefruit Salad
Mango Sticky Rice
Winter 2016: Odds and Ends
Povitica: The Best Babka Ever
Persimmon Walnut Bread
Sprout Chaat Salad + New Site!
Maple Walnut Squares
How to Give Thanks
Croissants (really, I made croissants) + other croissant-ish things

| hEALTHY |

Featured
Sprout Chaat Salad + New Site!
Fennel frond pesto + what to do with those pesky stalks
Asparagus Toasts with Pistachios and Mint
Eggplant-Walnut Pâté + Passover Ideas
1-DSC_0861-600x401.jpg
Lentils and Rice with Tamarind Sauce and Dukkah
Big Kale Salad with Pomegranate and Feta
Punchy Crunchy Ginger Salad

| BreakfAST |

Featured
Povitica: The Best Babka Ever
Croissants (really, I made croissants) + other croissant-ish things
Mushroom and Kale Breakfast Strata
Barley Porridge with Orange and Black Sesame
Ramps 'n' Eggs Biscuit Sandwiches
Asparagus Toasts with Pistachios and Mint
Apple-Cheddar Scones with Sage
Menemen - Turkish Eggs with Tomatoes and Peppers
You must select a collection to display.

© 2016 Rivka Friedman. All Rights Reserved.