Rivka Friedman
  • Home
  • About
  • Recipe Index
  • Contact
Menu

Rivka Friedman

Street Address
City, State, Zip
Phone Number

Your Custom Text Here

Rivka Friedman

  • Home
  • About
  • Recipe Index
  • Contact

Vanilla Bean Rooibos Tea Cookies and a Giveaway

April 25, 2013 Rivka
rooibos vanilla cookies batch 1

Our kitchen's been busy as ever, with spring finally here. The fridge is full of green (and even some red: rhubarb is back!) and I can't control the urge to cook a million things all at once. It's a special kind of attention deficit, and fortunately, its only notable side effects are too many pots bubbling on the stove and lots of full containers in the fridge/freezer/sink. Not too bad.

Chalk it up to my enthusiasm about spring recipes that I never shared this gem from fall. I love rooibos tea, I love vanilla beans, and I love sable cookies. One good day last November, I decided to put those three things together. A few whirls of the food processor later, I wound up with these lovely cookies, fragrant from toasted rooibos and whole vanilla beans and crunchy from their coat of sanding sugar.

The recipe actually won first place in Food52's Vanilla contest, and it'll be featured in (I think) the 3rd Food52 cookbook. So far, I'll have been published in all 3 books. So exciting!

In the fall, I'd have recommended you eat them with a spot of hot tea. But now that it's nice out, why not serve them with either iced tea or iced coffee? I'm already picturing a plate of them set out on our deck.

rooibos vanilla cookies batch 1 - 2

GIVEAWAY ...But I know why you're really here: giveaways are so fun, aren't they? This one is especially delicious: the kind folks from Sucré are offering one lucky NDP reader macarons! That's right: Sucré will send the winner of this giveaway its Signature Macaroon Collection. That's 15 macarons in flavors like chocolate, salted caramel, and pistachio. What's not to love?

To enter, simply Like our Facebook page, then leave a comment below sharing either your most frustrating macaron baking story, a tip for baking perfect macarons, or just your favorite flavor of macaron. I'll pick a winner next Wednesday, May 1st. Stay tuned, and good luck!

Update 5/1/13: The giveaway has ended! I picked a random number on random.org:

giveaway random number 5-1-13

And the 15th non-duplicate comment is....Margot C! Congratulations, Margot! I'll be in touch with details about your macarons.

Vanilla Bean Rooibos Tea Cookies 1/4 cup plus 1 tablespoon sugar 2 tablespoons rooibos tea leaves (about 5 tea bags) 1 vanilla bean, whole, ends trimmed, cut into segments 1 1/4 cups flour 1/4 cups powdered sugar 1/4 teaspoon salt 1 teaspoon vanilla 2 teaspoons milk 1/2 cups unsalted butter 1 1/2 tablespoons turbinado sugar

Heat a small stainless steel pan over medium heat. When pan is hot, add rooibos leaves, and shake pan to distribute tea into a single layer. Toast for about 2 minutes, until tea is fragrant but not darkened. Depending on your leaves, this may happen much more quickly; watch it carefully. When leaves are fragrant, transfer them to a bowl and let cool for a couple minutes.

Combine the sugar, vanilla bean, and rooibos in the bowl of a food processor and pulse for about 2 minutes, until there are no chunks of bean left in the bowl. Add the powdered sugar, flour, and salt to the bowl and pulse a few times to combine. Then add the milk, vanilla, and butter and pulse several times, until a dough forms.

Turn dough onto a very lightly floured surface, gather it together, and roll it gently into a log 1.5-inches in diameter.

Sprinkle turbinado sugar on a plate or work surface, and roll cookie dough log in the sugar, making sure to cover the entire surface of the log with sugar. Wrap log in plastic or wax paper and transfer to the fridge or freezer for at least 30 minutes to chill. (You can leave the log in the freezer and slice off cookies one by one, whenever the urge strikes.)

When ready to bake, turn on the oven to 375°F and line a baking sheet with parchment or silpat.

Remove log from fridge or freezer, and cut 1/3-inch slices off the log, rotating the log as you go to ensure that cookie slices stay round. Transfer cookies to the prepared baking sheet, leaving 1/2 inch between each (they don't really spread, but they need breathing room to crisp up). Bake for 12 minutes, until cookies are just starting to brown. Leave on the cookie sheet to cool for 5 minutes, then transfer to racks.

Cookies will keep in an airtight container for several days.

In cookies and bars
22 Comments
Share

Pineapple Macaroons

March 24, 2013 Rivka
1-DSC_0171
1-DSC_0171

I always say that the true test of a Passover dessert is one simple question: would you eat it not on Passover.

In the case of these macaroons, which I first made last June, again in July, and once again in the fall, clearly the answer is yes. They remind me of those piña cola cookies I made back in October, but – dare I say it? – they’re better.

1-DSC_0140
1-DSC_0140

No surprise there: David Lebovitz masterminded these macaroons, and most everything he makes – especially ice cream – is awesome. Pineapple macaroons, blissfully, are no exception.

Here’s how it all goes down.

1-DSC_0139
1-DSC_0139

The first step is the most important: you’ll be caramelizing pineapple. Think of regular caramel, where you heat sugar until it turns golden. Same concept, except this time, you’ve got little bits of pineapple in the mix. When the pineapple has caramelized, it’ll be stiffer, golden brown, and really fragrant. That’s when you combine it with the usual macaroon suspects (coconut, egg whites, sugar), mush the dough into mounds, and bake them off.

1-DSC_0167
1-DSC_0167

The result? Like a really good chocolate chip cookie, these macaroons have three distinct sections. They have a perfect outer crust, which gets crunchy and caramelized. They’ve got a soft inner core. And then they have that middle, which isn’t quite soft, but isn’t really crunchy either. It’s kind of perfect.

The first time I made these macaroons, I brought a huge tray of them to friends’. I was sure I’d leave a few for them to nibble on the next day, but slowly and surely, the six of us ate every last macaroon. Okay, true story: I made a second batch the very next day, they were that good.

And, with very little effort, they can be the star of the cookie platter at your seder table. I guarantee people will love them. I also guarantee that if, by some off chance, you end up with extras at the end of the holiday, you’ll have no urge to toss them out with that extra matzah. Like all good Passover desserts, these have staying power.

Pineapple MacaroonsAdapted from David Lebovitz

So David recommends using crushed pineapple, but I found that diced pineapple works much better. The crushed pineapple sort of melts into the coconut, and the texture of the resulting cookies is less...wonderful. The coconut gets less glazed, the pineapple is less distinctive, and the macaroons are generally not as addictive as when I used diced fruit. Either works, though, so use whatever you can find.

One 20 oz. can (about 600 g) diced unsweetened pineapple, with juice 1 cup (200 g) sugar pinch of salt 3 1/2 cups (245 g) dried unsweetened shredded coconut (available at health food stores, some supermarkets, and online zest of one lime, grated 3 large egg whites (not whipped) 1/2 teaspoon vanilla extract

Put the pineapple, juice, sugar, and salt into a large shallow skillet (David recommends nonstick, but I used a regular skillet and it worked just fine) and set over medium heat.

Cook until the liquid mostly evaporates, stirring occasionally. Then keep cooking for 8-10 more minutes, stirring regularly, until the pineapple firms up, turns golden, and gets very sticky. Transfer the sticky pineapple bits to a medium mixing bowl.

Add coconut to pineapple, and use your fingers to combine the two, pressing the coconut into the pineapple. Then add the egg whites and vanilla, and again, use your fingers to combine the mixture until it is uniform. Your fingers will get covered in sticky macaroon batter; do your best to scrape the batter off your fingers back into the bowl, and rinse your hands before shaping the macaroons.

Preheat the oven to 350° and line a large baking sheet with parchment paper or silpat.

Take a golf ball's worth of batter in your clean hands, and shape it into a sphere. Set the sphere onto the baking sheet, flattening the bottom side of the sphere against the sheet. Then cup your fingers around the top half of the sphere, pinching toward the tip until you wind up with a cone shape. Repeat with remaining batter; no need to leave much space between cookies – 1/2 an inch will do.

Bake cookies for 25 to 30 minutes, until their tips are a deep dark brown and their exteriors are mostly golden. Start checking at 20 minutes, to ensure that cookies don't burn (too much).

Serve cookies at room temperature. These cookies are best the day they're made, but they're not half bad the day after. The batter can also be kept in the fridge for up to 5 days and baked off as needed.

In cookies and bars, dessert, gluten-free, kosher for passover
3 Comments
Share

Raspberry Chocolate Hamentaschen

February 19, 2013 Rivka
1-DSC_0777
1-DSC_0777

The Jewish holiday of Purim was my favorite as a kid. It was the one day of the year when I got to skip the skirt in favor of sweat pants at school (clue: put on a whistle and, oh look, you're a coach). We got dismissed early, had a carnival for most of the day, and ate ourselves silly. Most of that eating was hamentaschen, which friends give each other on Purim.

The one major design flaw: my mom's hamentaschen were way better than everyone else's. In the weeks before Purim started, I'd watch my mom make enough hamentaschen to feed a small army - but by the end of Purim, we'd have only one small box left, and lots of slightly-less-delicious hamentaschen from friends. Call me biased, but every year, I became something of a hoarder, finding and saving my favorite (poppy!) cookies before they were gone for another year.

1-DSC_0748
1-DSC_0748

Why not make more? Because "these hamentaschen came together in a flash!" said no one, ever. But the fruits are worth the labor. And while I always make some poppy seed filling for myself and the three other people who enjoy it, this year, I've found a real crowd-pleaser: raspberry chocolate filling.

1-DSC_0675
1-DSC_0675

(For those of you who looked at this picture and balked, fret not! Shortcuts after the jump.)

1-DSC_0689
1-DSC_0689
1-DSC_0695
1-DSC_0695

The filling isn't a sauce, but it isn't jam, either. Cathy, who shared a Christine Ferber recipe that I then adapted for this purpose, calls the mixture "chocolate raspberry whatever." It's a fitting name for an indescribable but very good thing. One batch will fill about 50 hamentaschen, but if you find yourself sneaking spoonfuls of the stuff straight, don't say I didn't warn you.

1-DSC_0763
1-DSC_0763

The easiest way to make chocolate raspberry whatever is to mix a jar of raspberry jam with the listed amount chocolate and a squeeze of lemon juice. If you're in the mood for some fussing, you won't regret making the riff on Cathy's recipe that I share below.

1-DSC_0774
1-DSC_0774
1-DSC_0789
1-DSC_0789

I'm planning to take a couple three-pointed cookies in to work this week, if only to elicit the legitimate questions, "whaaa?" and "why not just make sandwich cookies?" Because then it wouldn't be Purim. (Though, this recipe would make a damn good sandwich cookie. If you try that out, give a shout in the comments.)

1-DSC_0810
1-DSC_0810

GIVEAWAY RESULTS! Thanks to everyone who participated in last week's Shabby Apple giveaway. I picked a random number using the random number generator, and the result is below:

random number
random number

Of the 31 comments not including duplicates and mine, lucky #22 won - congratulations Laura! The lovely folks at Shabby Apple will get in touch with you shortly.

Onward: let's make some hamentaschen.

Raspberry Chocolate Hamentaschenadapted from my mom and Mrs. Wheelbarrow Makes 75 cookies

the dough: 10 1/2 tablespoons butter 1/2 cup sugar 1 large egg 1 teaspoon vanilla extract zest of 1 lemon 1 teaspoon baking powder 1/2 teaspoon salt 2 1/4 cups flour, plus another 1/2 cup for rolling out the dough

For the filling: 12 oz. frozen raspberries 1/2 cup sugar juice of half a lemon 3 oz. bittersweet chocolate

First, make the sauce: Put the raspberries in a microwave-safe bowl, and heat until raspberries have thawed and exuded their liquid, about 2 minutes. don't stir the berries at all. Just let them heat up and let out their liquid. Once raspberries have thawed, strain them and either discard the liquid, or save it for another purpose.

If you want an extra-smooth filling, pass the raspberries through a food mill. This is totally not necessary.

Put the raspberries, sugar, and lemon juice into a medium pot, and heat on medium heat for a few minutes, until the sugar dissolves. Remove from the heat, and, if you didn't pass the raspberries through a food mill earlier, use a fork to mash them up now.

Add in the chocolate, return the pot to the heat, and bring just to a simmer, stirring frequently. Simmer for about 5 minutes, stirring frequently, until sauce has thickened slightly and is uniform in texture. Remove from the heat, transfer to a bowl, and either set over an ice water bath (which will cool the sauce in 10 minutes flat) or transfer to the fridge for 1 hour.

Make the dough: In the bowl of a stand mixer, cream butter and sugar for about 1 minute on medium speed. Add the egg and lemon zest, and mix 1 minute more, scraping down the bowl a couple times in between.

In a separate bowl, combine baking powder, salt, and flour. Add the dry ingredients to the butter mixture, and mix on low speed just to combine.

Gather the dough into plastic wrap or a plastic bag, compress into a solid disk, and refrigerate 30-45 minutes (much longer, and it’ll be tough to work with).

Preheat the oven to 375 degrees and line 2 large baking sheets with parchment paper or silpat.

Sprinkle a work surface liberally with flour, and roll out the dough to 1/8-inch thick. Use a 2.5-inch cutter to cut disks of dough, and immediately plop the disks onto the lined baking sheet. When the work surface is floured, the disks will pop right out when you pull up the cutter. If not, don't worry - just use a bench scraper or metal spatula to lift the disks and put them onto the baking sheet. Don't worry about spacing the disks evenly; these hamentaschen don't need much breathing room, and folded hamentaschen take up much less space than the disks.

This dough has very little liquid, so it lends itself well to re-rolling scraps. I generally work with half the dough at a time, and refrigerate the bunched scraps from one round while I bake the next batch. My oven only fits one of my cookie sheets at a time, but if yours fits multiple, feel free to shape and bake these in fewer batches than I did.

Once you've got a baking sheet full of disks, prepare your workstation: bring over your cooled filling and two small spoons, fill a small bowl with water, and get out a pastry brush.

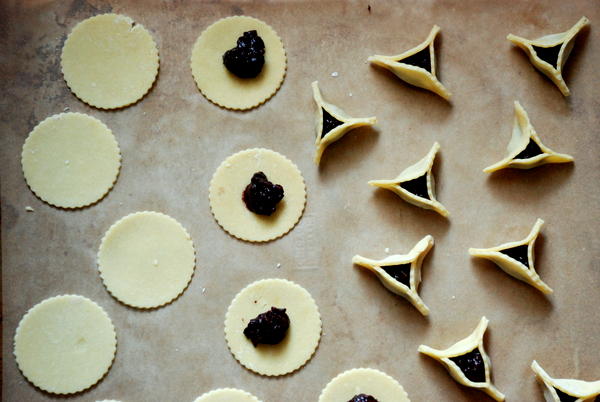
Put a scant teaspoon of filling into the center of each disk. Use the pastry brush to brush water along the edge of each disk, and then use your thumbs and pointers to fold each disk into a triangle shape (see here for pictures).

Bake cookies for 15 minutes, until tops are slightly golden. Remove from the oven and let cool for 10 minutes before transferring. Meanwhile, fill your second sheet with cookies. By the time round 2 is ready to bake, round 1 will be cool enough to transfer, and that baking sheet will be free for batch 3.

Hamentaschen will keep in an airtight container for at least a week, probably more. They also freeze very well.

In cookies and bars, events
14 Comments
Share

Caramelized White Chocolate Rhubarb Bars

May 17, 2012 Rivka
caramelized white chocolate rhubarb bars04

DC may not have local lemons. It may not have a growing season nearly as long as its sub-Mason-Dixon-Line location would suggest. But it does have beautiful spring produce, and it's out in all its glory for one precious month. (Isn’t it ironic, then, that just last week I discovered a great new way to prepare beets, and can’t stop, despite this being the moment to obsess over asparagus? Sigh. Beet recipe to come.) In last week's three-market crawl, I saw beautiful asparagus, but also ramps and strawberries, and even some first-of-the-season tomatoes. And of course, I also saw plenty of beautiful, red rhubarb.

Suspend your disbelief that that the reddest rhubarb I found was $7/lb. That’s an obscene price. And no, I don’t think there’s anything wrong with being appalled at the price of farmers’ market produce; I’m not looking for $5 brisket, but just because it’s local and sustainable doesn’t mean I need to spend $20 to buy enough rhubarb for one pie. Off the soapbox: there are more reasonably priced stalks to be had. Last week I bought a big bunch from Dupont - I think from New Morning Farm – at roughly $4/lb, and earlier this week proceeded to make what is most certainly my new favorite way to use the stalks. I'm sure you're as surprised as I am that it involves like half a pound of butter. Sometimes, the world is cruel that way. A few extra laps at boot camp, and all that jazz. These bars are worth it.

Let’s put a finer point on this. It's probably not surprising that when you combine a buttery shortbread crust, shards of good white chocolate, rhubarb cooked with whiskey, (yes, whiskey)and crunchy crumb topping, you end up with something you'd happily scarf by the pound if it had any nutritional value probably be willing to make again.

caramelized white chocolate rhubarb bars06
caramelized white chocolate rhubarb bars05

But there is something surprising about these bars. It’s that white chocolate. See, it isn’t white. Not even close. More like deep camel-brown. That’s what happens when you stick it in the oven, stirring intermittently, for the better part of an hour. What was an innocent bar of sweet cocoa solids becomes creamy and smooth, deeply colored and textured, and nutty in fragrance and in taste – almost like really, really good almond butter. But way better. People, this stuff is liquid gold.

Ever since discovering the recipe for caramelized white chocolate via David Lebovitz, I’ve not stopped playing with the stuff. I’ve added it to cakes (as has he), spread it on toast, and eaten more than I care to admit straight out of the bowl. But this latest experiment really put it over the top. It’s a match made in heaven: the chocolate smoothes out rhubarb’s rough edges and deepens its flavor. It also conveniently insulates the shortbread crust from softening too much. The resulting recipe is something of a project, but worth the elbow grease and patience involved.

Speaking of elbow grease: When you first remove the chocolate from the oven, especially at the later stages, it will look a bit crusty. Please don't fret. Just start stirring it, slowly but surely, and it will evolve from crystallized and chunky to ever-so-smooth. Just look at the photos below.

caramelized white chocolate rhubarb bars11
caramelized white chocolate rhubarb bars10
caramelized white chocolate rhubarb bars09
caramelized white chocolate rhubarb bars07
caramelized white chocolate rhubarb bars08

If you’ve ever made and/or experimented with caramelized white chocolate, do share in the comments: what have you made? What’s been super delicious? What should I make next? I’ve got a little bowl of the stuff dangerously sitting around, and if I don’t act fast, well… you know what’ll happen.

caramelized white chocolate rhubarb bars02

Caramelized White Chocolate Rhubarb BarsDeveloped using adaptations of recipes by David Lebovitz, Martha Stewart, The Joy of Baking, and Bon Appetit

As I said, this recipe is a bit of a project, with so many different components. If you're not up for 4 different steps, feel free to skip caramelizing the white chocolate. One source of the idea to combine these flavors was a Bon Appetit recipe for a white chocolate rhubarb tart, and there, the white chocolate is just straight-up. I've no doubt the result will still be delicious.

For the Crust: 1 cup all-purpose flour 1/4 cup powdered sugar 1/4 teaspoon salt 8 tablespoons very cold unsalted butter, cut into small pieces

For the filling: 1/2 pound white chocolate

5 cups (about 1 1/2 pounds) 1-inch pieces rhubarb 1/3 cup plus 1 tablespoon sugar 2 tablespoons whiskey

For the crumb topping: 6 tablespoons unsalted butter, melted, plus room-temperature butter for pan 1 cup all-purpose flour, (spooned and leveled), plus more for pan 1/2 cup packed light-brown sugar 1/4 teaspoon salt

First, caramelize the white chocolate: I have found David Lebovitz's recipe to be pretty much fail-safe. He has you preheat the oven to 250°, put the chopped chocolate in a single layer on a baking sheet, and cook it for anywhere from 30-60 minutes, removing it at 10-minute intervals and stirring/spreading it around to redistribute the chocolate. Here's the link to the full recipe.

That said, the last couple of times, I've actually done this on the stove. It's quite a bit riskier, because the chocolate can burn easily if you look away for even a second. That said, it takes only about 15 minutes to achieve thoroughly-caramelized chocolate, and there's something adrenaline-pumping about steering clear of the scorch while caramelizing something as delicate as white chocolate.

If you want to try it, you'll need a heavy-bottomed metal pan, a fork, and a silicon spatula. Heat the stove to medium-low, and melt the chocolate. Now, begin stirring. Start with the spatula, but as the chocolate fully melts, then begins to caramelize, you'll need to switch to the fork. Stir regularly, scraping little bits from the side as you would if you were caramelizing sugar. You don't want any of the chocolate to touch the bottom of the pan for too long, or it'll scorch. I told you, it's risky. But fun!

When your chocolate gets really stiff and/or begins to seize, remove it from the heat and stir vigorously. It'll calm down, and eventually, it'll return to its melty, delicious self. Repeat this on-off cycle for about 15 minutes, and eventually, you'll be rewarded with dark, caramelized white chocolate. Or just do it the fail safe way in the oven. Up to you.

Caramelized white chocolate behaves like regular melted chocolate: it'll harden as it sits, but it can easily be reheated in a microwave or over low heat.

Next, make the shortbread: Preheat the oven to 350°. In the bowl of a food processor or a stand mixer, combine flour, sugar, and salt, and blitz a couple times to combine. Add butter, and mix or process until dough comes together. Turn dough onto a lightly floured work surface, and using a light hand, turn it a few times to incorporate any errant bits.

Line an 8x8 pan with parchment paper, and press the tart dough into the lined pan. Aim for a uniformly flat square; you don't want the dough to creep up the sides. Anchor the dough by poking it in several places with a fork, then bake it for about 20 minutes, until lightly golden. Remove from the oven and allow to cool.

While the crust bakes, make the rhubarb filling: Combine rhubarb, sugar, and whiskey in a shallow saucepan and heat over medium until it starts to hiss. Cover pan and cook 6-8 minutes, until rhubarb is fully softened. Remove lid, raise heat to medium-high, and cook an additional minute or so, until juices evaporate. Stir rhubarb to break apart the individual pieces. You want the fruit to look uniformly blended, though it'll still have bits and strands in it, so it won't look smooth like a puree.

Make the crumb topping: Combine all ingredients in a small bowl, and use your fingers to mix them together.

Assemble and bake the bars: Spread the white chocolate over the shortbread crust, reheating it if it has solidified. Spread the rhubarb mixture over the chocolate, and sprinkle the crumb topping overtop.

Bake for 50 minutes, until crumb topping is golden and rhubarb is sizzling underneath. Let cool at least 1 hour before slicing and serving.

In cookies and bars
5 Comments
Share
← Newer Posts Older Posts →

Subscribe by email:

  • books (1)
  • crisps and crumbles (1)
  • frozen (1)
  • toys (2)
  • gifts (3)
  • egg whites (5)
  • fried (5)
  • how to use--- (6)
  • drinks (10)
  • menus (11)
  • travel (11)
  • fish (12)
  • kosher for passover (14)
  • thanksgiving (14)
  • vegan (20)
  • snacks (21)
  • techniques (21)
  • soup (26)
  • bread (28)
  • pies and tarts (28)
  • cake (33)
  • events (34)
  • condiments (36)
  • various and sundry (39)
  • uncategorized (42)
  • cookies and bars (46)
  • weekday lunch (47)
  • appetizers (48)
  • salad (51)
  • gluten-free (56)
  • comfort food (61)
  • breakfast and brunch (77)
  • sides (81)
  • dessert (90)
  • main dishes (100)
  • healthy (139)
  • easy (155)
  • vegetarian (180)

| LATEST |

Featured
Blue Chair Fruit's Black Raspberry Jam
Thai Grapefruit Salad
Mango Sticky Rice
Winter 2016: Odds and Ends
Povitica: The Best Babka Ever
Persimmon Walnut Bread
Sprout Chaat Salad + New Site!
Maple Walnut Squares
How to Give Thanks
Croissants (really, I made croissants) + other croissant-ish things

| hEALTHY |

Featured
Sprout Chaat Salad + New Site!
Fennel frond pesto + what to do with those pesky stalks
Asparagus Toasts with Pistachios and Mint
Eggplant-Walnut Pâté + Passover Ideas
1-DSC_0861-600x401.jpg
Lentils and Rice with Tamarind Sauce and Dukkah
Big Kale Salad with Pomegranate and Feta
Punchy Crunchy Ginger Salad

| BreakfAST |

Featured
Povitica: The Best Babka Ever
Croissants (really, I made croissants) + other croissant-ish things
Mushroom and Kale Breakfast Strata
Barley Porridge with Orange and Black Sesame
Ramps 'n' Eggs Biscuit Sandwiches
Asparagus Toasts with Pistachios and Mint
Apple-Cheddar Scones with Sage
Menemen - Turkish Eggs with Tomatoes and Peppers
You must select a collection to display.

© 2016 Rivka Friedman. All Rights Reserved.