• Home
  • About
  • Recipe Index
  • Contact
Menu

Rivka Friedman

Street Address
City, State, Zip
Phone Number

Your Custom Text Here

Rivka Friedman

  • Home
  • About
  • Recipe Index
  • Contact

Marion Cunningham's Nutmeg Muffins

March 15, 2013 Rivka
1-DSC_1062
1-DSC_1062

A few months back, I bought a cookbook for just one recipe. The book was Marion Cunningham's The Breakfast Book. The recipe was Cream Biscuits, i.e. the most perfect and foolproof biscuits that ever were. I read about them on Molly's site and knew at once that whatever book they were in was a book I should own.

I have something of a history when it comes to buying books based on one great recipe. When I was in college, I bought The New Best Recipe because a friend had made these thick and chewy triple chocolate cookies from it that absolutely blew me away. I bought Nigel Slater's Appetite because our friend Josh made this oxtail stew that had me going, against all good judgement, for a fourth helping. So I wasn't too worried that a biscuit recipe, already available online, had me jonesing for a book. I figured there were plenty of other things in it worth making.

Turns out, I was right.

Nutmeg Muffins were the second recipe I made from The Breakfast Book. The recipe jumped out at me because rarely, if ever, do you see nutmeg in the title of a recipe. Cinnamon, sure – that’s a flavor. I’ve had cinnamon cookies and cinnamon buns and even cinnamon ice cream. But nutmeg is a supporting cast member. It’s what makes béchamel sauce and cheese soufflé and eggnog taste so distinctive, but it’s also just barely there.

Nutmeg muffins aren't the sort of thing I’d think to make, but here was this book, which I’d bought on impulse because of some biscuits, and it was claiming the “Last Word in Nutmeg Muffins.” Better follow instructions.

I perched on a stool and dutifully grated one-and-a-half whole nutmegs. Did she really mean 1.5 whole nutmegs? Is it supposed to take this long? Am I really breaking a sweat from grating nutmeg? When it was all grated, I beheld the fruits of my labor:

1-DSC_0944
1-DSC_0944

That’s a whole lot of nutmeg. Yowza.

Mysteriously missing from the ingredient list? Vanilla. Or, come to think of it, any other flavoring at all. This is a bare-bones muffin batter with nutmeg carrying the heavy lift. After making them, and restraining yourself multiple times from adding just a splash of vanilla, you might be as surprised as I was to bite into a muffin still hot from its bake and learn that it is delicious.

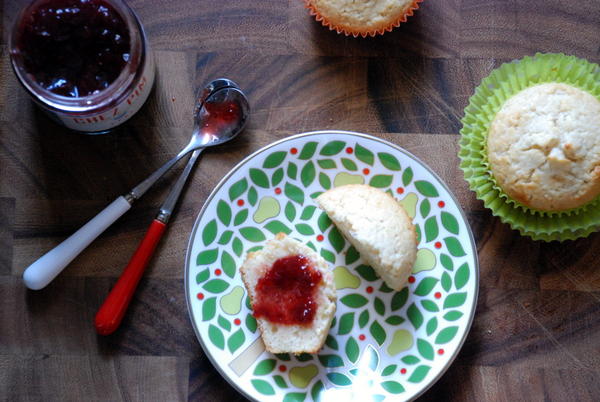
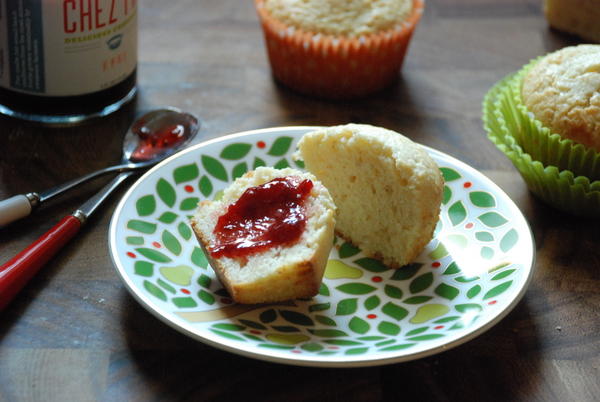
The nutmeg is a subtle flavor, but it isn’t bland. It’s there, and it’s actually quite complex, if you give it your attention.  With a spot of jam, these muffins are perfect. Having served them once to guests and once to just my unsuspecting wife, I guarantee folks will look at them puzzled and ask you what secret thing you tucked inside. You’ll tell them it’s just nutmeg; they won’t believe you. And then, maybe they’ll be as intrigued as I was by the subtle genius of this recipe that they’ll figure there must be other great recipes where it came from, so they’ll buy the book. And they’ll be right.

1-DSC_1078
1-DSC_1078

Marion Cunningham's Nutmeg MuffinsAdapted from The Breakfast Book Makes 12 muffins

Note: When making a bechamel or a souffle. maybe you use ground nutmeg from the jar. You can't do that here. Nutmeg is the star of the show; it must be fresh. You can get it at Indian markets, some Whole Foods, specialty stores, and online. As my friend Josh told me, the first time he cooked with fresh whole nutmeg, he promptly took his jar of ground nutmeg off the shelf and threw it away. Now that's a meaningful difference.

2 cups of flour ¾ cup sugar 1 tablespoon baking powder ½ teaspoon salt 1 ½ whole nutmegs, grated 1 egg ¾ cup heavy cream ¾ cup milk 5 tablespoons butter, melted

Preheat the oven to 400° and grease a muffin tin. Even if you line it with paper, spray the liners. These muffins really stick. If you have silicone liners, you’re in the clear. In a large mixing bowl, combine flour, sugar, baking powder, salt, and grated nutmeg. In a separate medium bowl, beat together the egg, cream, and milk until mixture is smooth. Add butter and stir to combine; little bits of the butter will solidify, which is totally fine.

Make a well in the center of your dry ingredients and add the wet ingredients all at once. Use a fork to mix the batter together just until the streaks of flour disappear. (Incidentally: have I ever told you that I mix almost all batter with a fork? Most are too thick for whisks. Forks are the secret weapon of batter mixing. Anyway.)

Use a ¼-cup measure to scoop muffin batter into the tins. You’re aiming to fill the tins ¾ of the way full. Once you’ve added batter to all 12 tins, distribute whatever’s left evenly.

Bake the muffins for 20 minutes, until just starting to turn light brown. Remove from the oven and set on a rack to cool for 5 minutes, or – whom are we kidding – be a good host and bring’em straight to the table so folks can dig in while they’re piping hot.

In breakfast and brunch, easy
1 Comment

Mushroom Tacos with Tomatillo-Chipotle Sauce

February 13, 2013 Rivka
DSC_0596
DSC_0596

I've been traveling a bunch for work, which has left our fridge less packed than usual. It's a bummer to open the fridge and so few bags of produce, but D gets positively gleeful about all the open space. O.C.D Organized people just love empty fridges, am I right?

With less time at home, I'm on the lookout for quick weeknight dinners that make use of whatever precious little food I've got in the fridge. Bonus points for dishes that aren't pasta, which is a fallback too often.

This week, I barely cooked at all. I only had one night in town when I wasn't working late, and our friend Abby was visiting from NY, so we met her at El Chucho, the new Mexican restaurant in Columbia Heights. It's got a dimly lit interior, tall tables and bar stools, and lots of bearded dudes in plaid shirts walking languidly around with plastic baskets in hand. Walk in, and you feel like you've walked into Brooklyn; Abby felt right at home. The food wasn't bad, the ambiance was fun, and margaritas were on tap. Of course. I bet we'll be back soon. Meanwhile, we're copying their dishes at home.

El Chucho had tacos de calabacitas on order, made with breaded fried squash. They were so addictive, we didn't miss the meat. When the weekend rolled around, I was hungry for more Mexican food but didn't have any squash on hand (it tends to be limp and sad in wintertime). I did have a bag of mushrooms that needed using, and a handful of tomatillos left over from the previous week's dinner party. I braced myself for a bit of fussing, figuring it was worth it - a craving is a craving, yes? But much to my surprise, dinner came together quite quickly. Corn tacos were heated. The mushrooms were tossed with a quick sauce of tomatillos and canned chipotles. Everything cooked through while I mashed up an avocado's worth of guacamole and opened a jar of the salsa I made this summer. We didn't have any queso at home, so I topped the tacos with a pinch of feta cheese, which in retrospect wasn't at all necessary. Done and done: dinner on the table in 20 minutes.

DSC_0576
DSC_0576

What I like most about these mushrooms is their versatility. I can see stuffing them into burritos or enchiladas, folding them into short vermicelli for a Mexican riff on fideos, or even adding some to a handful of melty cheese, piling the mixture into a flour tortilla, and making a mean quesadilla. They can go on pretty much anything. Come to think of it, they're the sort of thing I'd make a big bowl of, then tuck in the fridge for a busy day's dinner. Cooked mushrooms are smaller than raw ones; everyone's happy.

Mushroom Tacos with Chipotle Serves 4

For the mushrooms: 2 tablespoon olive oil, divided 2 cloves garlic, smashed and chopped 1/2 lb. tomatillos, husked, rinsed, dried, and roughly chopped 1 canned chipotle, chopped, plus 1 tablespoon of the canning sauce (start with half a chipotle if you're sensitive to heat) juice of half a lime 1 lb. cremini mushrooms, wiped clean and sliced salt

For serving: a big pile of small corn tacos guacamole and salsa (purchased is fine) queso fresco or feta cheese, optional

Put a large frying pan over medium heat and add 1 tablespoon olive oil. When oil shimmers, add garlic. Stir around to distribute, and cook for 1 minute. Then add tomatillos, stir into the garlic, and cook until they break down slightly, 2 minutes. Add chopped chipotle, stir through to incorporate, and cook until the mixture softens and becomes mostly smooth, about 2-4 more minutes. Spoon the sauce into a bowl, taste, and add salt or pepper as needed.

Give the pan a rinse and wipe it dry, then return it to medium-high heat and add the other tablespoon of olive oil. When oil shimmers, add mushrooms. Toss to distribute evenly, and then let them sit there for a few minutes, until the mushrooms on the bottom of the pan develop some color. Every couple of minutes, give the pan a shake to move mushrooms from top to bottom and vice versa. After 5 minutes or so, the mushrooms will have emitted enough water to shrink slightly, and the pan will be less crowded. When this happens, spoon in the tomatillo-chipotle sauce, stir it around to coat the mushrooms, and cook 1 or 2 more minutes, until mushrooms are coated and browned. Squeeze the half a lime into the pan, stir to incorporate, and turn off the heat. Scrape the mushrooms into the bowl that held the tomatillo-chipotle sauce. Wipe the pan out a bit, and return it to the heat.

Heat corn tortillas one at a time by leaving them in the hot pan just until warmed through (or, if you're crazy as I am, until the bottom of the tortilla is a bit brown and crispy), then stack them on a plate as they finish warming. When you've warmed enough tortillas for either one or two per person (depending on preference: I like two per taco, D prefers one), put the tortillas on plates, spoon some of the mushroom mixture onto the tortillas, and top with guacamole, salsa, and/or cheese. Serve immediately.

In gluten-free, main dishes, vegetarian, easy, healthy
1 Comment

Magic Chocolate Mousse, Some Other Ideas, and a Giveaway

February 11, 2013 Rivka
1-DSC_0592
1-DSC_0592

D and I aren't big on Valentine's Day. Forced romance and overpriced, heart-shaped dinners aren't our thing. However, I'll take pretty much any excuse to indulge in chocolate, so that, I'm on board with.

It's also my 30th birthday, which means I can do whatever I want. Right? Chocolate for all!

1-DSC_0581
1-DSC_0581

We celebrated with a couple close friends at a lovely, lovely dinner on Saturday night. This coming weekend, we're taking a ladies' trip to Spa World to celebrate three birthdays at once. But tonight, after a low-key dinner with the lady, I'll be spooning out a couple small bowls of this magic chocolate mousse, which requires only 2 ingredients (salt is optional) and tastes as decadent and as thoroughly chocolate as a good chocolate mousse should. 30 years of living and 2-plus years of marriage later, I've got more than a few gray hairs, and also a wee bit of combativeness about the wonder of chocolate. So I'm going to indulge; you only live once.

1-DSC_0587
1-DSC_0587

For the vegan and non-dairy inclined, this mousse can be made with chocolate and water. I prefer milk in my mouse, so I've used that here. Your choice. Either way, the process is dead simple: heat, then whip over ice water. That's really it.

And if you're feeling mighty adventurous, whip up a batch of caramelized white chocolate (which, incidentally, just got written up as a genius recipe by Kristen Miglore over at Food 52; it really is genius) and use that instead.

1-DSC_0595
1-DSC_0595

The recipe is below, and if you're curious to see a play-by-play, watch the bubbly and adorable Melissa Clark demonstrate the technique here.

I've got a couple other half-baked ideas percolating that don't yet merit a full post, but as a wise old woman of 30, I've decided to post them anyway. Food for thought.

1-DSC_0613
1-DSC_0613
  • Bake or Break has been in my Google Reader for years, but recently, I've gotten hooked on it all over again, and spent several afternoons digging through her archives. One recent recipe that I immediately flagged was her Italian Jam Crostada, a simple simple dessert made of shortbread, jam, and almonds. Last night, I finally got around to making it. I had about a tablespoon of orange marmalade left over from the croissant I'd had at Patika in Austin (sidebar: when pastries come with jam and you don't finish it, save it; you never know when it'll come in handy), so I folded that into the shortbread dough, and then used fig jam mixed with some lemon juice as my filling. The result was fantastic, and I'd urge you to make this with whatever jam you have lying around.
  • Tartine Bakery makes the best croissant I have ever eaten. The almond croissant I had in SF was so good that I got home, went right onto Amazon, and ordered their latest cookbook, Tartine Bread. I've got bread books from Peter Reinhart and Jim Lahey; I didn't exactly need another. I bought this book for the croissant recipe alone. Here's the irony: I still haven't made the croissants. What I have done is totally change the way I feed and use my sourdough starter. Tartine's method calls for less starter overall (which means less flour used on feeding each week) and a smaller portion of seed starter to make a loaf of bread. The smaller quantities suit my erstwhile approach to bread baking, and the new ratio produces a younger, milkier, less acidic-tasting loaf. I'm thrilled. And I haven't even made the croissants yet! More fun awaits.
  • Last but not least, I've become obsessed with chia pudding. Chia seeds look like a cross between poppy and flax seeds, they're high in fiber and omega-3, and best of all, they plump up in liquid. Add a few tablespoons to a cup of milk, and in about 10 minutes, you'll have something that resembles tapioca pudding. I've added them to my breakfast rotation, mixing a few tablespoons with a cup of either milk or yogurt, a bit of honey, and some chopped fruit. I pour the whole thing into a jar, and by the time I get to work, I've got pudding. It's great. You can get chia seeds at health food stores or online.

And hey, happy un-birthday to you!  The kind folks at Shabby Apple have created a giveaway just for NDP readers: they're offering 10% off of any Shabby Apple apparel for all readers using the coupon code notderbypie10off. Even better, one lucky reader will win a $100 giftcard to Shabby Apple. Check out all these adorable aprons! Personal favorite: blackberry pie.

Entering is really easy. All you have to do is "like" Not Derby Pie's facebook page, "like" Shabby Apple's page, and leave a comment below. I'll pick a winner at random next Monday, February 18th. Good luck!

Hervé This' Chocolate Mousse Serves 4

One note about using milk: if you use skim, you can disregard this. Skim has the same fat content as water. But if you use milk with some fat in it, you may need to add a few more drops than you would otherwise. a scale is very helpful in executing this recipe, but if you don't have one, I would start with what looks like a bit less than 3/4 of a cup, and only add if necessary. The melted liquid should have roughly the thickness and texture of whipping cream (go figure). If it thickens too quickly when you put it over ice, just remelt, add a few more teaspoons of liquid, and march on.

8 oz. high-quality chocolate 6 oz. water or milk (roughly 3/4 cup - see headnote) ice cubes whipped cream for topping, optional

Pour water into a small saucepan, add chocolate, and stir over medium heat until chocolate has melted and you have a homogenous sauce.

Put the saucepan into a bowl partly filled with ice cubes and a half-cup or so of water (or pour into another bowl over the ice -- it will chill faster), then whisk the chocolate sauce by hand (or, if you must, with an electric mixer) until a mousse forms.

No, seriously. That will happen.

Spoon immediately into ramekins or serving bowls, top with whipped cream if using, and either serve immediately, or let set in the fridge before serving. If you're feeling crazy, sprinkle a bit of flaky salt on top. Grand.

I made this once a couple years ago and it failed, but I've since made it three times (all this week) with success. Kristen says that three things can go wrong: if the mixture doesn't set, it probably doesn't have enough chocolate. Remelt, add more chocolate, and whisk again. The opposite can happen, too - a very stiff mouse would benefit from a bit more water. Remelt, add water, repeat. Lastly, if your mixture is too grainy, you overwhipped it. No problem: just remelt and whisk up again - no need to add anything.

Happy baking!

In dessert, events, easy
35 Comments

Fasolakia: Greek Braised Green Beans

January 15, 2013 Rivka
DSC_0089
DSC_0089

Well clearly, it's January. I got to the gym yesterday morning and my god was it crowded! You can practically taste the hope in the air. So much ambition, so many plans. Resolutions abound.

It's the second week of January, so I trust we've moved past the "I only eat raw vegetables" phase and are drifting back to real life. By real life, I mean "it's 6:30 and I just got home and I'm hungry enough that if I don't eat actual dinner right now I'm gonna go medieval on the chocolate bar in the drawer." That kind of real life.

For days like those, consider this fasolakia. Faso-what? It's a Greek dish of  green beans braised in tomato sauce. It's healthy. It's easy. Not only can you make it in advance, you should; it gets better with time.  And - here's something you can't say about that many dishes made of green beans - it's addictive. It's also gluten-free and can be vegan very easily. What other boxes can I check?

DSC_0744
DSC_0744
DSC_0740
DSC_0740

I've no clue what's traditional - stovetop or oven. What I can tell you is that both work very well: the trick is to go low and slow. Gentle heat coaxes these green beans into velvety, sweet submission. The dish starts with onions and some herbs and spices, but tomatoes do a lot of the work here, transforming into a mellow, luscious sauce for the beans with just a few soft pieces left whole.  I'm guessing the Greek way is to serve this atop rice, which soaks up the sauce. I just serve it as a vegetable alongside fish or a savory tart.

If I'm being honest, I should call these not-strictly-Greek green beans. My brother spent last year in Ankara, Turkey, and he brought me back a huge bag of the best urfa biber I've ever had. It's sweet and smokey, redolent of chocolate and berries. I've been putting it on everything, and these green beans were no exception. I love how it made an ordinary can of chopped tomatoes taste really special. If you don't have or can't find urfa biber, you can use any sweet-smelling chile or paprika. You may want to cut the quantity, though, if your chile is spicy; my urfa is pretty mild.

DSC_0081
DSC_0081

On serving them vegan: the first time I made these green beans, I forgot that I'd set aside some feta to sprinkle overtop. No one noticed, and the beans didn't suffer one little bit. They're so flavorful as is, they don't even need the cheese.

And while I'm dispensing tips, make a double batch, or even a triple. You can keep the beans in the fridge for at least a week with no problem, and they freeze beautifully as well. Hello, new favorite weekday lunch.

DSC_0091
DSC_0091

Fasolakia: Greek Braised Green Beans

3 tablespoons extra virgin olive oil 1 large red onion, diced 3 cloves garlic, smashed and then chopped 2 tablespoons urfa biber or other very fragrant mild chile flakes (less if using something spicy) 1 1/2 lbs. green beans, trimmed and cut into bite-sized pieces 1 28-oz. can diced tomatoes or, if you'd like a more irregular texture (which I do), canned whole tomatoes that you cut or tear yourself 1 teaspoon dried oregano 1/2 cup chopped parsley 1/2 cup chopped dill 1/2 cup crumbled feta cheese, optional

If using the oven, preheat to 285 degrees. If planning to cook on the stove, no need to preheat the oven.

In a large pot or deep pan, heat the olive oil over medium heat until it shimmers. Add onion and a big pinch of salt, and cook until soft, about 7 minutes. Add garlic and chile flakes, stir to combine, and cook another minute or so.

Add green beans, tomatoes, oregano, another big pinch of salt, and a few grinds of the pepper mill, and stir a few times until everything is well mixed. Bring to a very gentle simmer over medium heat.

At this point, cover the pot, and either turn the heat down as low as it'll go, or stick the pot into your preheated oven, and cook the green beans until soft an velvety, about 1 hour. When the green beans are cooked, taste and adjust seasoning, adding more salt, pepper, or chile, to taste. To serve, reheat green beans to a very gentle simmer, then stir in parsley and dill, reserving a bit of each to sprinkle overtop. Finish with the rest of the fresh herbs and a sprinkle of feta, if using, and serve hot.

If not serving immediately, store green beans either at room temperature (for up to a few hours) or in the refrigerator (for several days). These green beans also freeze very well.

In gluten-free, sides, vegetarian, weekday lunch, easy, healthy
7 Comments
← Newer Posts Older Posts →

Subscribe by email:

  • books (1)
  • crisps and crumbles (1)
  • frozen (1)
  • toys (2)
  • gifts (3)
  • egg whites (5)
  • fried (5)
  • how to use--- (6)
  • drinks (10)
  • menus (11)
  • travel (11)
  • fish (12)
  • kosher for passover (14)
  • thanksgiving (14)
  • vegan (20)
  • snacks (21)
  • techniques (21)
  • soup (26)
  • bread (28)
  • pies and tarts (28)
  • cake (33)
  • events (34)
  • condiments (36)
  • various and sundry (39)
  • uncategorized (42)
  • cookies and bars (46)
  • weekday lunch (47)
  • appetizers (48)
  • salad (51)
  • gluten-free (56)
  • comfort food (61)
  • breakfast and brunch (77)
  • sides (81)
  • dessert (90)
  • main dishes (100)
  • healthy (139)
  • easy (155)
  • vegetarian (180)

| LATEST |

Featured
Blue Chair Fruit's Black Raspberry Jam
Thai Grapefruit Salad
Mango Sticky Rice
Winter 2016: Odds and Ends
Povitica: The Best Babka Ever
Persimmon Walnut Bread
Sprout Chaat Salad + New Site!
Maple Walnut Squares
How to Give Thanks
Croissants (really, I made croissants) + other croissant-ish things

| hEALTHY |

Featured
Sprout Chaat Salad + New Site!
Fennel frond pesto + what to do with those pesky stalks
Asparagus Toasts with Pistachios and Mint
Eggplant-Walnut Pâté + Passover Ideas
1-DSC_0861-600x401.jpg
Lentils and Rice with Tamarind Sauce and Dukkah
Big Kale Salad with Pomegranate and Feta
Punchy Crunchy Ginger Salad

| BreakfAST |

Featured
Povitica: The Best Babka Ever
Croissants (really, I made croissants) + other croissant-ish things
Mushroom and Kale Breakfast Strata
Barley Porridge with Orange and Black Sesame
Ramps 'n' Eggs Biscuit Sandwiches
Asparagus Toasts with Pistachios and Mint
Apple-Cheddar Scones with Sage
Menemen - Turkish Eggs with Tomatoes and Peppers
You must select a collection to display.

© 2016 Rivka Friedman. All Rights Reserved.