 Catering? Moi? Uh, NO. Not exactly. I'm flighty, forgetful, and a host of other wonderful things that don't mix with catering. And yet, today, my mom and I cooked and served brunch to a party of 8 at their home. The brunch was an item that my mom had offered in a silent auction at work; I'm a sucker for all things food-related, so when mom enlisted my help, I happily agreed.
Can I tell you how utterly shocked I am that brunch today went PERFECTLY? I mean, without a hitch. Not a single issue. Nothing forgotten, undercooked, overcooked, gross-tasting; everything plated on time, ready to go, delicious. I'm in awe of my beginner's luck. In awe, I tell you.

To be fair, we really lucked out. The couple that won our item has a beautiful and spacious house with a tricked out kitchen that's about the size of my whole apartment building. Mom and I hardly noticed each other in the kitchen, there was so much room. And we're used to working together in the house I grew up in, which has an itsy bitsy kitchen; we're the only two people who can happily coexist in that kitchen.
Also, the hosts had two ovens with pure-convection settings, so our finished dishes could be held at 135 degrees until they were ready to eat. That was very, very helpful. And on top of the space and equipment, the hosts and their guests were very chill, making the whole experience relaxed and enjoyable for the cooks as well.

In our post-mortem session during the drive home, mom and I agreed on the elements that were key to our success. First, in menu-planning, I made sure that the dishes were manageable given our timeframe. Specifically, each dish required either time to cook or time to plate, but not both. Second, when selecting recipes, I kept an eye out for things that people tend to like, even if I myself don't care for them. Best example was the french toast we made, which was stuffed with a cream cheese and apricot mixture. I don't much care for creamy things like that, but people swooned over it. Recipe to come in a later post, I promise.
Even with the caveats, I'm totally impressed that we made it work. And by made it work, I mean kicked its butt, hit it out of the park. We kinda rocked today! As you can tell, I'm really proud of our success. So proud, in fact, that when the guests asked if I was up for hire, I didn't hesitate to say "YES."

Don't worry, I'm not quitting my day job -- but I would totally, totally do this again. For money. And truthfully, considering the actual cost of brunch (inexpensive) and the relative bang for buck (diners thought it was fancy and delicious), I think I could make it worth my while. We'll see.
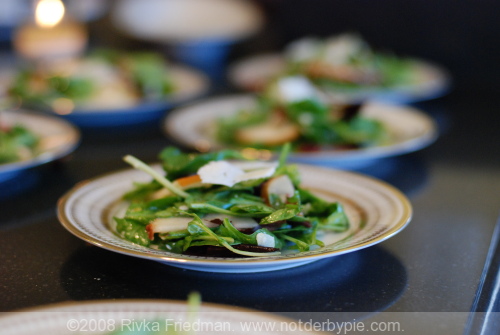
But all that's just prologue to today's recipe, a salad that will convert even the most adamant leaf-haters. It's dead-easy to make, and friendly to december's ever-dwindling supply of nice salad veggies. Best of all, it's freakin' delicious. Pics are from today's catered affair, with more pics and recipes to follow as I gather steam.
Hope you all had a lovely weekend!
Winter Salad with Pears and Manchego
adapted from Epicurious
1/3 cup green (hulled) pumpkin seeds (pepitas; not toasted)
1/3 cup plus 1 tablespoon olive oil, divided
3 tablespoons Sherry vinegar (I used champagne vinegar)
1 teaspoon mild honey
1 teaspoon grainy mustard
8 cups packed salad greens, such as radish greens, spinach, watercress, and arugula, tough stems discarded
1 (1/2-pound) piece Manchego cheese, rind removed and cheese shaved into thin slices (preferably with a cheese plane) -- please don't measure greens. it's ridiculous. just use a package or two.
2 small red or yellow Bartlett pears, sliced thinly
preparation
Cook seeds in 1 tablespoon oil in a small heavy skillet over medium-low heat, stirring frequently, until puffed and beginning to brown, about 4 minutes. Transfer with a slotted spoon to paper towels and reserve oil. Season seeds with salt and pepper.
Whisk together vinegar, honey, mustard, 1/4 teaspoon salt, and 1/8 teaspoon pepper. Add remaining 1/3 cup olive oil and reserved oil from skillet in a slow stream, whisking until emulsified.
Toss greens, half of cheese, and pear slices with dressing. Divide among salad plates. Top with remaining cheese, and sprinkle with seeds.
Cooks' notes
· Pumpkin seeds can be toasted 2 days ahead and kept separately from oil, covered, at room temperature.
· Greens can be washed and dried 1 day ahead and chilled, wrapped in paper towels, in a sealed bag.
 Before you get annoyed that the title of this post is dramatic without being descriptive, consider the following: this recipe has 6 ingredients, including salt. It takes 25 minutes start to finish and is easily the most delicious cauliflower dish I I've ever had ever ever. Ever. Better to tell the world how wonderful it is than to try to name what can only be described as good, yes?
 I know I've posted caponata on the blog before, but it's such a go-to recipe that I'm not surprised to see it up here again. Caponata is easy to make, very flavorful, and a true crowd-pleaser, even among the most carnivorous eaters. I made it this time as my contribution to a potluck lunch at work in honor of a colleague's last day, and was quite surprised by how popular it was with the meat-lovin crowd. I promised them I'd post the recipe, so even though I've already got a caponata recipe on the blog, here's one more.


 It's not every day that a half-eaten fruit turns into something truly out-of-this-world. I suppose I should thank the odd confluence of events that brought about these treasures: one, I bought a mandoline last week. After reading oodles of reviews about the best mandolines on the market, I learned that the two cheapest models (the Benriner and the OXO) are actually the best. My waffling back and forth about whether the 75 bucks was worth it was for nothing: I threw restraint out the window and got my new toy guilt-free. That's one.

