• Home
  • About
  • Recipe Index
  • Contact
Menu

Rivka Friedman

Street Address
City, State, Zip
Phone Number

Your Custom Text Here

Rivka Friedman

  • Home
  • About
  • Recipe Index
  • Contact

Cypriot Greens and Cheese Pie

May 9, 2013 Rivka
1-DSC_0666
1-DSC_0666

Sometimes, when I really want to share a recipe with you, I go a little nuts with the testing and tweaking. The recipes I get most jazzed about are the ones I want to be most perfect. So I make the thing 5 or 6 times, fussing with quantities and baking times and potential extra ingredients, all so that when you make it yourself, it's not almost perfect, it's actually perfect.

This recipe had me at hello. I made it once, and immediately knew how I'd change it for posting. Chick-chock, were headed straight for primetime. Amazing!

I sat down in front of my computer and opened up a blank page. Now then: what to call it?

Uh.

Guys, I made this in March. Only now, practically mid-May, do I finally have a title that's clear enough to tell you what you're making. And I feel like if I just explain what's actually in this thing-I-decided-to-call-a-pie, you'll see why it was so hard to figure out what it actually should be called - and you won't think I'm a total nutcase. But you will make it, yes you will, because it really is fantastic. So here goes.

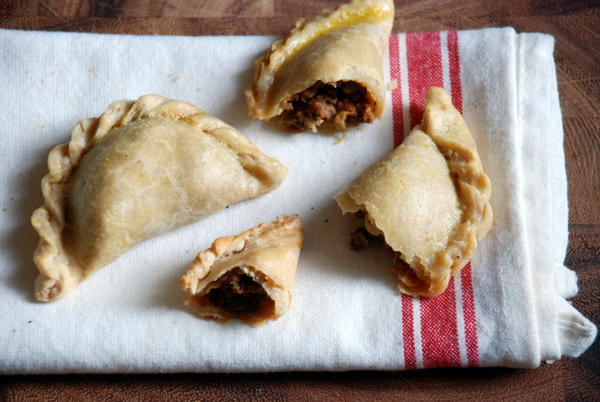
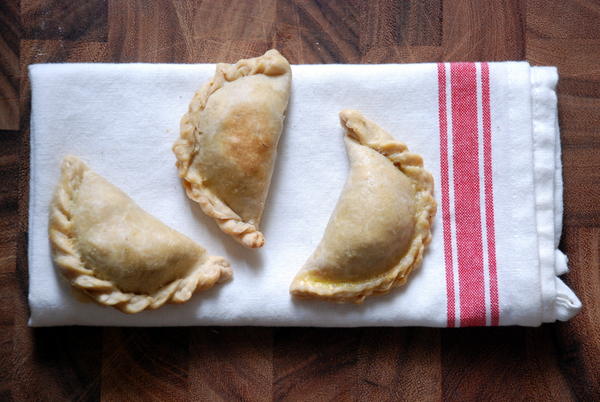
The pie started with a recipe from The Traveler's Lunchbox for flaounes, Greek Easter pastries. Right, I don't celebrate Easter. But flaounes looked really really good, so they've been in my to-make folder ever since Melissa posted about them in 2010. In typical "I have too many recipes in my inbox" fashion, it took me until March to make them. The savory, triangular pastries seemed like the perfect companion to the hamentaschen I was already making for Purim. They were a big hit among friends.

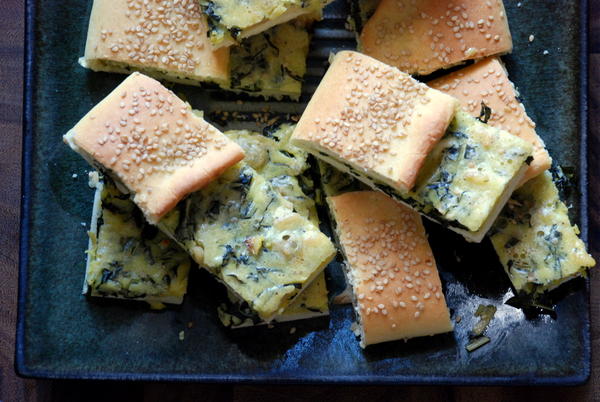
But they were kind of fussy, with all the rolling and cutting and folding and pinching. And triangle pastries are a tough sell for a main course at a dinner party - they feel more like a snack. Between you and me, I don't need cheese-filled dough lying around at snacktime. So on my next attempt, I went for a big slab pie. One piece of dough, rolled into a half sheet pan, filled with all the good stuff, and bam: lunch.

1-DSC_0691
1-DSC_0691

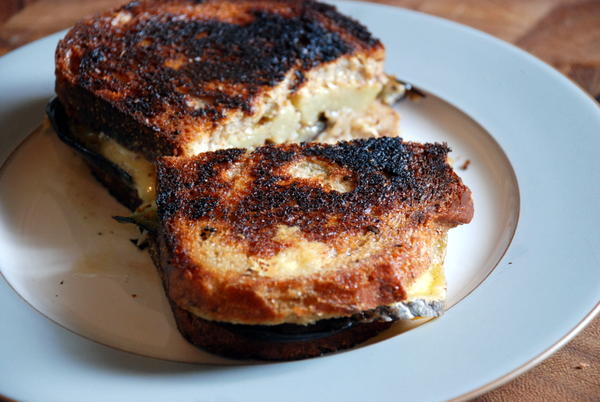
And a really good lunch at that. It reminded me a bit of those British "lunch dishes" that Nigella Lawson and others have written about: simple dough, stuffed with meat or cheese, baked till bubbly, then sliced and served just in time for the hunger pangs to strike. This was that. Incidentally, the leftovers kept quite well in the fridge. A 300-degree oven for 10 minutes did the trick in reheating, but once I even tried popping a slice in the toaster, which was quicker and more energy efficient.

1-DSC_0715
1-DSC_0715

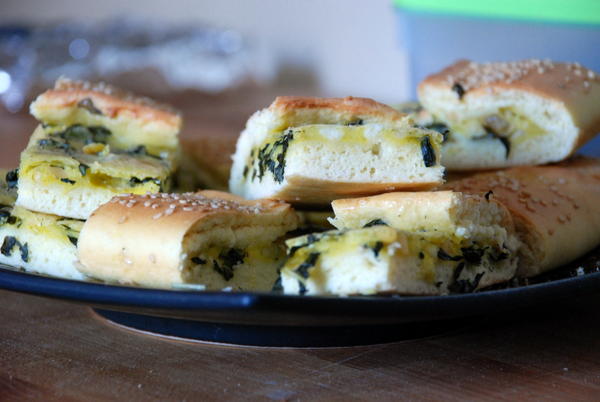
Now then: what to call the flaounes-turned-pie? Flaounes probably means about as much to me as it does to you, which is to say, very little. I wanted you to know that this thing is loaded with greens and cheese. But let's be honest: it's not really a pie. Pie signals buttery, crumbly crust, which isn't what you'll get here. Instead, you'll be making something more like a bread dough. It rises and puffs in the oven, and its exterior develops a sheen not unlike brioche or challah.  I thought about casserole, but that didn't seem right, either. Maybe "cheesy bread?

1-DSC_0727
1-DSC_0727

So forgive the slightly misleading name. Maybe let's just call this lunch.

Cypriot Greens and Cheese Pieadapted from The Traveler's Lunchbox

I baked my pie lunch dish in a half-sheet pan, which is 13" x 18". If you don't have a half-sheet pan, you can easily divide your dough in half and make two pies in two quarter-sheet (9" x 18") pans.

The mastic and machleb are quite distinctive, and they're what give the dough its unique flavor. They're available on Amazon (each linked appropriately0 but also on Kalustyans. As good as they are, though, you can skip them and still end up with a delicious dish.

For the dough: 5 cups (700g) all-purpose flour 1 1/2 teaspoons instant yeast 1 1/2 teaspoons salt 1 teaspoon mastic, ground in a mortar (optional; also called mastica) 1/2 teaspoon ground mahleb, (optional; also called mechlepi) 1 tablespoon sugar 3 large eggs 1/2 cup (125ml) milk 1/2 cup (125g) butter, melted and cooled 1/4-1/2 cup (60-125ml) lukewarm water, or as needed vegetable oil, for greasing bowl and work surface

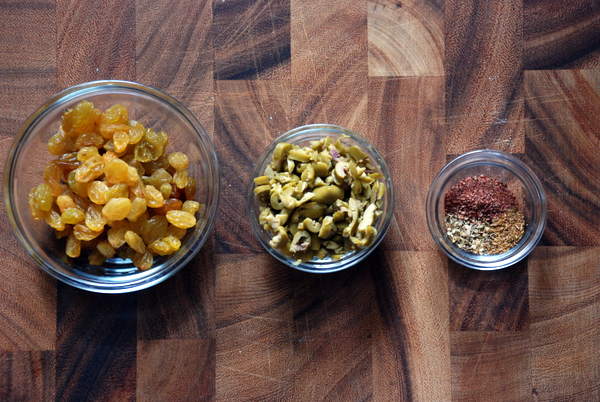
For the filling
: 1 lb 2 oz (500g) halloumi, kashkaval, pecorino, manchego, or a mixture of these cheeses, grated 1 1/2 tablespoons flour 7 large eggs; save a bit of one of the eggs for brushing on the dough 2 tablespoons dried mint 1/2 cup (50g) raisins or currants 8 oz. kale, chard, or other greens, shredded 1 teaspoon baking powder

1/3 cup sesame seeds

In a large mixing bowl, mix the flour, yeast, salt, mastic, mahleb, and sugar. In a separate bowl, whisk together the eggs, milk and butter and add this to the flour. Add as much water as needed to get a soft but kneadable dough (I needed only 1/4 cup plus 1 tablespoon). If it's too sticky to knead, add additional flour by the spoonful until you can knead it with clean hands without it sticking to your fingers. Turn the dough out onto a lightly oiled surface and knead until the dough is smooth and springy, about 5 minutes. Form the dough into a ball. Wash out the bowl, pour about a teaspoon of oil into the bottom, and put the dough in, rolling it around to coat it with the oil. Cover the bowl with a cloth and leave for about an hour, or until doubled in size. Fold the dough over itself a couple of times to deflate, cover the bowl with plastic wrap and refrigerate for at least 2 hours, or up to 24.

Meanwhile, mix all the filling ingredients except the baking powder (and a bit of one of the eggs, for brushing) and set aside. If refrigerating the dough overnight, cover and refrigerate the filling too.

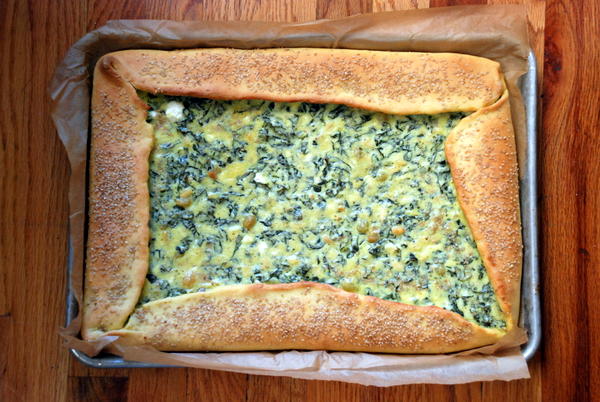
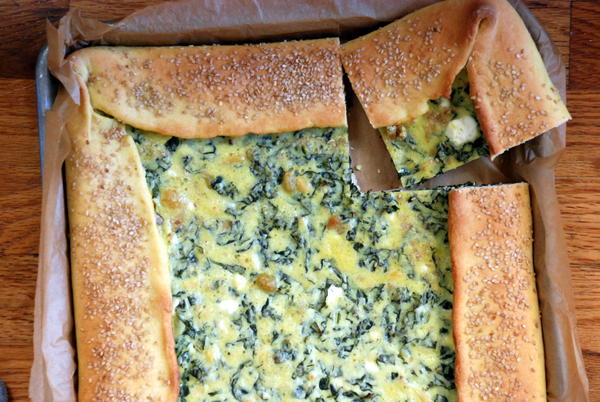
Line your rimmed half-sheet pan or two rimmed quarter-sheet pans with parchment paper that extends beyond the edges of your pan(s). Set the dough on a lightly floured workspace and roll out into a roughly 16" x 21" rectangle (if using a half sheet pan) or two 12" x "16" rectangles (if using 2 quarter-sheet pans). The exact shape of your dough doesn't matter - you're just going to fold the edges over the filling anyway, so don't sweat it. Just make sure the dough comes up past the edges of your sheet pan(s).

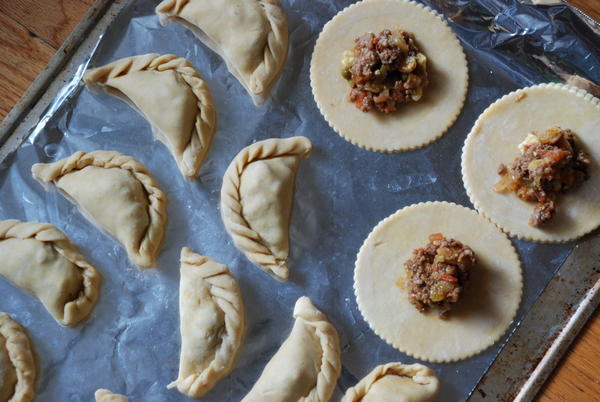
Pour the filling into the pan(s), and fold the edges of the dough over the filling. The dough edges won't even come close to covering the filling, and that's okay. You should wind up with a sort of funky looking half-crust, half-topping. See my photos above.

Brush the folded-over part of the crust with the reserved egg, and sprinkle sesame seeds onto the crust.

Let the pie rise on the counter for about 30 minutes. Halfway into the rise, preheat the oven to 375 degrees and set a rack in the center of the oven.

Bake the pie for 35-40 minutes, until the center is firm and the top of the crust is golden brown. Set the pan on a rack to cool for 10 minutes, then serve.

Pie can be reheated a 300-degree oven for 10-15 minutes, or by popping slices in a toaster.

In breakfast and brunch, main dishes, pies and tarts, vegetarian
4 Comments

Crispy Eggplant Ruben

April 22, 2013 Rivka
1-DSC_0619
1-DSC_0619

Over the years, my mother has taught me that rarely is restaurant food out of reach for the home cook. Once, she and I went to a Thai restaurant in Tenleytown; while I proceeded to heap spoonfuls of fish curry into my mouth, she speared a small piece of eggplant, took a bite, then another, and thought a long while before saying, “yep, I can make this one.” And sure enough, she did.

Since adopting her practice, I’ve made Thai pomelo salad, Indian dosas, and Japanese ohitashi. I’ve developed a habit that waiters and cooks are almost guaranteed to find horribly annoying, where after trying something especially delicious, I ask just a million questions about what’s in it, how it’s cooked, what spatulas they use to flip it, etc. What’s a girl to do? I can’t schlep out to Woodlands every time a dosa craving sets in.

But last week, I attempted a new party trick. This one’s called “recreate a restaurant dish you’ve never even tried.” Ballsy? Yes.

But you know what? It totally worked.

1-DSC_0541
1-DSC_0541

I encountered the Eggplant Ruben – or, rather, my friend Megan encountered it – when we went to DGS deli after work one day. What started as “just drinks” ended in hefty sandwiches and lots of napkins on the patio. I had my beloved pastrami, but Megan, a vegan, went with DGS’s Eggplant Ruben, a riff on the traditional meat-filled, Russian-dressing-oozing number. Two slices of rye bread, lots of spicy mustard, Russian, sauerkraut, Emmenthaler cheese (which, needless to say, they omitted for her) and two big slices of spice-rubbed fried eggplant. I’ll be honest: as I watched her bite down on that grilled beauty, I was a bit jealous.

1-DSC_0548
1-DSC_0548

So naturally, I did the only thing there was to do. I went straight to the market, bought an eggplant, and recreated the sandwich at home the next day. I didn’t have Emmenthaler at home, nor did I have Swiss (a natural substitute), but I did have a lovely sharp cow’s milk cheese from Cowgirl that melted perfectly. You, too, can use whatever you have on hand.

I read online that DGS used its pastrami spices to season the eggplant for the Ruben – that’s coriander, fennel, and black pepper. I ground equal measures of each with quite a bit of salt, and sprinkled that onto my eggplant before frying it.

When it came to frying the eggplant, I wanted soft insides and crispy outsides, but I worried about the eggplant-as-sponge problem, where the thing emerges flaccid and full of oil. To avoid this, I experimented with a couple different methods for crisping up the eggplant. First was this method from Danny Bowien, chef at the amazing Mission Chinese. Bowien has you soak the eggplant in ice water, which – in the words of Saveur – “shocks the surface of the vegetable and fills tiny air pockets between the cells, preventing the oil from entering them.” I believe that this works for Japanese eggplants, as he suggests, but my slices of regular eggplant did not take well to this approach.

Fortunately, my tried-and-true technique from Chow worked great here. Chow has you first steam the eggplant in a covered pan with a bit of water. Only after the eggplant has softened to you brush each side with oil to brown it. This way, each eggplant slice needs only a small amount of oil and still gets plenty crisped.

1-DSC_0574
1-DSC_0574

In this case, after steaming the eggplant, I brushed it with oil and sprinkled on the spices. I also added a few more drops of oil to the pan, because I wanted more than just a browned exterior – I wanted crispness. Feel free to adjust the oil used to your preference.

The rest is simple: good rye bread brushed with olive oil, plenty of mustard and sauerkraut, Russian dressing if that’s your thing (not mine), cheese, and the eggplant slices. Fry up the sandwich grilled-cheese style, and you’ve got yourself a bang-up lunch that'll please vegetarians and meat eaters alike.

1-DSC_0583-001
1-DSC_0583-001

Crispy Eggplant RubenInspired by DGS Deli Makes 2

4 slices rye bread 4 1/2-inch bias-cut slices of eggplant, scored in a crosshatch pattern 1/4 cup olive oil (or more, as needed) 1/2 teaspoon ground fennel 1/2 teaspoon ground coriander 1/2 teaspoon ground black pepper 1/2 teaspoon salt 4 slices Emmenthaler, Swiss, or other sharp, meltable cheese spicy grainy mustard Russian dressing, optional 1/2 cup sauerkraut

Cook the eggplant: Set a wide shallow nonstick or castiron pan over medium heat and add 2 tablespoons of water to the pan. Set the eggplant slices in the pan, cover with lid or foil, and steam for 2-3 minutes on each side, until softened but still fully intact and slightly firm. While eggplant steams, grind (if needed) and mix spices and salt in a small bowl. Remove then lid; all the liquid should have evaporated. If not, drain the pan.

Paint the face-up side of each slice of eggplant with a generous coating of olive oil. Sprinkle a bit of the spice mixture on top. Then crank the heat up to high, flip each eggplant slice over, and repeat brushing and seasoning on the second sides while the first sides crisp up. Fry for about 2 minutes on each side, until eggplant has crisp edges and a soft, tender center. Transfer to a plate in a single layer, lined with paper towel if you wish. Reduce heat to medium.

Prepare the sandwich: Lay the slices of bread on a work surface so the sides you eventually want on the inside of each sandwich are face-up. Spread slices with your perfect amounts of spicy mustard and/or Russian dressing. Lay two eggplant slices on one side of each sandwich.  Top each with sauerkraut and two slices of cheese. Lay the second slice of bread on top and press down firmly on each sandwich.

Add some olive oil to the pan. I like to add about half a tablespoon per side per sandwich, but you can also just brush each side of bread with olive oil, which probably uses less overall. Lay the sandwiches in the pan, and fry each side for 3-4 minutes, until the cheese has melted and the bread is fully browned and crispy.

Remove sandwiches to a workbench or plate, slice in half, and enjoy immediately.

In comfort food, main dishes, vegan, vegetarian
5 Comments

Beef Empanadas

April 17, 2013 Rivka
1-DSC_0496
1-DSC_0496

It seems the Sequester has had dilatory effects not only on the budget here in DC, but on the weather as well. We've waited far too long for spring, and last Sunday, I started to get impatient. There are only so many months for grilling, and I count April as one of them. So, on a whim, we invited a couple friends over for burgers Sunday night. If the weather won't beckon me to the grill, I'll beckon the weather.

By the time I had 8 burgers all pattied up and ready to go, there was quite a bit of ground beef left over in the bowl. It was then that I remembered this beef empanada recipe, which languished at the bottom of my to-make list for years, seeming too fussy for a weeknight. But now it was Sunday, and I had an hour or so before I needed to fire up the grill. I figured if I got the empanadas in the oven by the time folks came over, we'd have lunch for the week.

1-DSC_0343
1-DSC_0343
1-DSC_0347
1-DSC_0347

When Deb first made beef empanadas, she complained that the flavor fell flat. Fortunately, in my world, there never can be enough olives and raisins and spice. I amped up her quantities, which already were more than the original recipe called for. To my palate, the quantities below are perfect. The empanadas are super flavorful and even have a bit of a kick.

1-DSC_0394
1-DSC_0394
1-DSC_0405
1-DSC_0405

I thought about calling them "Vaguely Panamanian Beef Empanadas," since I also drew inspiration from a Food and Wine recipe for Panamanian empanadas. However: I've never been to Panama (or anywhere in Central America, for that matter) and know nothing about Panamanian food. What makes these empanadas Panamanian? I couldn't really tell you. Food and Wine called for annatto, or achiote, a fragrant red seed used for coloring and seasoning Central American food. But I don't think annatto is Panamanian, per se. So these empanadas aren't so Panamanian, and they may not be particularly authentic; they are, however, particularly good. You can whip them up in a couple hours and have lunch all week - or a fantastic appetizer for a dinner party.

1-DSC_0446
1-DSC_0446

Beef EmpanadasAdapted from this recipe and this one Makes 40 4-inch empanadas

Notes: I took Deb's advice to heart and upped the seasoning in my empanada filling, with great results. That said, feel free to adjust quantities up or down depending on your own preference. Don't like olives? Skip 'em. Feel like a sweeter filling? Double the raisins. No quantity here is make-or-break. I'm not a big hard-boiled egg fan, so I used only one, but most recipes I saw call for two, so feel free to add an extra if you wish.

Let's talk for a moment about the empanada dough. If you have or can find empanada dough ready-made, go for it. That makes this recipe even easier. If you can't find premade dough but don't want to make your own, I think that puff pastry would work reasonably well here, too. The final product won't be quite the same, but I can't imagine puff pastry filled with flavorful meat tasting bad, so from where I sit, it's a go. Let me know if you try that.

I used Deb's recipe, but I modified it to eliminate the dairy, swapping out the butter for olive oil. If that's a priority for you, the olive oil definitely works, but it's a fair bit more crumbly than a butter dough would be, and the dough requires 1.5 hours of refrigeration, compared to just 1 hour for the butter dough. It also NEEDS to be cold or else it's impossible to work with. Work quickly, and refrigerate what you aren't using. I imagine you'd have better results with an equal amount of margarine or shortening, but I just can't bring myself to do it. And, of course, if you want to be totally authentic, you'll use lard. Alternatively, if you're a vegetarian, you could always substitute Morningstar Farms crumbles or other meat substitute. Now then: Go forth!

1 tablespoon olive oil 3/4 lb. ground beef, preferably chuck 1 teaspoon ground cumin 1 teaspoon dried oregano 1 teaspoon ground annatto/achiote seeds 1 teaspoon smoked paprika 1/2 medium onion, finely chopped 1 garlic clove, finely chopped 1 14-oz. can whole tomatoes, drained and chopped, plus 2 tablespoons juice; can substitute 2 large fresh tomatoes 3 tablespoons raisins 2 1/2 tablespoons chopped pimiento-stuffed olives (or regular green olives - we ran out of the pimiento ones) 1/2 a serrano chile, minced 1 large hard-boiled egg, chopped into bits

1 egg, for brushing

1 package frozen empanada pastry disks, thawed (or homemade, recipe follows)

If making empanada dough from scratch, start there (below these instructions) and make the beef filling while the dough rests in the fridge.

Make the filling: In a large shallow frying pan, heat the olive oil over medium-high heat, then add ground beef and spices and use a wooden spoon to break up any big chunks. Cook, stirring occasionally, until no pink bits remain, about 4 minutes.

Add onion and garlic, stir to combine, and cook until onion has softened slightly, about 5 minutes. Add tomatoes, stir to combine, turn the heat to high, and cook, stirring occasionally, until about half of the liquid has evaporated, about 5 minutes. Remove from the heat.

Spread meat mixture on a plate to cool it quickly.

Preheat the oven to 400 degrees and line 2 baking pans with parchment or silpat.

Roll out the empanada dough (recipe below): Lightly flour a workbench and roll one disk of the empanada dough to between 1/4 and 1/8 inch thickness. Cut 4-inch disks out of the dough and set them onto a lined baking sheet.

Put 1 1/2 tablespoons of filling onto each disk. Wet two fingers and "brush" water around the edges of each disk, then fold them in half and either crimp edges closed with the tines of a fork, or fold them together in a pleated pattern like this. Leave 1/2 an inch of room between empanadas so they crisp up.

Bake the empanadas: Once all empanadas have been filled and folded, brush them with egg wash (1 egg mixed with 2 tablespoons of water) and then bake for 25 minutes, until very lightly browned on top. Let cool on pans for 5 minutes, then serve either warm or at room temperature. Alternatively, let cool completely on racks, then transfer to a sealed container and store in the fridge for up to 1 week; reheat in a 300-degree oven for 10 minutes before serving.

Empanada Dough

2 cups (9 oz.) whole wheat flour 2 1/2 cups (11.25 oz) all-purpose flour 3 teaspoons salt 2 sticks (1 cup or 8 ounces) cold unsalted butter, cut into 1/2-inch cubes - or substitute 1 cup olive oil 2 large eggs 2/3 cup ice water 2 tablespoons white vinegar

In the bowl of a food processor, blend the flour, salt, and butter/olive oil until fully combined. (If you use butter, you're looking for lima bean-sized bits of butter; if you use oil, the mixture will look far sludgier. Fret not.) Combine eggs, water, and vinegar, then add to the flour mixture and process until the mixture forms a uniform dough. If mixture looks too wet, add flour by the tablespoonful and pulse until the mixture looks drier.

Dump the dough onto a floured work surface and gather into a mass. Knead the dough a few times to bring it together, then divide it into 2 disks, cover each with plastic wrap, and refrigerate for at least 1 hour and up to 6. (If you refrigerate it longer, you'll want to bring it back to just colder than room temperature before working with it.)

In main dishes, weekday lunch
2 Comments

Aromatic Burmese Fish Stew

April 12, 2013 Rivka
1-DSC_0067
1-DSC_0067

As promised, here's the companion dish to the Burmese black eyed peas I made last week.

Can we have an honest moment about fish stew? It's usually a pain in the butt. Many recipes call for fish stock; they require you to brown the fish before stewing it, which makes a mess and smells up the house; and at the end of the day, after painstakingly browning lots of little pieces of fish, perhaps some onion and other vegetables, you end up with a big pile of nondescript food that doesn't always seem worth the effort.

Not this stew. This one's different.

Naomi Duguid is the genius behind this recipe. It comes from her new book, Burma, and it fed a dinner party of 8 people Friday night, plus leftovers for both of us the next day.

Unlike its more fussy compatriots, this fish stew contains only fish, tomatoes, spices, and water. If you have a food processor or spice grinder, you're good to go. You just blend a bunch of spices into a paste, add them to water to make a broth, and cook fish and tomatoes in that broth for scarcely 10 minutes. Then, you eat.

1-DSC_0080
1-DSC_0080

Because I was serving this at a dinner party, I wanted the cooking time to be more flexible. After bringing the broth to a boil, I turned the heat so low you could barely see the flame. Then I added the fish. The fish basically poached in a hot water bath, taking its merry time while we schmoozed and sipped wine. By the time we got to the table, about an hour after I added the fish, it had cooked perfectly. It was flaky and firm, but not at all tough. The tomatoes had melted into the broth. Over white rice, topped with some herbs, it was just perfect.

If you serve this for a more casual dinner, you might consider skipping the sides entirely and just serving the stew in bowls over rice, topped with herbs or even a dollop of yogurt. It's a pretty brothy stew; you'd be missing out if you couldn't slurp it all up. Because we served it on plates with a bunch of sides, I ladled out a couple spoonfuls of the broth and mixed them with 2 tablespoons of rice flour, then poured that makeshift slurry back into the stew. The slurry thickened the broth just a bit, giving it a texture somewhere between broth and gravy. Still very liquidy, but with enough body to not be wholly out of place on a dinner plate.

I'll give the Burmese food a rest for a while, but I'm not promising I won't be back with more of it at some point. I can hardly help myself.

Aromatic Burmese Fish StewAdapted from Naomi Duguid's new book, Burma

serves 6

Notes: Ideally, you'll make the spice paste in a food processor. That's certainly easiest. However, if you don't have a processor, you can make it in batches in a spice grinder. Duguid also says you can use a mortar and pestle, which I assume is traditional, but it'll take you forever, and you'll wind up with a somewhat coarse paste. I'm not so into the texture of lemongrass, but if you are, don't let me stop you from doing things the old-fashioned way.

I've included instructions for thickening the broth below, but that's optional. If you're serving the stew in bowls, you definitely don't need to do it. Just be sure to serve it with both forks and spoons.

If you can find whole tumeric root, definitely use it here - it has a bright, floral flavor that really adds something to the stew. That said, Duguid offers ground tumeric as an acceptable substitute.

If you happen to have Burmese crumbled toasted soybean disks, you need two tablespoons for this recipe. For the rest of us, I've offered Duguid's recommended substitutions below.

Lastly, because you'll be dumping all the herbs and spices in a food processor anyway, no need to be precise in your cutting. Just chop everything up and dump it in the processor bowl. In a pinch, you probably can get away without chopping the garlic or shallots.

1/4 cup chopped lemongrass (1 stalk yields almost exactly this much) 1 2-inch knob of tumeric root, chopped; or substitute 1 tablespoon ground tumeric 2 tablespoons kosher salt 4-5 medium shallots, sliced (about 1/2 cup) 5-6 cloves garlic, sliced (about 1/4 cup) 2 tablespoons chopped cilantro stems (Duguid calls for roots but I couldn't find them) 1-4 green cayenne or other green chiles, sliced (Duguid calls for about 1/2 cup, but I'm warning you, that is a lot of chiles. I used only 2 serrano chiles and the stew was plenty spicy for me.)

8 cups water 2 medium tomatoes, cut into wedges 2 teaspoons miso (preferably brown but any works) 3 pounds skinned, filleted mild but thick white fish, such as halibut, cod, or hake; cut into 2-inch pieces 2 scallions, minced 2 cups loosely backed Thai basil and/or cilantro leaves 2 tablespoons rice flour, optional

Combine lemongrass, tumeric, shallots, garlic, ginger, coriander, 1 chile, and 1 tablespoon salt in the bowl of a food processor and blend until smooth. Add a couple tablespoons of water if necessary, and scrape down the sides occasionally.

Meanwhile, bring the water to a boil in a large pot or casserole. Add the spice paste, the remaining tablespoon of salt, and the tomatoes. When the water returns to a boil, boil hard for 10 minutes.

Turn the heat to medium-low. Scoop out a little broth into a small bowl and dissolve the miso in the broth, then add back to the pot. Add the fish, cover, and simmer for about 10 minutes, until the fish is cooked through. Add most of scallions and herbs, stir to combine, and remove the stew from the heat.

Serve over white or brown rice, with the remaining herbs and scallions.

* If you want to thicken the stew, follow the instructions for the miso: scoop out some broth, stir the rice flour into the broth until smooth, then pour the slurry back into the broth and stir to combine.

In fish, gluten-free, main dishes, vegetarian, healthy
3 Comments
← Newer Posts Older Posts →

Subscribe by email:

  • books (1)
  • crisps and crumbles (1)
  • frozen (1)
  • toys (2)
  • gifts (3)
  • egg whites (5)
  • fried (5)
  • how to use--- (6)
  • drinks (10)
  • menus (11)
  • travel (11)
  • fish (12)
  • kosher for passover (14)
  • thanksgiving (14)
  • vegan (20)
  • snacks (21)
  • techniques (21)
  • soup (26)
  • bread (28)
  • pies and tarts (28)
  • cake (33)
  • events (34)
  • condiments (36)
  • various and sundry (39)
  • uncategorized (42)
  • cookies and bars (46)
  • weekday lunch (47)
  • appetizers (48)
  • salad (51)
  • gluten-free (56)
  • comfort food (61)
  • breakfast and brunch (77)
  • sides (81)
  • dessert (90)
  • main dishes (100)
  • healthy (139)
  • easy (155)
  • vegetarian (180)

| LATEST |

Featured
Blue Chair Fruit's Black Raspberry Jam
Thai Grapefruit Salad
Mango Sticky Rice
Winter 2016: Odds and Ends
Povitica: The Best Babka Ever
Persimmon Walnut Bread
Sprout Chaat Salad + New Site!
Maple Walnut Squares
How to Give Thanks
Croissants (really, I made croissants) + other croissant-ish things

| hEALTHY |

Featured
Sprout Chaat Salad + New Site!
Fennel frond pesto + what to do with those pesky stalks
Asparagus Toasts with Pistachios and Mint
Eggplant-Walnut Pâté + Passover Ideas
1-DSC_0861-600x401.jpg
Lentils and Rice with Tamarind Sauce and Dukkah
Big Kale Salad with Pomegranate and Feta
Punchy Crunchy Ginger Salad

| BreakfAST |

Featured
Povitica: The Best Babka Ever
Croissants (really, I made croissants) + other croissant-ish things
Mushroom and Kale Breakfast Strata
Barley Porridge with Orange and Black Sesame
Ramps 'n' Eggs Biscuit Sandwiches
Asparagus Toasts with Pistachios and Mint
Apple-Cheddar Scones with Sage
Menemen - Turkish Eggs with Tomatoes and Peppers
You must select a collection to display.

© 2016 Rivka Friedman. All Rights Reserved.