• Home
  • About
  • Recipe Index
  • Contact
Menu

Rivka Friedman

Street Address
City, State, Zip
Phone Number

Your Custom Text Here

Rivka Friedman

  • Home
  • About
  • Recipe Index
  • Contact

Asparagus and Scallion Tart

May 12, 2012 Rivka
asparagus scallion tart05

Asparagus are everywhere right now, and I'm pretty sure they're at their peak. I saw them at three different farmers' markets this week (why I went to three different farmers' markets this week is another story entirely), and most every farmer had them wrapped in nice, tight bundles of 1/2-1 pound each. There are long, skinny ones and short, stubby ones. I'll happily eat them all.

asparagus scallion tart10

If going to 3 farmers' markets in one week isn't absurd enough for you, I currently have about six pounds of asparagus in my fridge. Yes, I'm crazy. But the season isn't very long, and I need to get my fix while I can - not to mention put up a few pounds as pickles.

asparagus scallion tart09
asparagus scallion tart08
asparagus scallion tart07
asparagus scallion tart06

I have one little bundle of purple asparagus - beautiful, sturdy little things - from Smucker Farms. Smucker Farms is an Amish market at 14th and V. It's relatively new, and they're carrying beautiful produce, jarred goods, meat and dairy from local growers and producers. (No, I'm not counting them as one of the markets I visited last week. Yes, I know I'm nuts.) Their asparagus and strawberries looked especially good last week, so I brought home both, along with some chevre.

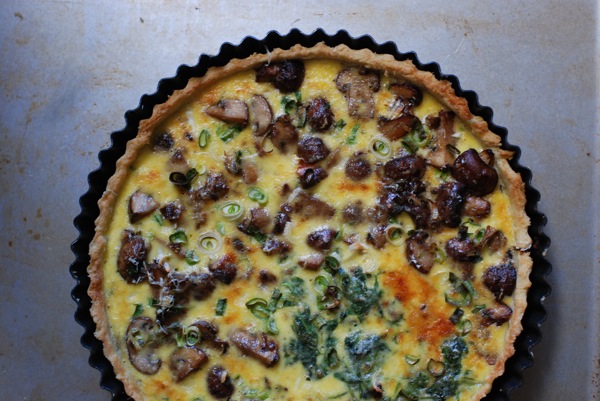
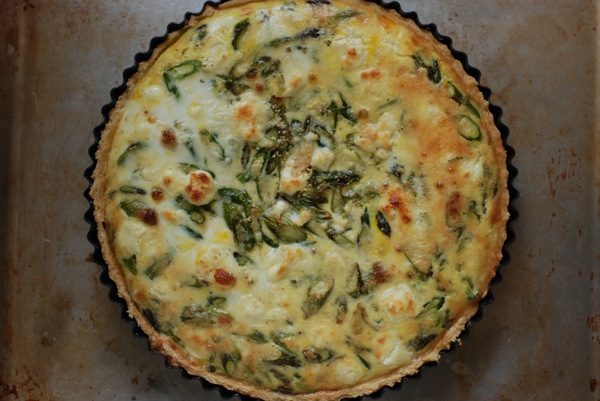
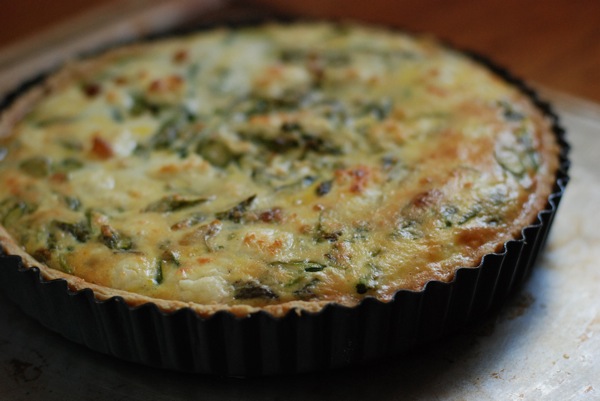
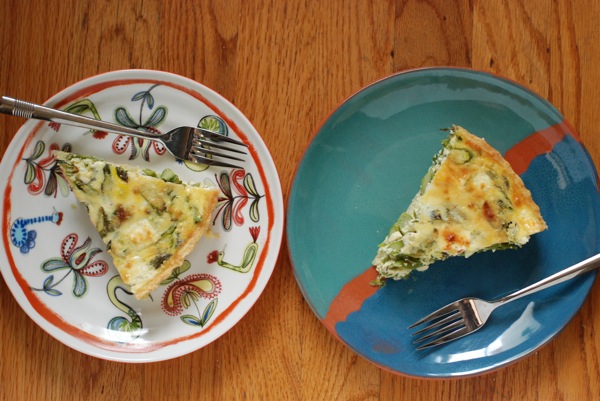
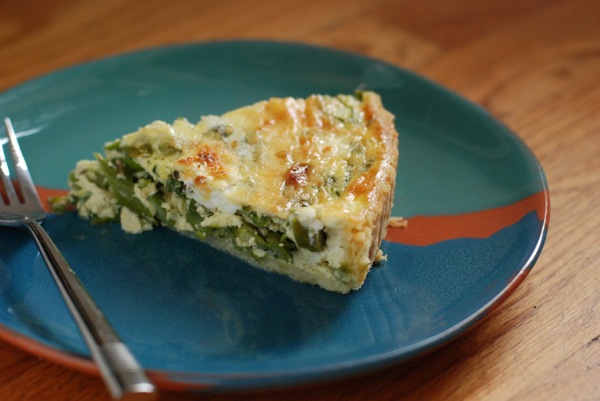
I couldn't wait on those purple asparagus - they found their way into my eggs the very next day. But this weekend, I did tuck into my massive collection of green asparagus to make this beautiful tart. To my taste, it's got the perfect ratio of vegetable to custard - just enough egg mixture to hold the vegetables together - and it tastes unmistakably of Spring. I think it'd be perfect on your Mothers' Day brunch table tomorrow.

asparagus scallion tart15
asparagus scallion tart14
asparagus scallion tart13
asparagus scallion tart12

The tart shell recipe I used for this tart is from Le Pain Quotidien. I found it on the back of one of those recipe cards they give you with your receipt, which I usually throw away but, this time, blessedly, didn't. I've tucked the recipe into my permanent rotation. A few things set it apart from others I've made: first, no blind-baking. The tart shell gets rolled, fitted, filled, and baked all in one fell swoop. Two, It's got cornstarch in it, which I think makes it extra crispy (the same way it crisps up these "waffles of insane greatness," from the queen of soul herself). Three, it can be made with or without a food processor. Four, it barely shrinks back at all when baked. Lastly, well, it tastes great.

asparagus scallion tart11

And the filling? Not bad, not bad at all. I'm excited with how this came out; if you make it, do let me know if you like it as much as we did.

asparagus scallion tart04

We won't be eating this tart tomorrow. We're having mother's day brunch, but my mom isn't such a quiche person, so I'll be making things that are more up her alley. It's the least I can do, for the woman who taught me to cook and to love cooking.

asparagus scallion tart02

There's some really wonderful writing about Mothers' Day out there this year: don't miss this piece about a mother-daughter trip to a beach resort (and the accompanying write-up from the author's daughter offering some tips for traveling with mom. NYT also has a moving tribute from Timothy Egan on his relationship with his mother, not to be missed. Lastly, Kat Kinsman - managing editor for CNN's Eatocracy blog - wrote about her personal choices on parenting. It's a must-read, as much for parents and those with parenting aspirations as for those who don't want children. Don't miss it.

asparagus scallion tart01

Happy Mothers' Day to all! Have a lovely weekend.

Asparagus and Scallion TartAdapted from Martha Stewart and Le Pain Quotidien

For the tart shell:

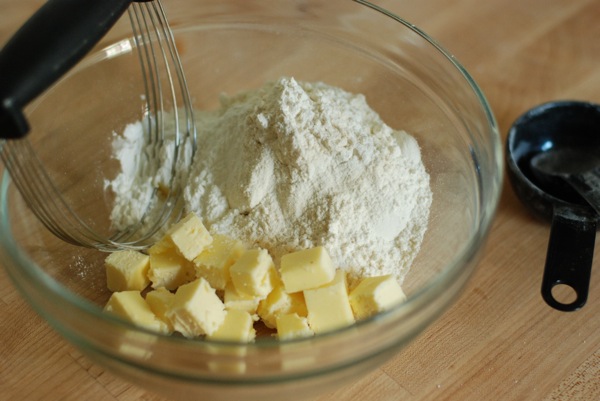
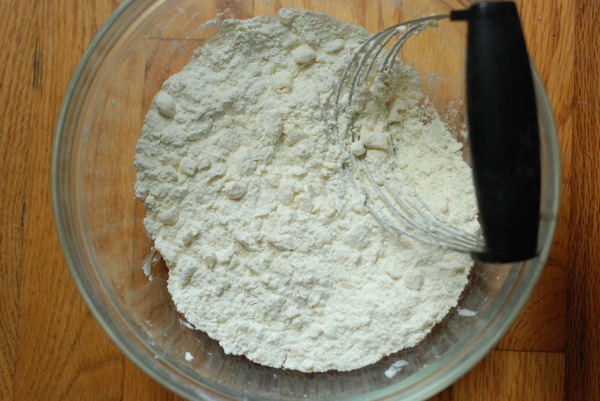
1 1/4 cups all-purpose flour 1 1/2 tablespoons cornstarch 1/4 teaspoon salt 6 tablespoons butter, diced 1 egg, lightly beaten

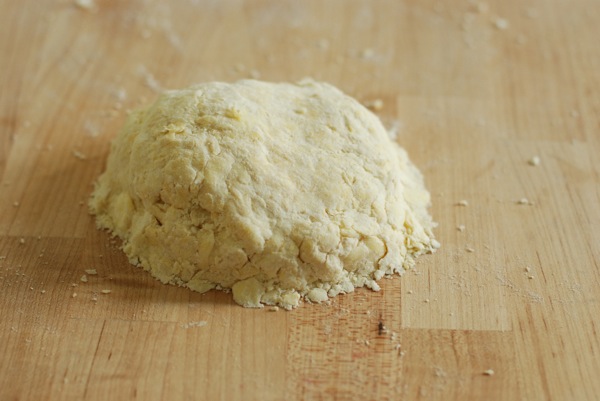
Combine flour, cornstarch, and salt in a medium bowl. Add butter, and use a pastry blender to cut the butter into the flour until the pieces are the size of peas. Add the egg, and use a fork to combine. Then turn the dough out onto a floured surface, and knead a few times (or more than a few times, if the egg is small and the dough is dry) to bring the dough together. Be patient; the flour takes a few minutes to absorb the egg, and once it does, the dough will more easily come together.

Sprinkle a bit more flour onto the work surface, and roll the dough into a 12-inch disk. Lay into a tart pan, press against the sides, trim off the excess, and refrigerate for at least 30 minutes.

For the filling:

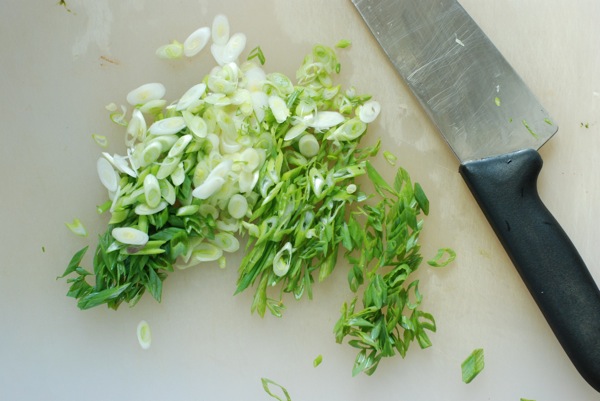
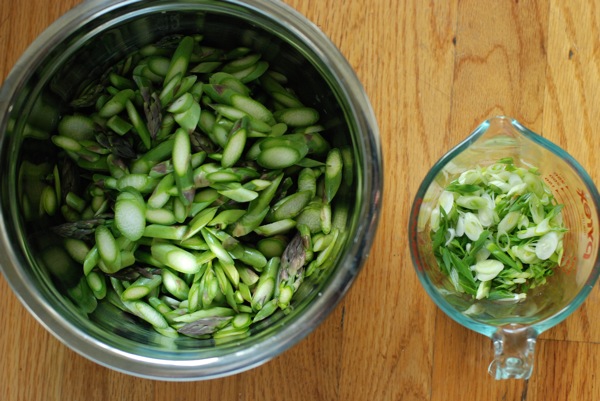
1 tablespoon butter 1 pound asparagus, rinsed, dried, and sliced thinly on the bias 2/3 cup scallions, sliced thinly on the bias 4 eggs 1 1/4 cups half-and-half salt and pepper 1/2 teaspoon freshly ground nutmeg 3 oz. goat cheese or fresh chevre 1/2 cup gruyere cheese 1/2 cup parmesan cheese

Preheat the oven to 350.

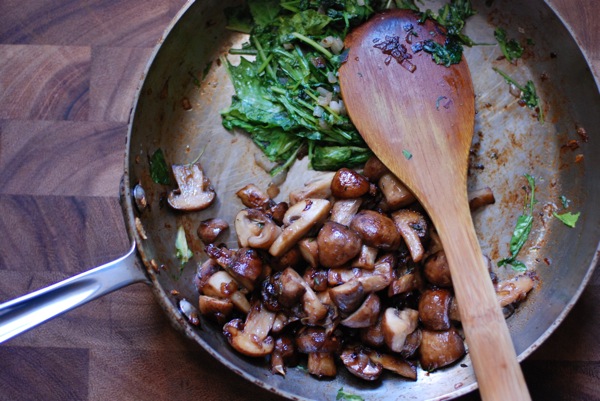
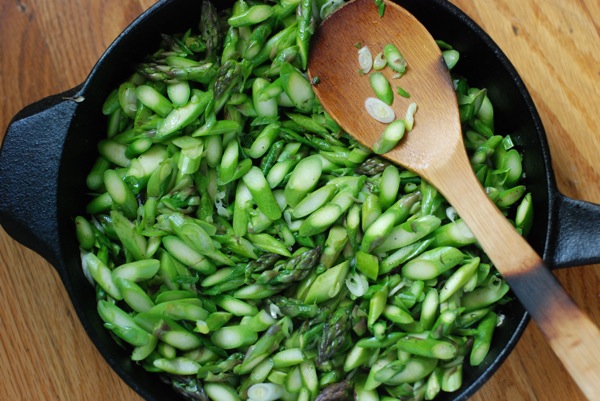
Melt butter in a frying pan over medium heat, and add scallions and asparagus. Toss to coat with the butter, season with a pinch of salt and a few grinds of the pepper mill, and cook about 6 minutes, until asparagus are crisp-tender. Set aside.

In a medium bowl, combine eggs, half-and-half, nutmeg, and 1/2 teaspoon each of salt and pepper. Whisk to combine. Add gruyere cheese, and stir to combine.

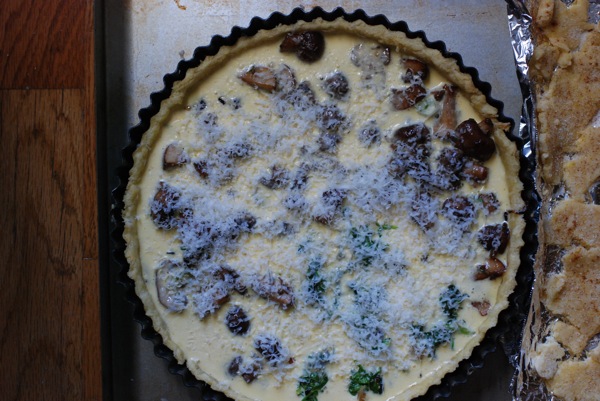
Remove tart shell from the fridge and set on a baking sheet. Pour asparagus mixture into the tart shell, distributing evenly. Dot with goat cheese. Pour egg mixture over asparagus; mixture should nearly fill tart shell. Sprinkle grated parmesan cheese overtop, and tuck into the oven for 50 minutes, until top is lightly golden and the center is just set. Cool about 10 minutes, then slice and serve.

In pies and tarts, vegetarian
1 Comment

Mushroom Shallot Quiche

November 21, 2011 Rivka
DSC_0164
DSC_0164

A couple weekends ago, our friends Meryl and Benjy came to town. We slept in for the first time in years, and then we hosted a late morning brunch. There's nothing like nursing a cup of strong, steaming coffee, stirring eggs and cream, and soaking in a perfect fall day.

First to the table was my new cold-weather staple, citrus salad: peeled sliced grapefruit and oranges, a little honey, some mint, presto. Rebecca made French toast casserole, dripping maple syrup and topped with fresh blueberries. To round things out, I made this quiche.

DSC_0155
DSC_0155

There are lots of things to love about this recipe, originally from Dorie Greenspan. Its filling calls for just two eggs, instead of the usual six. It comes together very easily. And it calls for layering the ingredients into the quiche, pouring the eggs and cream over the mushroom mixture, then topping everything with grated cheese and sliced scallions. This method came in especially handy over the weekend, when I learned that Benj didn't like mushrooms. No sweat: I just sautéed some arugula with shallot and piled it into one section of the quiche in lieu of mushrooms. Problem solved.

DSC_0152
DSC_0152

This quiche here, it's made in a tart shell (which accounts for the smaller number of eggs). That means you'll be baking it on a baking sheet - the better to pile scraps of leftover pie crust on the pan next to it, sprinkle with cinnamon sugar, and bake off. Cook's treat.

P.S.Were you looking for a Thanksgiving side? I think this would be mighty handsome on your holiday table. Hope it's a wonderful weekend!

Mushroom Shallot Quiche Adapted from Dorie Greenspan

1 1/2 cups all purpose flour 1 teaspoon salt 1 teaspoon sugar 1/2 cup (1 stick) chilled unsalted butter, cut into 1/2-inch cubes 1 large egg 1-2 teaspoons cold water

1 1/2 tablespoons unsalted butter 1/3 cup chopped shallots (about 2 medium) 1/2 pound mushrooms, quartered (halved if small) 5 teaspoons chopped fresh thyme, divided 1 tablespoon Madeira, vermouth, or white wine, optional

3/4 cup whipping cream 2 large eggs Pinch of salt Pinch of ground black pepper 2 green onions (white and pale green parts only), thinly sliced 2 tablespoons finely grated Gruyère cheese

Make Crust: Blend flour, salt, and sugar in food processor. Add butter, and pulse until the mixture resembles coarse meal. Whisk 1 egg and 1 teaspoon cold water in small bowl; add to flour mixture. Pulse processor just until moist clumps form. If necessary, add second teaspoon water and repeat. Transfer to work surface and knead gently until dough comes together, about 4 turns. Form into ball; flatten into disk. Wrap in plastic and chill 1 hour. Dough can be made 1 day ahead. Keep chilled.

Par-bake Crust: Butter 9 1/2-inch round fluted tart pan with removable bottom. Roll out dough on lightly floured surface to 12-inch round. Transfer dough to pan, pressing onto bottom and up sides of pan; trim any excess dough so edge lies flush with fluted edge of tart pan. Chill 1 hour.

Preheat oven to 400°F. Butter a large piece of foil and press, butter side down, onto crust. Fill with pie weights or dried beans. Bake 20 minutes. Remove foil and weights. Using fork, pierce bottom of crust all over (about 10 times). Bake until golden, about 10 minutes. Cool. Can be baked 6 hours ahead. Let stand at room temperature.

Make Filling: Melt butter in large nonstick skillet over medium heat. Add shallots; sauté until soft, about 2 minutes. Add mushrooms; sprinkle with salt and pepper. Add Madeira, vermouth, or white wine, if using. Increase heat to high and sauté until liquid is absorbed and mushrooms are tender, about 8 minutes. Sprinkle with 2 1/2 teaspoons thyme and cook 1 minute. Transfer mixture to plate. Cool mushrooms completely.

Assemble and Bake: Preheat oven to 350°F. Place cooled crust in pan on baking sheet. Sprinkle with remaining 2 1/2 teaspoons thyme. Drain mushrooms, if needed. Scatter mushrooms over thyme. Whisk cream, eggs, salt, and pepper in medium bowl. Pour egg mixture over mushrooms. Sprinkle with green onions and cheese.

Bake quiche until custard is set, about 25 minutes. Cool 15 minutes. Serve warm or at room temperature.

In breakfast and brunch, main dishes, pies and tarts
Comment

Best Blackberry Pie

August 10, 2011 Rivka
blackberry pie 5
blackberry pie 5

I do my best to keep up with the kids, to stay in the know about what's new. I caught wind of the microbrew trend a couple years back, and I even went so far as to buy a beer-of-the-month club subscription for D. (She loved it so much, she told me to never think again about birthday presents: it's beer club from here on out.) But every so often, a new tidbit of knowledge seems to sweep the food world by storm while skipping me completely, Passover-style. This time, it was tapioca flour, which has quickly supplanted corn starch as the best thickener, ever. Unlike corn starch, tapioca is undetectable in every way. It thickens up pies without any of that milky, gloopy, corn starch texture. It also doesn't threaten to leave a raw-flour taste if it doesn't cook completely. In short, it's basically foolproof. Cook a pie with tapioca, and you'll think there's no thickener in it at all - until you cut the first slice and see that there is no puddle of murky fruit liquid swamping your pie. It's an amazing feat. Your guests will ooh and ahh.

blackberry pie 4
blackberry pie 4

So how did I miss the trend? I don't know. But I blame being late to the tapioca party for not sharing this amazing pie recipe until now. This, my friends, is the best blackberry pie. Ever.

Blackberries are in season right now. If you haven't had any over the past couple of weeks, carpe diem, people. They're tangy, sweet, and complex. They pair well with cinnamon and lemon, both of which are in this pie recipe. Oh, and butter. They go well with butter. We've got that here, too.

blackberry-pie-3
blackberry-pie-3

If you've been following along, I recently settled on my ideal pie crust recipe. I used that here, and it's as good as I remember. But I'm also a sucker for a good crumb topping, and I usually find double crust pies to be a little too crusty. For this pie, I riffed on Deb's crumb topping for sour cherry pie, which calls for ground almonds and ground oats. It's got great flavor, and it pairs perfectly with blackberries. If you don't have oats or oat flour, you can substitute whole wheat or even white flour here.

blackberry pie 6
blackberry pie 6

We had plenty of blackberries for this pie, and Elise's pie filling fit the bill just perfectly with only minor tweaks. If you'd like to mix blackberries with another summer berry, this pie is a great place to do that. Also, if you're not a cinnamon person (strange, I know, but there are such people), omit. And if you're the type who loves orange zest, blackberries, cinnamon, and orange are a trio made in heaven. Do it.

blackberry pie 2
blackberry pie 2

Once you've made a pie with tapioca flour, you may never go back. And you know what? It's pretty good on this side of things.

Best Blackberry PieAdapted from recipes from Simply Recipes and Smitten Kitchen (thanks, Elise and Deb!)

1 recipe best all-butter pie crust

For the pie filling: 5-6 cups blackberries, rinsed, picked clean, and patted dry (if using frozen berries, defrost fully and drain) 1/2 cup sugar 1 teaspoon lemon juice 1 teaspoon lemon zest 1/2 teaspoon cinnamon 1/4 teaspoon vanilla extract 1/4 teaspoon almond extract (optional, but it plays off the almond crumble really nicely) 3 Tbsp tapioca flour (I found it in the baking aisle of a natural foods store; Whole Foods and many supermarkets carry it, too)

For the topping: 2/3 cup whole oats, ground to a flour in a food processor (or, if you have it, 1/2 cup oat flour) 1/2 cup all-purpose flour 1/2 cup sugar 1/4 teaspoon ground cinnamon 1/2 teaspoon kosher salt (you might want to first read up on kosher salts) 3/4 cup unsalted whole almonds, coarsely ground in a food processor (or, if you have it, 1/2 cup almond meal) 6 tablespoons unsalted butter, melted and cooled

Prepare the crust: Preheat the oven to 400 degrees. Roll out the chilled pie dough into a 12-inch disk. Gently lower into a 9- or 9.5-inch pie dish. (I do this by gently folding the dough into quarters, lifting it into the dish, and then gently unfolding it, as pictured above.) Trim the edges of the crust, leaving a 1/2-inch overhang. Crimp the edges, line with foil or wax paper, fill with pie weights or rice/beans, and bake for 30 minutes, until lightly browned. Remove pie crust from the oven, remove weights and lining, and allow to cool completely. Meanwhile...

Prepare the filling: Put blackberries, sugar, lemon juice and zest, cinnamon, extracts, and tapioca flour into a large bowl. Toss gently to coat berries evenly, and leave to macerate for 20 minutes. While this is macerating...

Prepare the crumb topping: Combine flours, sugar, cinnamon, salt, and almond meal in a medium bowl. Add melted butter and stir until mixture resembles wet sand.

Make the pie: Spoon blackberries into bottom crust. Sprinkle crumb topping evenly over the top of the pie. Set the pie on a baking sheet (to catch any juices that drip, avoiding that whole smoking oven thing), and bake for 30 minutes. Reduce heat to 350 degrees, and bake another 30-35 minutes, until juices are bubbling and crumb topping is browned. Let cool at least 30 minutes before eating.

Serve with vanilla ice cream, FTW.

In dessert, pies and tarts
17 Comments

Sour Cherry Hand Pies, and the Perfect Pie Crust

July 9, 2011 Rivka
DSC_0425
DSC_0425

I hope by now you've become as hooked on sour cherries as I am. I've been preaching some gospel about the fleeting summer fruit, pushing you all to make this sour cherry compote (and some of you have made it! and liked it! phew.). But this here, this is a recipe you absolutely need right this very moment, before sour cherries exit stage left for another year.

DSC_0026-1
DSC_0026-1

Reader, make some sour cherry hand pies. Not just any hand pies, but these - for these may be the most perfect hand pies I've ever made or eaten. And while I know in light of my raving about the whole sour cherry-ness of these pies what I'm about to say will seem strange, it all starts with the crust. That's right: after years of making pie, using my old-faithful all-butter pie recipe (which I think I originally got from the lovely Deb), I'm changing my tune on the perfect crust.

DSC_0422
DSC_0422
DSC_0433
DSC_0433

Don't worry, we're not talking about radical departures here. Just small tweaks that make a big difference.

1. A food processor and a pastry blender produce equally good crust, but the method matters. I tend to choose between processor and pastry blender based on my mood. Lazy me chooses the processor. If I've had a sh***y day and need to get out some aggression, the pastry blender is great. Here's the catch: when cutting the butter into the flour, if you're using a pastry blender, go for pea-sized pieces of butter, since you'll be folding the liquid into the dough rather than blending it. If you're using a food processor, follow Melissa Clark's great advice and go for lima bean-sized pieces. That way, you've got some wiggle room so that when you add the liquid and pulse again, you can pulse until the liquid is incorporated without worrying that the butter pieces will become too small.

DSC_0417
DSC_0417

2. Pie crusts should taste good on their own. Never is this more important than when making hand pies, where the ratio of filling to crust is much smaller than in regular pie. When you get a bite that's mostly crust, it should taste delicious. I've find most pie crust recipes woefully under-seasoned. I've settled on 1 teaspoon of salt and 2 teaspoons of sugar in the dough for a single-crust pie, but feel free to experiment yourself.

3. For the best results, chill everything. We're talking the bowl, the pastry blender, the flour, the butter (after cutting it into chunks), the ice water...everything. Freezing your whole workstation will inhibit the formation of gluten, which will prevent your dough from turning chewy.

That's the newest from the pie dough frontier. I tell you, these hand pies I made last week, their crust was flaky and crunchy, with big shards breaking off at each bite. It doesn't get better than this.

Today's Saturday. If you've got the time, head to the market, grab one last batch of sour cherries, and make yourself some hand pies. You can freeze them between layers of wax paper, and they'll last for weeks. As you dole them out to family and friends, you'll slow down and enjoy a summer that seems to be flying by.

Sour Cherry Hand Piesadapted from Karen DeMasco and Martha Stewart's crust and cherry pie recipes

Crust recipe makes 1 single-crust pie, or 25 hand pies

For the crust:

1 1/2 cups flour 1 teaspoon salt 2 teaspoons sugar 12 tablespoons (1 1/2 sticks) chilled unsalted butter, cut into small pieces and rechilled 1/4 cup ice water

For the filling: 1 1/2 pounds fresh sour cherries, pitted 2 tablespoons unsalted butter 2/3 cup plus 1 tablespoon sugar 2 tablespoons cornstarch 2 teaspoons lemon juice

1 egg (for eggwash) sanding sugar

If using a food processor, combine flour, salt, and sugar in the processor bowl and pulse to combine. Add butter and pulse several times until butter is in pieces the size of lima beans.

Add half the water and pulse several times. Add the remaining water and pulse again, stopping when mixture forms clumps that bind together. If mixture is still too dry, add more ice water a tablespoon at a time, until dough holds together.

Turn dough onto a floured work surface and bring it together by hand. Divide dough in half, wrap each half in plastic, and refrigerate at least 45 minutes.

Meanwhile, make the filling: heat the 2 tablespoons butter in a large skillet over medium heat until foam subsides, then add cherries with any juices and the sugar and lemon juice and simmer, stirring, until sugar is dissolved. (Cherries will exude juices.) Transfer a few spoonfuls of the cherry liquid into a small bowl, and add cornstarch, whisking to form a paste. Continue to simmer the cherry mixture until cherries are tender but not falling apart, about 8 minutes. Then stir cornstarch mixture into simmering filling and boil, stirring frequently, 2 minutes. Transfer filling to a bowl and put in fridge.

Preheat oven to 375°F and line two baking sheets with parchment paper or silpat.

While cherries are cooling, remove one piece of dough from fridge and roll out on floured work surface to  1/8-inch thickness. Use a 4-inch biscuit cutter to cut disks of dough, and transfer disks to one of the baking sheets. When the dough has been cut into disks and one baking sheet is full, gather the dough scraps into a ball, re-wrap in plastic, and return to the fridge. Spoon about 2 teaspoons (depending on size of biscuit cutter) of filling into the center of each disk. Fold each disk over itself to make a half-moon that fully encapsulates the filling, then use the edge of a fork to crimp around the edges of each pie. Transfer baking sheet to the freezer for 10 minutes. Meanwhile, repeat with second half of the dough. Gather the scraps from the second piece, combine with the first scraps, and roll out one last time, repeating steps above. Transfer second filled baking sheet to freezer.

Remove baking sheets from the freezer, and brush pies with egg, then sprinkle with sanding sugar. (Regular or demerara sugar will work just fine.) Use a paring knife to make three diagonal vents in the top of each pie. Transfer to the oven and bake 25-30 minutes, until golden brown. Cool 10 minutes; serve warm or at room temperature. Hand pies can be frozen in an airtight container between layers of wax paper for upto 1 month.

In dessert, pies and tarts
8 Comments
← Newer Posts Older Posts →

Subscribe by email:

  • books (1)
  • crisps and crumbles (1)
  • frozen (1)
  • toys (2)
  • gifts (3)
  • egg whites (5)
  • fried (5)
  • how to use--- (6)
  • drinks (10)
  • menus (11)
  • travel (11)
  • fish (12)
  • kosher for passover (14)
  • thanksgiving (14)
  • vegan (20)
  • snacks (21)
  • techniques (21)
  • soup (26)
  • bread (28)
  • pies and tarts (28)
  • cake (33)
  • events (34)
  • condiments (36)
  • various and sundry (39)
  • uncategorized (42)
  • cookies and bars (46)
  • weekday lunch (47)
  • appetizers (48)
  • salad (51)
  • gluten-free (56)
  • comfort food (61)
  • breakfast and brunch (77)
  • sides (81)
  • dessert (90)
  • main dishes (100)
  • healthy (139)
  • easy (155)
  • vegetarian (180)

| LATEST |

Featured
Blue Chair Fruit's Black Raspberry Jam
Thai Grapefruit Salad
Mango Sticky Rice
Winter 2016: Odds and Ends
Povitica: The Best Babka Ever
Persimmon Walnut Bread
Sprout Chaat Salad + New Site!
Maple Walnut Squares
How to Give Thanks
Croissants (really, I made croissants) + other croissant-ish things

| hEALTHY |

Featured
Sprout Chaat Salad + New Site!
Fennel frond pesto + what to do with those pesky stalks
Asparagus Toasts with Pistachios and Mint
Eggplant-Walnut Pâté + Passover Ideas
1-DSC_0861-600x401.jpg
Lentils and Rice with Tamarind Sauce and Dukkah
Big Kale Salad with Pomegranate and Feta
Punchy Crunchy Ginger Salad

| BreakfAST |

Featured
Povitica: The Best Babka Ever
Croissants (really, I made croissants) + other croissant-ish things
Mushroom and Kale Breakfast Strata
Barley Porridge with Orange and Black Sesame
Ramps 'n' Eggs Biscuit Sandwiches
Asparagus Toasts with Pistachios and Mint
Apple-Cheddar Scones with Sage
Menemen - Turkish Eggs with Tomatoes and Peppers
You must select a collection to display.

© 2016 Rivka Friedman. All Rights Reserved.