Rivka Friedman
  • Home
  • About
  • Recipe Index
  • Contact
Menu

Rivka Friedman

Street Address
City, State, Zip
Phone Number

Your Custom Text Here

Rivka Friedman

  • Home
  • About
  • Recipe Index
  • Contact

Zucchini with Basil, Pine Nuts, and Croutons

July 15, 2013 Rivka
1-DSC_0132
1-DSC_0132

Well, London may have the edge when it comes to strawberries, but DC is just bursting with amazing fruits and vegetables this time of year. And I'm going to go out on a limb and say that eating that summer produce is way, way more fun when your A/C works. Because since May, ours hasn't. And now it does. And cold air, it is wonderful. (In other news: if you've come over to our house in the last couple months and been inexplicably hot, sorry about that.)

Now that we're no longer hot from the moment we wake up in the morning, I can bear a trip down to the Sunday market. This past Sunday, I picked up some bright red, plump sour cherries, two pounds of rhubarb (for recipes I'll be telling you about soon), and some lovely baby zucchini.

1-DSC_0114
1-DSC_0114

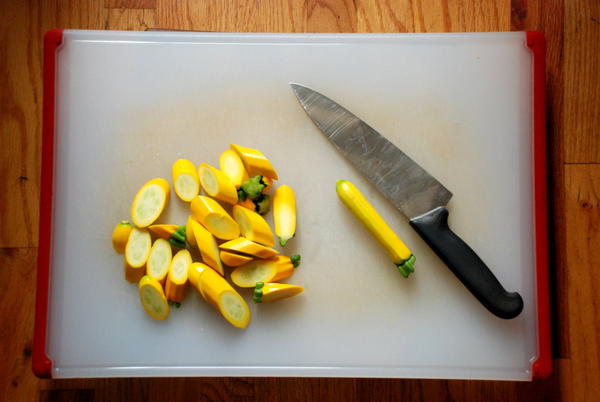
Baby zucchini is so, so pretty, no? All those different shapes and sizes? The little skinny sticks and the bigger, round patty pans? How can you not love them?

And yet, as is the case every year, I bring home a basket of those zucchini, and they sit. In the fridge. For days. Because people, I don't ever know what to do with them. They don't taste different than big zucchini, they just look different. So I feel like I have to leave them whole to preserve their cuteness. Otherwise, why not just buy the regular ones?

A couple years ago, I got hooked on this recipe for zucchini and snap peas dressed very simply with sesame oil. But not all baby zucchini can be left whole. At some point, you gotta cut the things up. Fortunately for me (and you), I've come up with a dish of zucchini sliced small enough that it can be eaten in a civilized fashion without your guests totally missing the fact that you sprang for the little guys.

The dish is inspired by something far more fussy from the legendary Dan Barber, a dish made with, yes, zucchini bread croutons. If you happen to have leftover zucchini bread lying around, this is a great way to put it to use. For the rest of us, say it with me now: summer is unfussy. Then go laugh at the fact that Oprah says this recipe takes 10 minutes. Really? Ba-ha.

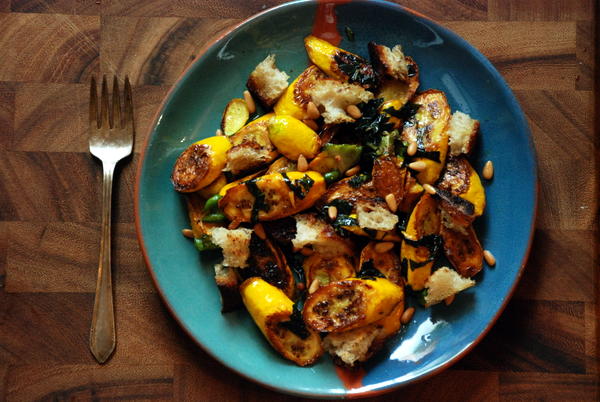
Where were we? Yes. You're slicing baby zucs, getting 'em nice and browned, and tossing them with some basil oil, some toasted pine nuts, and some croutons. Simple? Simple.

1-DSC_0129
1-DSC_0129

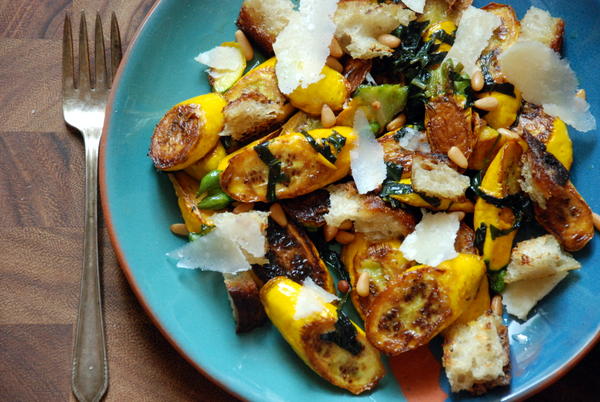
If you don't feel like making croutons, simply toast a couple pieces of bread, smear their toasted tops with some ricotta or goat cheese, and pile the zucchini on top. You can also top this with shards of a harder cheese, like parmesan or pecorino. Even a harder goat cheese would work well.

1-DSC_0173
1-DSC_0173

While we're on the topic of do-what-you-want, if you -- like my beloved -- hate pine nuts (I know, how could she??), swap in almonds, hazelnuts, or no nuts whatsoever. If you don't love basil (again with D...crazy), try dill or mint. And if you don't feel like buying the baby zucs, big ones work just fine. I'm on a mission to make summer recipes flexible and un-fus-sy. I will prevail. And then we'll all not fuss one bit, and eat delicious summer food, and be very happy.

Zucchini with Basil, Pine Nuts, and Croutons Inspired by a recipe from Dan Barber serves 2-3 as a side dish or appetizer

1 pound small zucchini (about 5), trimmed and cut on the bias into 1" slices 4 tablespoons extra-virgin olive oil, separated 1/2 teaspoon flaky salt 1/4 teaspoon freshly ground pepper juice of half a lemon 1/4 cup basil chiffonade 1/4 cup pine nuts 1 cup torn croutons (I like sourdough, but any bread will work) 7 or 8 big shards of a salty, hard cheese like parmesan or pecorino (optional)  

Preheat the oven to 350 degrees and spread pine nuts onto a baking sheet in a single layer. Toast pine nuts until evenly golden, about 7 minutes. Set aside.

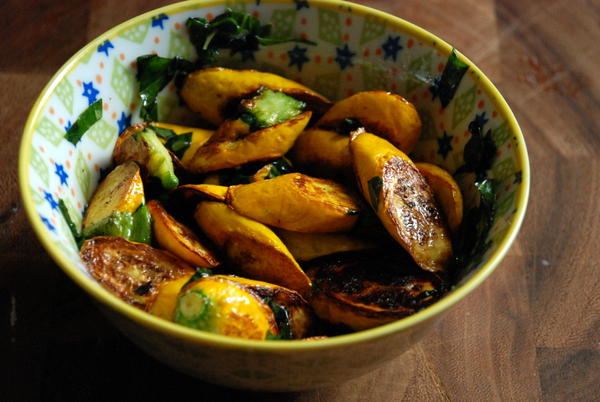
Add 2 tablespoons olive oil to a large heavy pan (I like cast iron) and set it over medium heat. When oil shimmers, add zucchini slices in a single layer. Season with salt and pepper, then let cook undisturbed for 3-5  minutes, until undersides are shiny and golden-brown. Patience is the virtue here; if you move the zucchini around too much, it will steam and not brown properly.

Flip browned slices onto their second side and cook for 3-5 minutes more. Meanwhile, transfer chiffonade basil (or other herb) to a small mixing bowl, and as the zucchini slices finish cooking, add them to the bowl and stir to wilt the basil. Add any oil that remains in the pan into the bowl, to help the basil wilt and emit its flavor.

Add the remaining olive oil to the same pan, heat on medium, and when it shimmers, add the croutons. Season with salt and pepper, and again, leave undisturbed for about 3 minutes until undersides are golden. Flip to get as many sides of each crouton as possible crisped and slicked with the oil. When croutons are golden and toasty, Remove to a plate.

To serve, arrange zucchini and basil, pine nuts, croutons, and cheese (if using) on a flat platter. Squeeze the lemon overtop and serve warm or at room temperature.

In appetizers, sides, vegan, vegetarian, easy, healthy
3 Comments
Share

Quinoa and Asparagus Salad with Yogurt Dressing

May 20, 2013 Rivka
1-DSC_0335
1-DSC_0335

Lurking behind the shiny exterior of this homepage is a Drafts folder, containing every post I've ever started. And friends, I could make an entire second blog out of the posts stuck in draft-purgatory. There's a parsnip cake I made for my mom's birthday back in 2011; a winter citrus salad that I keep meaning to tell you about while it's still...well, winter; a tremendous zucchini gratin that I will tell you about in just a few short weeks, when summer decides to make an appearance for good; and about 15 quinoa recipes, none of which I deemed delicious enough to share.

Thing is, I am no big fan of quinoa. Try as I might, I can't love the stuff. I wish I did: it's nutritious, cooks up really quickly, and at least purports to be versatile. I'm just not the biggest fan.

But last week, fresh on a tear to use up all the little bits of things in the bottom of jars in my kitchen, I came upon some quinoa, leftover from Passover and languishing at the back of my grain shelf. I've been trying to cook more economically, and I've been having success tucking bits of boring-seeming leftovers into new dishes. I improved my last batch of mujaddara by adding bits of salsa verde-braised green beans. What's a little quinoa?

1-DSC_0318
1-DSC_0318

And here's the best part of it all: I actually enjoyed this salad a lot. It's bits of asparagus, golden raisins, and toasted pepitas for crunch. I'm especially fond of the dressing, which came together unexpectedly well, considering it was yet another attempt to use over bits of things in jars in the fridge. Win-win.

1-DSC_0357
1-DSC_0357

Quinoa and Asparagus Salad with Yogurt Dressing Serves 6

Notes: I made this recipe to use what I had in the fridge, and there's no reason you shouldn't do the same. Feel free to swap out the quinoa for wheatberries, pearl barley, or bulgur. If you don't have (or don't like) asparagus (though I'm not sure we can be friends if it's the latter...), you might finely chop some raw greens, scallions, green beans, radish, or a mixture of these. Consider this less of a prescriptive recipe and more of a starting point. That said, this combination does work really well. -R

For the salad: 1 cup quinoa 1 bunch asparagus (about 10 spears), rinsed, ends trimmed, and sliced on the bias 1/2 cup golden raisins 1/2 cup pepitas (pumpkin seeds)

For the dressing: 1/2 cup yogurt 4 tablespoons olive oil, divided juice of half a lemon half a preserved lemon, diced (I like using the whole thing, but some folks use only the rind and discard the flesh) - or, if you don't have preserved lemon, check out this helpful post from the Food52 hotline 2 teaspoons honey salt and pepper to taste

Set a medium pot full of water over medium-high heat. When water reaches a boil, add quinoa, stir to combine, and cook for 15 minutes, until quinoa is cooked through but still keeps its shape. Strain and transfer to a large mixing bowl.

Meanwhile, heat a medium sauté pan over medium heat. Add pepitas, a pinch of salt, and the tiniest drop of oil; toss to combine, and cook until you hear one pepita pop. By then, pepitas should have started to turn golden. Remove from the heat and transfer pepitas to a bowl.

Place pan back on the heat, add 2 tablespoons of olive oil, and add the asparagus. Cook for about 3 minutes, just until asparagus glisten and start to turn golden in a couple spots. (If you like your asparagus fully soft, continue cooking for 4-5 minutes more.) Spoon asparagus into the bowl with the quinoa, and stir in raisins while asparagus and quinoa are still warm - it helps them plump up.

Make the dressing: Combine the yogurt, preserved lemon, honey, and remaining 2 tablespoons olive oil in a jar. Shake to combine. Taste, and add salt and pepper to taste (you must add the s&p after adding the preserved lemon, since it is quite salty).

Drizzle most of the yogurt dressing onto the quinoa, stir to combine, and taste. Add more of the dressing if desired. Top with the toasted pepitas just before serving.

In gluten-free, kosher for passover, salad, sides, vegetarian, weekday lunch, healthy
2 Comments
Share

Grape Leaf Pie

January 31, 2013 Rivka
DSC_0348
DSC_0348

I'm having a bit of a moment with Asian food right now. If you follow me on twitter or instagram, you've seen this borne out in a series of slightly-obsessive photos of yam som-o, pomelo salad, which I am very, very close to perfecting (and then posting!). This, of course, is because we traveled to Vietnam and Thailand in December. D so anticipates these obsessive bouts when and after we travel that she doesn't even bother to roll her eyes anymore. She sees the packages of  rice, tamarind, bamboo steamers, and obscure Thai cookbooks, makes me promise I'll still make pasta sometimes, and lets it lie. Best wife ever.

DSC_0186
DSC_0186
DSC_0206
DSC_0206

It just so happens that my Asian cooking moment has coincided with a period of self-imposed exile from Mediterranean food. You wouldn't know it from the number of recipes I've posted from Plenty and Jerusalem lately, but I've been taking a break from hummus, muhamarra,, and labneh. I ate too much of it in the fall, and I needed some time off.

DSC_0210
DSC_0210
DSC_0237
DSC_0237

The vacation was also a vacation from grape leaves, which I generally love but basically O.D.ed on back in November. After a not-particularly-successful attempt at making my own, I cut myself off. We ate a lot of pasta in December, and then we went to Asia. Now we're back, and while I could eat pad thai for probably 2 weeks straight before needing a break, D has had enough Asian noodles to last her a lifetime. It was time to get back on the Mediterranean bandwagon.

DSC_0251
DSC_0251
DSC_0252
DSC_0252

A long-time lover of stuffed grape leaves, I was thrilled to find a recipe in Yotam Ottolenghi's Plenty for Grape Leaf, Herb, and Yogurt Pie. It's basically a deconstructed stuffed grape leaf, but with crispy, crunchy bread crumbs sprinkled overtop. The other genius this about this recipe is that instead of calling for rice, which you'd have to cook and cool in order to use, Ottolenghi has you bring the filling together with rice flour. Brilliant.  If you used GF breadcrumbs, this whole dish could be gluten free.

I ate this and was excited to eat more; I guess I'm back onto Mediterranean food.

DSC_0264
DSC_0264
DSC_0285
DSC_0285
DSC_0308
DSC_0308

Grape Leaf PieAdapted from Plenty

When I first made this, I thought it would be a perfect vegetarian main course. Now that we've tried it, I think it's more like a side. It'd make a fantastic dish as part of a meal like this, where basically everything is a side. If you wanted to make it more substantial, you could probably double the recipe (grape leaves and filling) and put it in a deeper, larger dish. You'd also need to cook it for probably 20 minutes longer.

I changed a bunch of things here. First, Ottolenghi calls for 5 1/2 tablespoons of fat, but you don't need it all. I cut to 4 (3 olive oil, 1 butter) and found that to be, er, plenty. I also added currants, which gave this pie much needed bits of sweet to contrast all its tartness. For me, the currants made the dish. Use raisins if you don't have or can't find currants. I also skipped the yogurt garnish. This whole pie tastes like yogurt; adding more on top was overkill. If you really want to finish the dish, you might warm a few tablespoons of honey and drizzle that overtop. That would be really lovely. Do leave a comment if you try it.

The last thing I changed was the instruction on how to fold the grape leaves over the pie. At first, I followed Ottolenghi's instructions to fold the overhanging leaves back over first, then pile the remaining leaves overtop. (That's what you see in the picture above.) On second thought, I undid this, put down the remaining leaves first, and then folded in the overhang. That way, the overhanging leaves envelop the whole pie, and it's much easier to cut.

Special ingredient alert: it's not every day you leave the grocery store with a jar of grape leaves and a bag of rice flour. I get it. Grape leaves are available at some Whole Foods and Mediterranean markets. Rice flour is available at WF, as well as at many health food stores, and increasingly at regular grocery stores, with the explosion of GF diets. Happy shopping!

20 to 25 grape leaves (fresh or from a jar) 4 shallots, finely chopped 1/4 cup currants or raisins 3 tbsp olive oil 1 tbsp unsalted butter, melted 1 cup Greek yogurt 1/4 cup pine nuts, lightly toasted 1/2 tbsp finely chopped tarragon 2 tbsp finely chopped parsley 3 tbsp finely chopped dill 4 tbsp finely chopped mint grated zest of 1 lemon 1 tbsp lemon juice salt and black pepper 1/2 cup rice flour 3 tbsp dried breadcrumbs (preferably panko)

Preheat the oven to 375°F. Place the grape leaves in a shallow bowl, cover with boiling water and leave for 10 minutes. Then remove the leaves from the water and dry them well with a tea towel. Use scissors to trim off and discard the bit of hard stem at the base of each leaf.

Sauté the shallots in 1 tablespoon of the oil for about 8 minutes, or until light brown. Add the currants and 1 tablespoon of water, stir to combine with the shallots, and leave to cool down.

Take a round and shallow ovenproof dish that is roughly 8 inches in diameter, and cover its bottom and sides with grape leaves, slightly overlapping them and allowing the leaves to hang over the rim of the dish. Mix the melted butter with 1 tablespoons of olive oil; use about two-thirds of this to generously brush the leaves lining the dish.

Mix together in a bowl the shallots and currants, yogurt, pine nuts, chopped herbs, and lemon zest and juice, and season with salt and pepper to taste. Then add in the rice flour and mix until everything is combined and uniform. Spread the mixture evenly in the baking dish, using an offset spatula or the back of a spoon to nudge the mixture into the dish without disturbing the grape leaves.

Use the remaining grape leaves to cover the top of the pie, making sure to cover the middle if you don't have enough to cover the entire surface. Then fold the overhanging grape leaves back over the top of the pie. Brush with the rest of the butter and oil mix. Finally, scatter the breadcrumbs over the top and drizzle over the remaining 1 tablespoon olive oil.

Bake for 40 minutes, or until the leaves crisp up and the breadcrumbs turn golden brown. Remove from the oven and leave to rest for at least 10 minutes. Use a very sharp or (preferably) serrated knife to cut into wedges and serve warmish or at room temperature.

In gluten-free, sides
4 Comments
Share

Fasolakia: Greek Braised Green Beans

January 15, 2013 Rivka
DSC_0089
DSC_0089

Well clearly, it's January. I got to the gym yesterday morning and my god was it crowded! You can practically taste the hope in the air. So much ambition, so many plans. Resolutions abound.

It's the second week of January, so I trust we've moved past the "I only eat raw vegetables" phase and are drifting back to real life. By real life, I mean "it's 6:30 and I just got home and I'm hungry enough that if I don't eat actual dinner right now I'm gonna go medieval on the chocolate bar in the drawer." That kind of real life.

For days like those, consider this fasolakia. Faso-what? It's a Greek dish of  green beans braised in tomato sauce. It's healthy. It's easy. Not only can you make it in advance, you should; it gets better with time.  And - here's something you can't say about that many dishes made of green beans - it's addictive. It's also gluten-free and can be vegan very easily. What other boxes can I check?

DSC_0744
DSC_0744
DSC_0740
DSC_0740

I've no clue what's traditional - stovetop or oven. What I can tell you is that both work very well: the trick is to go low and slow. Gentle heat coaxes these green beans into velvety, sweet submission. The dish starts with onions and some herbs and spices, but tomatoes do a lot of the work here, transforming into a mellow, luscious sauce for the beans with just a few soft pieces left whole.  I'm guessing the Greek way is to serve this atop rice, which soaks up the sauce. I just serve it as a vegetable alongside fish or a savory tart.

If I'm being honest, I should call these not-strictly-Greek green beans. My brother spent last year in Ankara, Turkey, and he brought me back a huge bag of the best urfa biber I've ever had. It's sweet and smokey, redolent of chocolate and berries. I've been putting it on everything, and these green beans were no exception. I love how it made an ordinary can of chopped tomatoes taste really special. If you don't have or can't find urfa biber, you can use any sweet-smelling chile or paprika. You may want to cut the quantity, though, if your chile is spicy; my urfa is pretty mild.

DSC_0081
DSC_0081

On serving them vegan: the first time I made these green beans, I forgot that I'd set aside some feta to sprinkle overtop. No one noticed, and the beans didn't suffer one little bit. They're so flavorful as is, they don't even need the cheese.

And while I'm dispensing tips, make a double batch, or even a triple. You can keep the beans in the fridge for at least a week with no problem, and they freeze beautifully as well. Hello, new favorite weekday lunch.

DSC_0091
DSC_0091

Fasolakia: Greek Braised Green Beans

3 tablespoons extra virgin olive oil 1 large red onion, diced 3 cloves garlic, smashed and then chopped 2 tablespoons urfa biber or other very fragrant mild chile flakes (less if using something spicy) 1 1/2 lbs. green beans, trimmed and cut into bite-sized pieces 1 28-oz. can diced tomatoes or, if you'd like a more irregular texture (which I do), canned whole tomatoes that you cut or tear yourself 1 teaspoon dried oregano 1/2 cup chopped parsley 1/2 cup chopped dill 1/2 cup crumbled feta cheese, optional

If using the oven, preheat to 285 degrees. If planning to cook on the stove, no need to preheat the oven.

In a large pot or deep pan, heat the olive oil over medium heat until it shimmers. Add onion and a big pinch of salt, and cook until soft, about 7 minutes. Add garlic and chile flakes, stir to combine, and cook another minute or so.

Add green beans, tomatoes, oregano, another big pinch of salt, and a few grinds of the pepper mill, and stir a few times until everything is well mixed. Bring to a very gentle simmer over medium heat.

At this point, cover the pot, and either turn the heat down as low as it'll go, or stick the pot into your preheated oven, and cook the green beans until soft an velvety, about 1 hour. When the green beans are cooked, taste and adjust seasoning, adding more salt, pepper, or chile, to taste. To serve, reheat green beans to a very gentle simmer, then stir in parsley and dill, reserving a bit of each to sprinkle overtop. Finish with the rest of the fresh herbs and a sprinkle of feta, if using, and serve hot.

If not serving immediately, store green beans either at room temperature (for up to a few hours) or in the refrigerator (for several days). These green beans also freeze very well.

In gluten-free, sides, vegetarian, weekday lunch, easy, healthy
7 Comments
Share
← Newer Posts Older Posts →

Subscribe by email:

  • books (1)
  • crisps and crumbles (1)
  • frozen (1)
  • toys (2)
  • gifts (3)
  • egg whites (5)
  • fried (5)
  • how to use--- (6)
  • drinks (10)
  • menus (11)
  • travel (11)
  • fish (12)
  • kosher for passover (14)
  • thanksgiving (14)
  • vegan (20)
  • snacks (21)
  • techniques (21)
  • soup (26)
  • bread (28)
  • pies and tarts (28)
  • cake (33)
  • events (34)
  • condiments (36)
  • various and sundry (39)
  • uncategorized (42)
  • cookies and bars (46)
  • weekday lunch (47)
  • appetizers (48)
  • salad (51)
  • gluten-free (56)
  • comfort food (61)
  • breakfast and brunch (77)
  • sides (81)
  • dessert (90)
  • main dishes (100)
  • healthy (139)
  • easy (155)
  • vegetarian (180)

| LATEST |

Featured
Blue Chair Fruit's Black Raspberry Jam
Thai Grapefruit Salad
Mango Sticky Rice
Winter 2016: Odds and Ends
Povitica: The Best Babka Ever
Persimmon Walnut Bread
Sprout Chaat Salad + New Site!
Maple Walnut Squares
How to Give Thanks
Croissants (really, I made croissants) + other croissant-ish things

| hEALTHY |

Featured
Sprout Chaat Salad + New Site!
Fennel frond pesto + what to do with those pesky stalks
Asparagus Toasts with Pistachios and Mint
Eggplant-Walnut Pâté + Passover Ideas
1-DSC_0861-600x401.jpg
Lentils and Rice with Tamarind Sauce and Dukkah
Big Kale Salad with Pomegranate and Feta
Punchy Crunchy Ginger Salad

| BreakfAST |

Featured
Povitica: The Best Babka Ever
Croissants (really, I made croissants) + other croissant-ish things
Mushroom and Kale Breakfast Strata
Barley Porridge with Orange and Black Sesame
Ramps 'n' Eggs Biscuit Sandwiches
Asparagus Toasts with Pistachios and Mint
Apple-Cheddar Scones with Sage
Menemen - Turkish Eggs with Tomatoes and Peppers
You must select a collection to display.

© 2016 Rivka Friedman. All Rights Reserved.