• Home
  • About
  • Recipe Index
  • Contact
Menu

Rivka Friedman

Street Address
City, State, Zip
Phone Number

Your Custom Text Here

Rivka Friedman

  • Home
  • About
  • Recipe Index
  • Contact

Quinoa and Asparagus Salad with Yogurt Dressing

May 20, 2013 Rivka
1-DSC_0335
1-DSC_0335

Lurking behind the shiny exterior of this homepage is a Drafts folder, containing every post I've ever started. And friends, I could make an entire second blog out of the posts stuck in draft-purgatory. There's a parsnip cake I made for my mom's birthday back in 2011; a winter citrus salad that I keep meaning to tell you about while it's still...well, winter; a tremendous zucchini gratin that I will tell you about in just a few short weeks, when summer decides to make an appearance for good; and about 15 quinoa recipes, none of which I deemed delicious enough to share.

Thing is, I am no big fan of quinoa. Try as I might, I can't love the stuff. I wish I did: it's nutritious, cooks up really quickly, and at least purports to be versatile. I'm just not the biggest fan.

But last week, fresh on a tear to use up all the little bits of things in the bottom of jars in my kitchen, I came upon some quinoa, leftover from Passover and languishing at the back of my grain shelf. I've been trying to cook more economically, and I've been having success tucking bits of boring-seeming leftovers into new dishes. I improved my last batch of mujaddara by adding bits of salsa verde-braised green beans. What's a little quinoa?

1-DSC_0318
1-DSC_0318

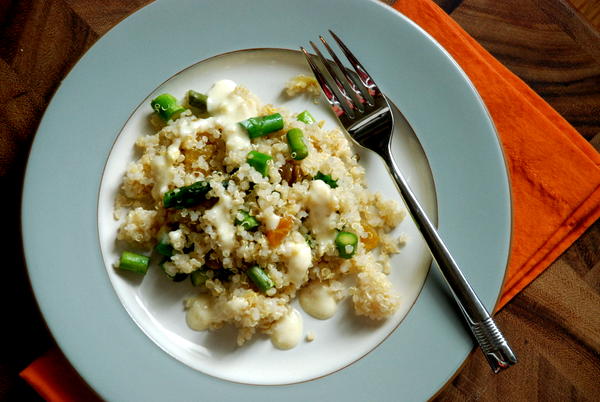
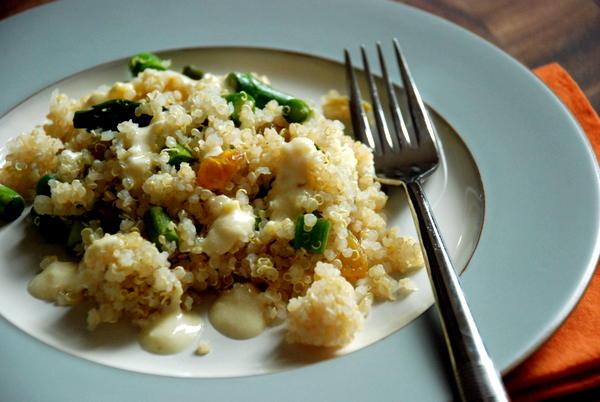
And here's the best part of it all: I actually enjoyed this salad a lot. It's bits of asparagus, golden raisins, and toasted pepitas for crunch. I'm especially fond of the dressing, which came together unexpectedly well, considering it was yet another attempt to use over bits of things in jars in the fridge. Win-win.

1-DSC_0357
1-DSC_0357

Quinoa and Asparagus Salad with Yogurt Dressing Serves 6

Notes: I made this recipe to use what I had in the fridge, and there's no reason you shouldn't do the same. Feel free to swap out the quinoa for wheatberries, pearl barley, or bulgur. If you don't have (or don't like) asparagus (though I'm not sure we can be friends if it's the latter...), you might finely chop some raw greens, scallions, green beans, radish, or a mixture of these. Consider this less of a prescriptive recipe and more of a starting point. That said, this combination does work really well. -R

For the salad: 1 cup quinoa 1 bunch asparagus (about 10 spears), rinsed, ends trimmed, and sliced on the bias 1/2 cup golden raisins 1/2 cup pepitas (pumpkin seeds)

For the dressing: 1/2 cup yogurt 4 tablespoons olive oil, divided juice of half a lemon half a preserved lemon, diced (I like using the whole thing, but some folks use only the rind and discard the flesh) - or, if you don't have preserved lemon, check out this helpful post from the Food52 hotline 2 teaspoons honey salt and pepper to taste

Set a medium pot full of water over medium-high heat. When water reaches a boil, add quinoa, stir to combine, and cook for 15 minutes, until quinoa is cooked through but still keeps its shape. Strain and transfer to a large mixing bowl.

Meanwhile, heat a medium sauté pan over medium heat. Add pepitas, a pinch of salt, and the tiniest drop of oil; toss to combine, and cook until you hear one pepita pop. By then, pepitas should have started to turn golden. Remove from the heat and transfer pepitas to a bowl.

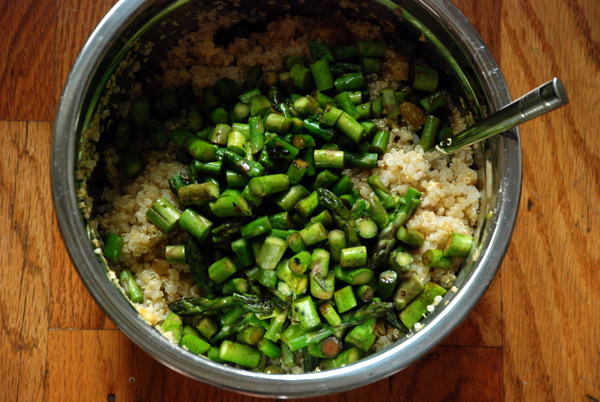
Place pan back on the heat, add 2 tablespoons of olive oil, and add the asparagus. Cook for about 3 minutes, just until asparagus glisten and start to turn golden in a couple spots. (If you like your asparagus fully soft, continue cooking for 4-5 minutes more.) Spoon asparagus into the bowl with the quinoa, and stir in raisins while asparagus and quinoa are still warm - it helps them plump up.

Make the dressing: Combine the yogurt, preserved lemon, honey, and remaining 2 tablespoons olive oil in a jar. Shake to combine. Taste, and add salt and pepper to taste (you must add the s&p after adding the preserved lemon, since it is quite salty).

Drizzle most of the yogurt dressing onto the quinoa, stir to combine, and taste. Add more of the dressing if desired. Top with the toasted pepitas just before serving.

In gluten-free, kosher for passover, salad, sides, vegetarian, weekday lunch, healthy
2 Comments

The Best Way to Caramelize Onions

May 14, 2013 Rivka
DSC_0395
DSC_0395

One of my favorite food-related articles from 2012 came from Slate. It was called, "Why do recipe writers lie and lie and lie about how long it takes to caramelize onions?" and it spoke the truth: caramelizing onions is a matter of patience. Doing it properly takes at least 40 minutes, and the recipes that tell you you'll have soft, brown onions in five or ten minutes are straight-up lying.

So, do I have some sort of trick to shorten your wait? Not exactly. But let's be honest: we see caramelized onions in a recipe, and we let out a sigh. There goes any hope of getting dinner on the table quickly. And friends, that's a problem I can solve.

The trick? Caramelize onions in bulk. Onions keep for a really long time; onions in lots of oil keep even longer. These will keep in the fridge for easily a week (actually longer, but if you're nervous about storing them for so long, top them with a hefty drizzle of olive oil). If you make a big ole' batch on a lazy Sunday, you'll have enough caramelized onions to get you through a week's worth of frittatas, tarts and more tarts, Mujaddara, and more.

And anyway, I find that it's easier to caramelize onions in bulk. Pile 'em into a big pan, turn the heat very low, and cover. Then walk away. It's pretty much that easy, and with no stress about how long they take, the promise of silky, soft, golden onions isn't too much to hope for.

Let's do this thing.

Best Caramelized Onions

5 large yellow onions 5 tablespoons butter, olive oil, or a mix (I like 3 and 2) 1 teaspoon salt

Peel onions, halve them from pole to pole, and slice into thin half-rings.

Pile the onions into the largest shallow skillet you have. If your largest shallow skillet doesn't fit them, put them into a wide pot. Make sure whatever pot or pan you're using has a lid.

Turn the heat to medium and add the butter/oil and salt. When the onions start making those wonderful sizzling noises, give the onions a good stir, reduce the heat to low, and cover the pot/pan.

After 20 minutes, check the onions. They should have sweated down considerably to the point where they are very soft and possibly turning tan. Spend the next 20-30 minutes cooking the onions uncovered, with the top off, and stirring occasionally to prevent sticking and ensure even cooking.

After 50-60 minutes, the onions should be very soft and deep golden brown. Store in a sealed container topped with a hefty drizzle of olive oil. Onions will keep for over a week.

Troubleshooting: If the onions look too dry, add water by the tablespoon and stir to incorporate with the onions. You can also add a bit more olive oil or butter if the onions aren't glistening enough.

If you have one of those amazingly powerful stoves where "low" is still pretty high (lucky you), you'll want to keep a closer eye on the onions to avoid burning them. Adding water and constant stirring are pretty good insurance policies there.

Finally, depending on how firm your onions are when you start out, they can soften quickly or very, very slowly. If your onions feel particularly soft, in 20 minutes of covered cooking they'll probably have "melted" - meaning, they'll be super soft and almost have lost their shape. Firmer onions will keep their shape in 20 minutes, so if you're hoping for super melty onions, you may want to leave them covered on the heat for a bit longer.

Here's to big batches of delicious ingredients. More to come.

In condiments, vegan, vegetarian Tags components of a meal, cooking economically
5 Comments

Cypriot Greens and Cheese Pie

May 9, 2013 Rivka
1-DSC_0666
1-DSC_0666

Sometimes, when I really want to share a recipe with you, I go a little nuts with the testing and tweaking. The recipes I get most jazzed about are the ones I want to be most perfect. So I make the thing 5 or 6 times, fussing with quantities and baking times and potential extra ingredients, all so that when you make it yourself, it's not almost perfect, it's actually perfect.

This recipe had me at hello. I made it once, and immediately knew how I'd change it for posting. Chick-chock, were headed straight for primetime. Amazing!

I sat down in front of my computer and opened up a blank page. Now then: what to call it?

Uh.

Guys, I made this in March. Only now, practically mid-May, do I finally have a title that's clear enough to tell you what you're making. And I feel like if I just explain what's actually in this thing-I-decided-to-call-a-pie, you'll see why it was so hard to figure out what it actually should be called - and you won't think I'm a total nutcase. But you will make it, yes you will, because it really is fantastic. So here goes.

The pie started with a recipe from The Traveler's Lunchbox for flaounes, Greek Easter pastries. Right, I don't celebrate Easter. But flaounes looked really really good, so they've been in my to-make folder ever since Melissa posted about them in 2010. In typical "I have too many recipes in my inbox" fashion, it took me until March to make them. The savory, triangular pastries seemed like the perfect companion to the hamentaschen I was already making for Purim. They were a big hit among friends.

But they were kind of fussy, with all the rolling and cutting and folding and pinching. And triangle pastries are a tough sell for a main course at a dinner party - they feel more like a snack. Between you and me, I don't need cheese-filled dough lying around at snacktime. So on my next attempt, I went for a big slab pie. One piece of dough, rolled into a half sheet pan, filled with all the good stuff, and bam: lunch.

1-DSC_0691
1-DSC_0691

And a really good lunch at that. It reminded me a bit of those British "lunch dishes" that Nigella Lawson and others have written about: simple dough, stuffed with meat or cheese, baked till bubbly, then sliced and served just in time for the hunger pangs to strike. This was that. Incidentally, the leftovers kept quite well in the fridge. A 300-degree oven for 10 minutes did the trick in reheating, but once I even tried popping a slice in the toaster, which was quicker and more energy efficient.

1-DSC_0715
1-DSC_0715

Now then: what to call the flaounes-turned-pie? Flaounes probably means about as much to me as it does to you, which is to say, very little. I wanted you to know that this thing is loaded with greens and cheese. But let's be honest: it's not really a pie. Pie signals buttery, crumbly crust, which isn't what you'll get here. Instead, you'll be making something more like a bread dough. It rises and puffs in the oven, and its exterior develops a sheen not unlike brioche or challah.  I thought about casserole, but that didn't seem right, either. Maybe "cheesy bread?

1-DSC_0727
1-DSC_0727

So forgive the slightly misleading name. Maybe let's just call this lunch.

Cypriot Greens and Cheese Pieadapted from The Traveler's Lunchbox

I baked my pie lunch dish in a half-sheet pan, which is 13" x 18". If you don't have a half-sheet pan, you can easily divide your dough in half and make two pies in two quarter-sheet (9" x 18") pans.

The mastic and machleb are quite distinctive, and they're what give the dough its unique flavor. They're available on Amazon (each linked appropriately0 but also on Kalustyans. As good as they are, though, you can skip them and still end up with a delicious dish.

For the dough: 5 cups (700g) all-purpose flour 1 1/2 teaspoons instant yeast 1 1/2 teaspoons salt 1 teaspoon mastic, ground in a mortar (optional; also called mastica) 1/2 teaspoon ground mahleb, (optional; also called mechlepi) 1 tablespoon sugar 3 large eggs 1/2 cup (125ml) milk 1/2 cup (125g) butter, melted and cooled 1/4-1/2 cup (60-125ml) lukewarm water, or as needed vegetable oil, for greasing bowl and work surface

For the filling
: 1 lb 2 oz (500g) halloumi, kashkaval, pecorino, manchego, or a mixture of these cheeses, grated 1 1/2 tablespoons flour 7 large eggs; save a bit of one of the eggs for brushing on the dough 2 tablespoons dried mint 1/2 cup (50g) raisins or currants 8 oz. kale, chard, or other greens, shredded 1 teaspoon baking powder

1/3 cup sesame seeds

In a large mixing bowl, mix the flour, yeast, salt, mastic, mahleb, and sugar. In a separate bowl, whisk together the eggs, milk and butter and add this to the flour. Add as much water as needed to get a soft but kneadable dough (I needed only 1/4 cup plus 1 tablespoon). If it's too sticky to knead, add additional flour by the spoonful until you can knead it with clean hands without it sticking to your fingers. Turn the dough out onto a lightly oiled surface and knead until the dough is smooth and springy, about 5 minutes. Form the dough into a ball. Wash out the bowl, pour about a teaspoon of oil into the bottom, and put the dough in, rolling it around to coat it with the oil. Cover the bowl with a cloth and leave for about an hour, or until doubled in size. Fold the dough over itself a couple of times to deflate, cover the bowl with plastic wrap and refrigerate for at least 2 hours, or up to 24.

Meanwhile, mix all the filling ingredients except the baking powder (and a bit of one of the eggs, for brushing) and set aside. If refrigerating the dough overnight, cover and refrigerate the filling too.

Line your rimmed half-sheet pan or two rimmed quarter-sheet pans with parchment paper that extends beyond the edges of your pan(s). Set the dough on a lightly floured workspace and roll out into a roughly 16" x 21" rectangle (if using a half sheet pan) or two 12" x "16" rectangles (if using 2 quarter-sheet pans). The exact shape of your dough doesn't matter - you're just going to fold the edges over the filling anyway, so don't sweat it. Just make sure the dough comes up past the edges of your sheet pan(s).

Pour the filling into the pan(s), and fold the edges of the dough over the filling. The dough edges won't even come close to covering the filling, and that's okay. You should wind up with a sort of funky looking half-crust, half-topping. See my photos above.

Brush the folded-over part of the crust with the reserved egg, and sprinkle sesame seeds onto the crust.

Let the pie rise on the counter for about 30 minutes. Halfway into the rise, preheat the oven to 375 degrees and set a rack in the center of the oven.

Bake the pie for 35-40 minutes, until the center is firm and the top of the crust is golden brown. Set the pan on a rack to cool for 10 minutes, then serve.

Pie can be reheated a 300-degree oven for 10-15 minutes, or by popping slices in a toaster.

In breakfast and brunch, main dishes, pies and tarts, vegetarian
4 Comments

More Asparagus for Dinner

May 6, 2013 Rivka
1-DSC_0856
1-DSC_0856

It's me again. Just wanted to tell you that I am still love-loving asparagus season (and still freezing my butt off...DC, get warm already!). To prove my undying love for the green spears, I've shared a few more thoughts about asparagus for dinner (okay, and breakfast and lunch, too) over at Food52. Cold soup, hot hash, and more - it's all up on the site now. Go check it out, and then get thee to the grocery. Dinner awaits!

In various and sundry, vegetarian
Comment
← Newer Posts Older Posts →

Subscribe by email:

  • books (1)
  • crisps and crumbles (1)
  • frozen (1)
  • toys (2)
  • gifts (3)
  • egg whites (5)
  • fried (5)
  • how to use--- (6)
  • drinks (10)
  • menus (11)
  • travel (11)
  • fish (12)
  • kosher for passover (14)
  • thanksgiving (14)
  • vegan (20)
  • snacks (21)
  • techniques (21)
  • soup (26)
  • bread (28)
  • pies and tarts (28)
  • cake (33)
  • events (34)
  • condiments (36)
  • various and sundry (39)
  • uncategorized (42)
  • cookies and bars (46)
  • weekday lunch (47)
  • appetizers (48)
  • salad (51)
  • gluten-free (56)
  • comfort food (61)
  • breakfast and brunch (77)
  • sides (81)
  • dessert (90)
  • main dishes (100)
  • healthy (139)
  • easy (155)
  • vegetarian (180)

| LATEST |

Featured
Blue Chair Fruit's Black Raspberry Jam
Thai Grapefruit Salad
Mango Sticky Rice
Winter 2016: Odds and Ends
Povitica: The Best Babka Ever
Persimmon Walnut Bread
Sprout Chaat Salad + New Site!
Maple Walnut Squares
How to Give Thanks
Croissants (really, I made croissants) + other croissant-ish things

| hEALTHY |

Featured
Sprout Chaat Salad + New Site!
Fennel frond pesto + what to do with those pesky stalks
Asparagus Toasts with Pistachios and Mint
Eggplant-Walnut Pâté + Passover Ideas
1-DSC_0861-600x401.jpg
Lentils and Rice with Tamarind Sauce and Dukkah
Big Kale Salad with Pomegranate and Feta
Punchy Crunchy Ginger Salad

| BreakfAST |

Featured
Povitica: The Best Babka Ever
Croissants (really, I made croissants) + other croissant-ish things
Mushroom and Kale Breakfast Strata
Barley Porridge with Orange and Black Sesame
Ramps 'n' Eggs Biscuit Sandwiches
Asparagus Toasts with Pistachios and Mint
Apple-Cheddar Scones with Sage
Menemen - Turkish Eggs with Tomatoes and Peppers
You must select a collection to display.

© 2016 Rivka Friedman. All Rights Reserved.