• Home
  • About
  • Recipe Index
  • Contact
Menu

Rivka Friedman

Street Address
City, State, Zip
Phone Number

Your Custom Text Here

Rivka Friedman

  • Home
  • About
  • Recipe Index
  • Contact

Pulled Jerk Chicken Sandwiches

May 22, 2012 Rivka
jerk chicken 1
jerk chicken 1

D will tell you - if somewhat tiredly - that I am loath to make the same dish twice. Maintaining this site means constantly searching for new recipes to tell you about, and returning to an old favorite means passing up the opportunity for a new dish, which, if we love it, means a new post. Aside from re-testing recipes I'm planning to blog, I've settled into a somewhat maddening pattern of behavior: I make a recipe, love it, rave about it, promise to add it into the rotation, and then blithely move on to something unfamiliar, leaving the old-new favorite on the (overloaded) back burner for eternity. If I could break that habit just once, it'd be for these jerk chicken sandwiches.

It started the way no other jerk chicken story has ever started: with rolls. Before jetting out of the house on Friday morning, I glanced in the fridge and probably uttered an expletive as I realized I'd forgotten that I'd put up pizza dough the previous day, hoping to make pizza when I got home from work. I didn't get home till 9, and neither did D, making pizza night unrealistic. But the dough had fully risen in the fridge, and I'd have hated to waste it. So I threw caution to the wind, punched it down, and formed it into rolls. Rolls that turned out seriously, honestly, delicious. They were so good, I made a second batch.

The good thing about serving rolls for dinner is that you don't need to make challah. Sometimes, there just isn't enough time for that. Having crossed that off my list, I started brainstorming what our guests might like to eat on/in their rolls. That's when I remembered this jerk chicken recipe I've wanted to make for ages. Sure enough, you could make it in the crock pot - easy! - and you were meant to eat it atop crusty French rolls, which by some miracle I now had.

Done.

Friday was so busy and involved so much running around that I actually showered twice. To say I threw this dinner together somewhat haphazardly would be an understatement. I tossed some asparagus and cauliflower under the broiler as the rolls baked, and made one dressing to use on both. I made the easiest cake ever. And I made this jerk chicken, which - if you use boneless chicken thighs - involves little more than browning chicken, mixing together a bunch of things you probably already have, and then letting them get to know each other for a few hours in the crock pot. In a pinch, you can even skip the browning.

jerk chicken 2
jerk chicken 2

I told you I made my own rolls, and I've included the (very easy) recipe for those below. But you can definitely buy the rolls instead. That'd bring this dinner within reach for a weeknight. And since I don't think our work lives will be getting less busy anytime soon, I just might put some jerk chicken in the crock pot tomorrow night. If I were in town for Memorial Day weekend, I'd definitely do it again then. I told you, it's a recipe you'll want to make again and again.

jerk chicken 3
jerk chicken 3

Pulled Jerk Chicken Sandwichesadapted from Chow.com

As I said above, this recipe does have two steps - browning the chicken and braising it in the marinade - but the browning can be skipped in a pinch. If you do skip the browning, simply add the rub ingredients to the crock pot along with the rest of the marinade ingredients.

Another note about cooking this recipe: it can be made either in a crockpot or in a dutch oven. If making in a crockpot, turn the crockpot onto warm before starting on the chicken, so that it'll be hot by the time the chicken is browned. In that case, you can use whatever pan you'd like to brown the chicken: stainless steel and cast iron both work.

If making the chicken in a dutch oven, you can do both the browning and braising in that same pot.

For the chicken: 1 tablespoon ground cinnamon 2 teaspoons ground allspice 2 teaspoons kosher salt 1 1/2 teaspoons ground nutmeg 4 pounds dark-meat chicken (I liked a mix of drumsticks and boneless thighs) 2 tablespoons vegetable oil

For the marinade: 1/2 cup freshly squeezed lemon juice 1/2 cup molasses 1/3 cup distilled white vinegar 1/3 cup freshly squeezed orange juice 1/3 cup soy sauce 10 peppercorns 5 garlic cloves, smashed 3 scallions, trimmed and thinly sliced 1 1/2 cups cilantro (about 1 bunch), coarsely chopped 1 tablespoon finely chopped fresh thyme leaves 1 (3-inch) piece fresh ginger, sliced into 1/4-inch coins 1 Scotch bonnet or habanero pepper, sliced into rounds

Brown the chicken: Combine spices in a small bowl. Sprinkle over chicken and rub in to coat all over. Set aside. If using a slow cooker, turn on "warm" setting.

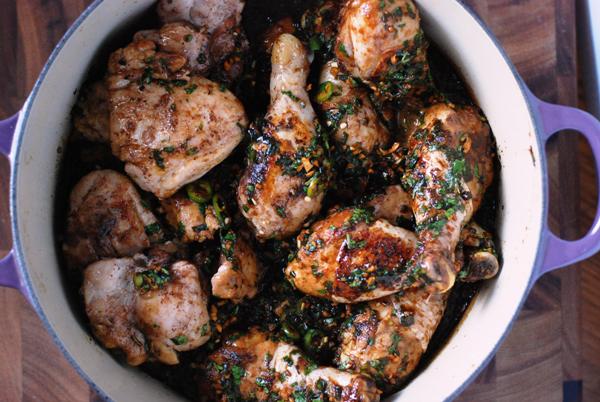
Pour 2 tablespoons vegetable oil in either a heavy-bottomed metal pan or a dutch oven (see headnote) and turn heat to medium-high. When pan is hot, place chicken in pan in a single layer - you'll likely do this in batches - and cook until underside is golden brown. Flip and repeat with the other side. When both sides have browned, remove chicken to a plate (if doing the braising in that dutch oven) or to your slow cooker. Chicken will still be raw inside. Repeat with remaining pieces of chicken.

Combine marinade ingredients in dutch oven or slow cooker, and stir chicken and marinade together. Set dutch oven over lowest heat and cover, or cover slow cooker (set to "warm"), and cook chicken until falling off the bone or shredding when prodded with a fork, 5-8 hours. (Drumsticks are especially forgiving on cooking time, which is why I like them, but thighs - even boneless thighs - will do just fine.)

When the chicken is ready, remove bones and shred meat into small strips. Return shredded chicken to pot or slow cooker with sauce until ready to serve.

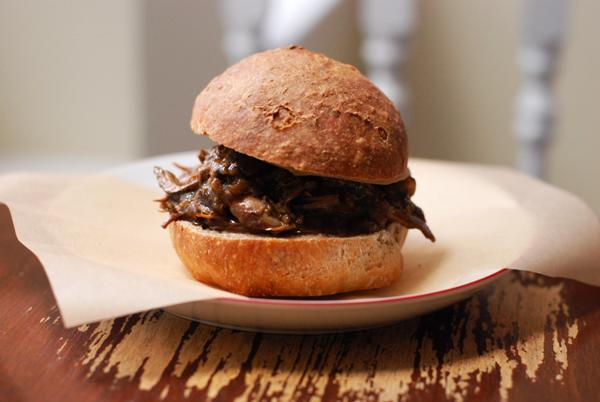
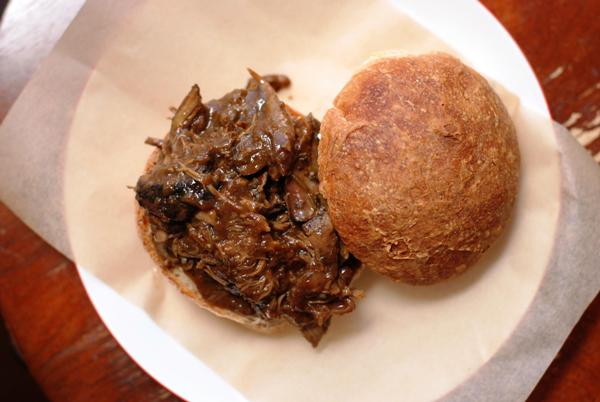
Serve on halved crusty rolls (recipe below) with plenty of napkins.

Crusty Rollsadapted from Jim Lahey

3 3/4 cups flour 2 1/2 teaspoons instant or other active dry yeast 3/4 teaspoon salt 3/4 teaspoon sugar 1 1/3 cup room-temperature water

In a medium bowl, stir together the flour, yeast, salt, and sugar. Add the water and use a large fork or your hand to mix until blended, at least 30 seconds. The dough will be stiff, not wet and sticky. Cover the bowl and let sit at room temperature until the dough has more than doubled in volume, about 2 hours. Divide the dough in half, and divide each half into 4. Shape each ball into a roll by gently tucking the edges under and into a point at the center of the roll on its bottom. (There are several videos online explaining how to shape dinner rolls, if you'd like more detailed instruction, but it isn't a particularly fussy process.) At this point, rolls can be placed into oiled plastic bags and frozen, or refrigerated the same way for upto 1 day.

When ready to bake the rolls, preheat oven to 450°.

Put balls on a lined baking sheet, leaving a good 2 inches of space on either side of each roll if you want them to come out round and with fully crisp crusts. (For rolls more square in shape and with crusts only on top, you can put them closer together on the baking sheet, and they'll bake up more like pull-apart rolls. Again, your choice.) While the oven preheats, proof the rolls for about 45 minutes. Then bake 40-45 minutes, until tops are golden brown and rolls sound hollow when tapped.

Let cool completely, then slice in half, top with chicken and a ladleful of sauce, and serve.

In main dishes, weekday lunch
3 Comments

Kale Salad with Avocado Dressing

November 7, 2011 Rivka
DSC_0066
DSC_0066

This is the latest in NDP's Weekday Lunch series, your one and only source into the scandalous lives of my tupperware. For earlier Weekday Lunch posts, check this out.

I'm a big fan of kale salads. They're a pop of green in a season where not much is; they basically never wilt; and given how healthy they are, it's hard not to feel righteous eating one.

My usual kale salad combines lacinato kale - the long, bumpy leaves that are almost glamorous in texture, also known as dinosaur kale - with pine nuts, raisins or currants, and shards of Parmigiano Reggiano cheese. It's the sort of salad that's good now, better later. My friend (and author of various guest posts on NDP) Jeremy pointed out that over time, as the kale wilts, it takes on a texture almost like seaweed, which is quite pleasant.

Last week, in the mood for kale salad, I opened the fridge to find I was fresh out of lacinato. I did have a bunch of regular curly-leaf kale, but I knew it would take a thicker, more serious dressing to tame those wiry leaves. Where did I turn? The humble avocado.

Avocado dressings are flat-out underrated. People talk of yogurt, of mayonnaise (the enemy of delicious - I can't stand the stuff), of buttermilk, but never of avocado. It's too bad: avocados are smooth and buttery, thick enough to make a beautifully emulsified dressing, and did I mention they're delicious?

DSC_0062
DSC_0062

For this salad, I combined kale with those crunchy, juicy asian pears that I can't seem to get enough of. I added scallions for texture and bite, then dressed the mess with a dressing of soy, rice wine vinegar, and avocado, whipped into submission with the help of grapeseed and sesame oils. And now, I warn you: people, the combination is addictive. I really can't get enough. I've made this dressing three or four times over the past few weeks, tweaking it ever so slightly to get that perfect zestiness. I've eaten it on regular kale, on lacinato kale once I replenished my supply, and even used it as a dip for slices of asian pear as an afternoon snack. It's ridiculously good. Hope you like it as much as I do.

Kale Salad with Avocado Dressing serves 2

1 bunch kale (any kind - regular or lacinato are both great; mine was about 3 oz) 1 asian pear, halved, cored, and sliced 2 scallions, sliced 1 avocado juice of 1 lime 1/2 tablespoon (1 1/2 teaspoons) soy sauce 1 tablespoon rice wine vinegar 1/4 teaspoon salt 1/2 teaspoon sesame oil 1/4 cup grapeseed oil water if needed

Rip the kale into medium sized pieces and place in a large bowl. Add sliced scallions and pear.

Scoop the avocado into a medium bowl and use a fork to mash it until totally smooth. Add all the remaining ingredients except the grapeseed oil and stir to combine. Then gradually add the grapeseed oil and whisk until fully combined. If necessary, add water by the tablespoon until dressing is thin enough to pour.

Add dressing to kale salad. Start with half, toss, and add more dressing if necessary. Allow the salad to sit for at least 10 minutes before serving. Salad will keep up to 1 day dressed; dressing will keep up to 1 week in the refrigerator.

In gluten-free, salad, vegetarian, weekday lunch, easy
8 Comments

Easy Eggplant Curry

October 3, 2011 Rivka
easy eggplant curry
easy eggplant curry

Somehow, D and I were hosted for all of our Rosh Hashana meals. Five times, we found ourselves in good friends' homes, ripping off pieces of round, honey-dunked challah, and savoring slices of apples picked as nearby as Maryland, and as far as a friend's hometown of Omaha. Five times, we ate way more than we needed to, fought to stop ourselves from taking one more piece of mushroom tart, one more spoonful of ethereal fennel soup, one more scoop of squash gratin, one more slice of my mom's famous carrot kugel, one more bite of toasted coconut ice cream. Needless to say, we're pretty stuffed.

(Another highlight, while we're on the topic: my mom made a sweet-savory noodle kugel with feta. Talk about creative! I'm going to need that recipe.)

Alas, the languid pace and gluttonous eating of the past three days can't go on indefinitely. There's work - a new job, for one of us - right around the corner. And while, after weeks of working too hard and having little time for myself, it was great to not have to cook for this holiday, it also means that the fridge is strangely free of leftovers. Needless to say, I had to rectify that situation.

I discovered this Food52 recipe last year, and made it probably 10 times in the ensuing weeks. It takes maybe 30 minutes, start to finish; it keeps in the fridge for days, maybe even improves as it sits; and it reheats like a charm at the office, which by now you know seals the deal for me.

I serve this curry with brown rice and a scoop of yogurt. If you're feeling fancy, you can make raita to go with it, but plain yogurt works nicely, too. We've got a container full of the stuff, waiting to greet us at the end of the workday tomorrow. There's no better way to start the new year.

Easy Eggplant CurryAdapted from "Purnima Garg's Eggplant and Tomato Curry" on Food52 serves 4-6

3 tablespoons peanut oil (canola also works) 1 teaspoon brown mustard seeds 1 teaspoon cumin seeds 1 onion, sliced 4 Japanese (long and thin) eggplants, sliced 1/2 inch thick 1 serrano chile, seeded (if you're concerned about spice - I left my seeds in) and chopped fine 1 teaspoon ground coriander 14 ounces canned diced tomatoes with juice 1/2 teaspoon garam masala 1 teaspoon salt 1/2 teaspoon black pepper

Heat 1 tablespoon oil in a large frying pan until it shimmers. Add the mustard seeds and cumin seeds and heat about 30 seconds, until they pop.

Add the sliced onions, and stir occasionally over medium high heat until they are deep brown in spots (this will take a while, but makes a big difference to the taste and they won't burn if you are careful).

Add 1 more tablespoon of oil. Add half the eggplant, and saute until the skin turns brown and the flesh just starts to soften. Remove onions and cooked eggplant to a heatsafe bowl. Add the final tablespoon of oil, the remaining eggplant, and saute until browned and slightly softened. Add the onions and the first batch of eggplant back to the pan.

Add the chile, coriander, garam masala, tomatoes, and salt and pepper. Turn heat to medium low and cook, covered, until the eggplant is soft, stirring occasionally.

Serve hot with rice and plain yogurt or raita. Feel free to add other condiments, like spicy pickle or chutney.

In gluten-free, sides, vegetarian, weekday lunch, easy
6 Comments

Mushroom Turnovers

July 25, 2011 Rivka
DSC_0014-1
DSC_0014-1

Most of you regulars probably know that in the summer months, D and I operate under a cold-oven policy. Our apartment, see, it loves the heat. It clings to every last morsel of July humidity like there's some shortage (which, having spent the past week in town clinging to my vent, I can say with certainty there is not). Living in this hot, sticky mess, I'm so tired I can barely cook. We've been eating lots of salads these past few weeks, and in our near future, there's no shortage of those, either.

DSC_0013-1
DSC_0013-1

On the rare occasions that I do turn on the oven (for, say, this peach blackberry wonder), I try to maximize its utility. That's what had me making these mushroom turnovers a couple weeks back. The oven was already on, so I figured I should get as much stuff inside as I possibly could. The beauty of these triangles is that you can cook the whole batch at once, freeze them, and then pop a couple into a container any which day and call 'em lunch.

I've been making spanikopita for years, both with puff pastry and with phyllo dough, and apple turnovers are a beloved winter brunch staple. But mushroom turnovers are the newest addition to my turnover repertoire. They're easy, delicious, and appropriate for all seasons. Also, they're pretty easy to make.

DSC_0017-1
DSC_0017-1

I modeled the recipe on my stuffed mushrooms, which are inspired by the delicious stuffed mushrooms my mom makes. They're purist's mushrooms, made using the chopped up fungi, cheese, and little else. For my turnovers, I sauteed chopped mushrooms with shallots and garlic till soft and flavorful, deglazed with white wine, and cooked the whole mixture until the liquid had evaporated. Into each turnover goes a scoop of the mushrooms and a sprinkle of cheese. That's it.

If you don't make these until fall, I won't judge. It's pretty darn hot. But if you're already making that cherry pie, why toss a batch of these into the oven at the same time? That way, you can be as lazy as the heat requires for the rest of the week, and still not go hungry. A good deal, if you ask me.

Mushroom Turnovers makes 12 turnovers

1 package (24 sheets) phyllo dough (most boxes contain two packages) 3 tablespoons olive oil 6 tablespoons butter, divided 4 small to medium shallots, diced 4 garlic cloves, peeled and minced 2 lbs. mushrooms, wiped clean, trimmed and diced (including stems) salt and pepper 1/2 cup white wine 1/2 cup grated parmesan or pecorino romano cheese

Leave phyllo dough out on the counter, still wrapped, for at least 1 hour to thaw.

Meanwhile, add olive oil and 3 tablespoons butter to a large saute pan set over medium heat. When butter has melted, add shallots, garlic, and a pinch of salt. Sweat for two minutes. Add chopped mushrooms, another pinch of salt, and several gratings of pepper. Cook mushrooms, stirring every so often, until soft, fragrant, and slightly shriveled, about 15 minutes. Add white wine to the pan, and use a wooden spoon to scrape up all the caramelized bits of mushroom and shallot from the bottom of the pan. Cook about 5 minutes more, until wine has totally evaporated and mixture no longer looks moist. Remove from heat and allow to cool at least 10 minutes.

Melt remaining 3 tablespoons butter in a small bowl.

Preheat the oven to 350. Unwrap phyllo dough so that the stack of sheets lies completely flat. Cover with a kitchen towel, and keep phyllo covered with towel while making the turnovers. Line a large baking sheet with parchment paper or silpat, and take a second baking sheet to use as your workspace.

Now you have your workstation - phyllo on one side, mushroom mixture and butter next to you, lined baking sheet right nearby. Take one sheet of phyllo dough and gently place it onto the unlined baking sheet (your workspace). Brush lightly with melted butter - a 3 strokes per sheet, maximum. Place another sheet of phyllo over the first, and brush butter again. Repeat two more times, for a total of four phyllo sheets stacked one on the next. Then use a paring knife to slice this stack in two lengthwise, so you have two long strips (as in the first picture). Put 1 1/2 tablespoons of the mushroom mixture at one edge of each strip, and sprinkle about 1/2 tablespoon cheese (more, if desired) over the mushroom mixture. Then fold as you would a paper football (again, see top picture) until the mixture is completely wrapped in phyllo. Place onto lined baking sheet so the end of each strip of dough is tucked under the turnover. Repeat with remaining sheets of phyllo, until you've done these steps 6 times and made a total of 12 turnovers. Place turnovers on lined baking sheet with a bit of space between each.

Bake turnovers for 30 minutes, until golden brown. Serve immediately, or cool completely on a rack, then transfer to the freezer. Turnovers will keep frozen for several months.

In main dishes, vegetarian, weekday lunch
7 Comments
← Newer Posts Older Posts →

Subscribe by email:

  • books (1)
  • crisps and crumbles (1)
  • frozen (1)
  • toys (2)
  • gifts (3)
  • egg whites (5)
  • fried (5)
  • how to use--- (6)
  • drinks (10)
  • menus (11)
  • travel (11)
  • fish (12)
  • kosher for passover (14)
  • thanksgiving (14)
  • vegan (20)
  • snacks (21)
  • techniques (21)
  • soup (26)
  • bread (28)
  • pies and tarts (28)
  • cake (33)
  • events (34)
  • condiments (36)
  • various and sundry (39)
  • uncategorized (42)
  • cookies and bars (46)
  • weekday lunch (47)
  • appetizers (48)
  • salad (51)
  • gluten-free (56)
  • comfort food (61)
  • breakfast and brunch (77)
  • sides (81)
  • dessert (90)
  • main dishes (100)
  • healthy (139)
  • easy (155)
  • vegetarian (180)

| LATEST |

Featured
Blue Chair Fruit's Black Raspberry Jam
Thai Grapefruit Salad
Mango Sticky Rice
Winter 2016: Odds and Ends
Povitica: The Best Babka Ever
Persimmon Walnut Bread
Sprout Chaat Salad + New Site!
Maple Walnut Squares
How to Give Thanks
Croissants (really, I made croissants) + other croissant-ish things

| hEALTHY |

Featured
Sprout Chaat Salad + New Site!
Fennel frond pesto + what to do with those pesky stalks
Asparagus Toasts with Pistachios and Mint
Eggplant-Walnut Pâté + Passover Ideas
1-DSC_0861-600x401.jpg
Lentils and Rice with Tamarind Sauce and Dukkah
Big Kale Salad with Pomegranate and Feta
Punchy Crunchy Ginger Salad

| BreakfAST |

Featured
Povitica: The Best Babka Ever
Croissants (really, I made croissants) + other croissant-ish things
Mushroom and Kale Breakfast Strata
Barley Porridge with Orange and Black Sesame
Ramps 'n' Eggs Biscuit Sandwiches
Asparagus Toasts with Pistachios and Mint
Apple-Cheddar Scones with Sage
Menemen - Turkish Eggs with Tomatoes and Peppers
You must select a collection to display.

© 2016 Rivka Friedman. All Rights Reserved.