Graham Crackers

D's stepmom, Terri, has an absolute weakness for graham crackers. She says they're the one thing she absolutely can't keep in the house, because once she opens the package, she'll eat every last one. I learned this on our recent trip to Israel, and was pleased to be able to reply that in my bag, I just so happened to have two homemade graham crackers that I'd packed as a plane snack. Naturally, her eyes bulged. I bounded up the stairs and grabbed them immediately.

It had all started innocently enough: having given in several times the previous week to sugary, buttery shortbread and chocolate chip cookies and really so much more, I was determined to bake a snack that would satisfy my sweet tooth without pushing me over the edge. That whole "new year, new habits" thing has nothing to do with it, promise.

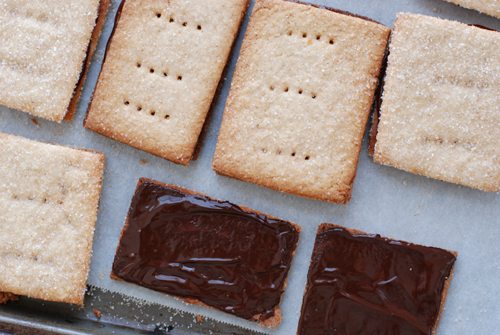
Graham crackers were the perfect choice. (They're called crackers -- how bad could they be?) I made a batch a couple days before we left; I gave a few away as holiday presents, and the rest I played around with. Some got a one-sided dunking in chocolate, others became sandwiches.

The cookies were just perfect. They were addictively crunchy, and the addition of whole wheat flour gave them a rustic, graham-y quality. And don't forget the generous dusting of cinnamon sugar to finish them off.

Now Terri wasn't all that enthused by the graham crackers, because the particular pair I'd brought were sandwiching a thick layer of intensely brown caramel, which overpowered the rather subtle flavor of the graham crackers. I liked 'em just fine, but I probably won't make them again. Graham crackers are meant to be simple, the kind of thing you munch alongside a steaming cup of tea. They satisfy a sweet craving just perfectly, no caramel or chocolate needed.

Graham Crackers adapted ever so slightly from The Washington Post

For the graham crackers

9 tablespoons plus 1 teaspoon unsalted butter, at room temperature 3/4 cup plus 1 tablespoon sugar 3/4 cup plus 1 tablespoon flour, plus more for rolling 1 1/3 cups whole-wheat flour 4 teaspoons baking powder 3/4 teaspoon salt 6 tablespoons whole or low-fat buttermilk or milk

For the topping (optional)

1 cup sugar 1 tablespoon ground cinnamon

Combine the butter and sugar in the bowl of a stand mixer or hand-held electric mixer. Beat on medium speed until light.

Combine the flours, baking powder and salt on a sheet of parchment paper or wax paper.

Reduce the speed to low; add the flour mixture, then the buttermilk, in several increments, ending with the flour; beat to form a soft dough. Divide the mixture in half, then wrap each portion in plastic wrap. Refrigerate for 1 hour or until well chilled.

For the topping (if using): Combine the sugar and cinnamon in a bowl.

Position oven racks in the upper and lower thirds of the oven; preheat to 325 degrees. Line 2 rimmed baking sheets with parchment paper.

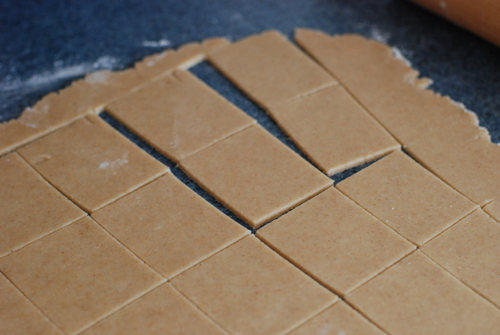
Lightly flour a work surface. Working with 1/2 portion at a time (keeping the others chilled), lightly flour the top of the dough. Roll out to a rectangle with a thickness of slightly less than 1/4 inch. Use cookie cutters to cut into shapes, or use a sharp knife and a ruler to cut the dough into 2-by-3-inch rectangles. Alternatively, use a scalloped cutter to give your cookies a wavy edge. (I did this on batch number 2.) Prick each cookie two or three times with a fork, and place the unbaked crackers on the baking sheets, spaced 1/4 inch apart. Sprinkle evenly with the topping, if using.

Bake for 6 to 8 minutes, then rotate the baking sheets top to bottom and front to back. Bake for 6 to 9 minutes, until golden brown and baked through. Let cool on the baking sheets before serving or storing.
Pickles!

pickles1 Folks, I'm finding it hard to contain my excitement about NDP's second-ever guest post. Guess who wrote it? MY MOM!
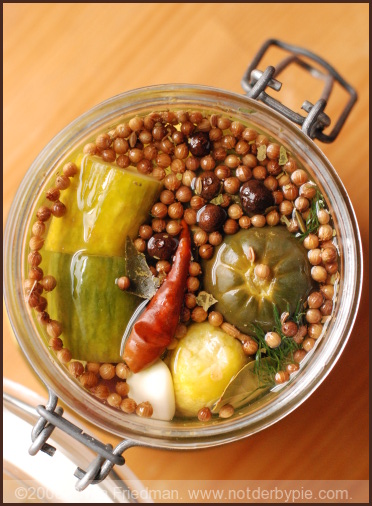
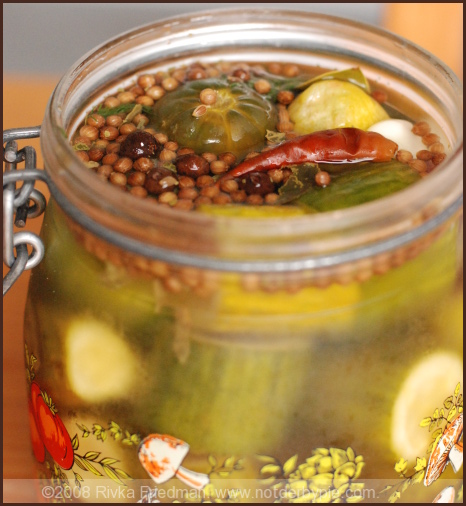
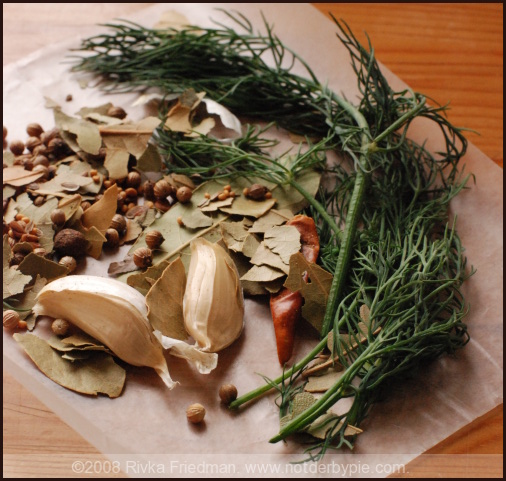
That's right: in the post below, NDP Ima tells you all about easy-to-make, hard-to-stop-eating pickles. You'll see from her intro paragraph where I got my taste buds. These pickles are salty, tangy, and really bright from the addition of fresh dill. So read up -- then go make some pickles!

pickles2

I am really not a salt lover. I don’t use much when I cook, and in restaurants great food that’s well-seasoned is often too salty for my taste. I don’t care for chips or french fries, and I prefer nuts spicy or au naturel. Nonetheless, I do love briny salty things – olives, capers, and sour pickles. So when I was leaving town for a long weekend and had a lot of small cucumbers that wouldn’t last until my return, I decided to try my hand at some pickles. I wanted spicy, garlicky, dill pickles that would make themselves in the refrigerator while I was gone. I remembered the ones a family friend used to make with cucumbers from his garden and my dad’s. He didn’t use shortcuts, though – he put his pickles in huge crocks of brine and alum in the basement for weeks.

I cut the cukes into thick, chunky slices and placed them in a quart jar with pickling spices and garlic. I didn’t have any fresh dill, so my first batch just had dill seed from the pickling spice, but it still tasted authentic. I prepared the vinegar brine and filled the jar, leaving it upside down on the counter overnight. The next morning, before rushing to the airport, I put the jar in the frig. When I returned four nights later, the pickles were done to perfection! pickles3

The recipe below is really more of a method – you can vary the ingredients, and the size of your jars and your cucumbers will determine your quantities. As long as you maintain the proportions of ¾ cup of vinegar and ¼ cup of kosher salt per quart of boiled and cooled water, your brine will work and you’ll have great pickles in a matter of days. Try this with green tomatoes if you have them in your garden, with blanched cauliflower, small sweet peppers, or blanched pearl onions. Add onions or hot peppers for extra kick. I used just one hot pepper to enhance the spicy flavor. I made a second batch with fresh dill sprigs, blanched carrots, and a few kalamata olives in addition to the cukes. They’re not quite finished as a I write this, but they look so good I can’t wait to sample them!

If you like sweet pickles instead of sour, substitute sweet pickling spices, cloves, and allspice, use cider vinegar instead of white vinegar, and add sugar (1/2 cup to ¾ cup) to your brine.

Your pickles will keep about four months in the refrigerator. If you seal your finished pickle jars with a canning process, they will keep on the shelf indefinitely. Open jars should be refrigerated.

pickles4

Refrigerator Dill Pickles

1 dozen or more pickling cucumbers or small English cucumbers

4-8 cloves garlic, peeled and cut in half

2-3 tablespoons pickling spice (the brand I used had dill seed, mustard seed, celery seed, coriander, ginger, black peppercorns, bay leaves, and red pepper)

A few sprigs of fresh dill

1 small dried hot pepper, or a fresh hot pepper cut in half and seeds removed (optional)

1 quart water boiled and cooled

¾ cup white vinegar

¼ cup salt (kosher salt works well, but sea salt or table salt are also fine)

A pinch of sugar (if desired – I omitted)

Use one or two quart jars or a gallon jar, depending on how your cucumbers fit into the jar. The amounts of spices are for one gallon jar or two quart jars, but you can modify this according to taste and the quantity of pickles you want to make. Place one tablespoon of pickling spice, half the dill and half the garlic in the bottom of the jar. If using slender or English cucumbers, you can cut them into thick chunks/slices and they will be ready in less time. If you use larger cucumbers, you can pickle them whole and cut them into lengthwise quarters when you serve them. Pack the cucumbers tightly into the jar(s). When you have added most of the cucumbers, add half of the remaining spices and garlic. When all the pickles are in the jar, add the last of the spices. If using the pepper, place it in the middle layer.

When the jar is full of cucumbers and spices, stir the salt into the vinegar. Pour the mixture into the boiled water and stir to finish dissolving the salt. The water does not have to reach room temperature, since it will continue to cool as you make the brine. Fill the jar to the brim with brine. Close the jar tightly with its lid. Invert the jar into a bowl and leave it outside the refrigerator. After one day, turn the jar upright. Check to see how pickled the cucumbers are. If you used the smaller, slender cukes, it is probably time to refrigerate the pickles. They will be completely done in another three or four days. If you used larger cucumbers, leave them out for another day or two. Check for doneness according to your preferences – if you prefer half-sour, they should be edible after just one-two days.

When the pickles are as done as you like them, you can pour out half the brine, leaving as many spices in the jar as possible. Replace the removed liquid with a mixture of plain boiled water and vinegar. For each cup of boiled, cooled water, add two tablespoons of white vinegar. Fill the jar to the top again and refrigerate. You can also remove the hot pepper if you don’t want the pickles to get spicier over time.

Granola with Tahini

tahinigranola1 Ahh lovely readers, I've missed you! I've been posting sporadically at best for the past month, because work has been absolutely insane and I haven't had time to even enter the kitchen, let alone write about it. That last post on zucchini soup was my lame attempt to give you reading material while I was at work, so as not to abandon you completely -- but I unwittingly passed along a post from last year, just before my Alaska cruise, and let you all think I was headed on a fabulous vacation. Not so! I spent Labor Day.....well, laboring. At the office. Until very late. But now all that should be behind me because we signed off on our research yesterday, and all that's left to do is write the accompanying speech. I'm hoping today is the beginning of my re-entry into my favorite room of the apartment. Cross your fingers for me, will you?
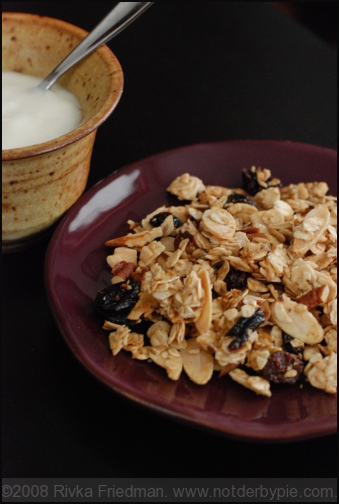
Busy times at the office need to end with something restorative. Sometimes it's a big bowl of pho, with its etherial broth and slurp-tastic noodles. Other times it's a piece of good toast with some homemade jam. This morning, the first in a month that I haven't had to start a 15-hour day at 8:30 am, I made my own granola.

I once was in the habit of making granola every week. It's a good thing to have around for breakfast in the morning, and it pairs great with that super-tart yogurt in the fridge. But lately there's been no time for such simple pleasures, and breakfast has consisted mostly of whatever I grabbed the night before at Trader Joe's. Needless to say, I was more than ready to put my own labor hours back into the food I eat.

tahinigranola2

My usual granola has almond butter, which I find creates clumps better than water or oil and whose flavor doubles down on the granola's nutty flavor. This morning, though, I was out of almond butter, so I went with tahini (sesame butter), which has a similar texture, instead. To balance the flavor of tahini, which can be overwhelming if not used sparingly, I added a splash of walnut oil, as well as a bit of chopped crystallized ginger, which paired well with the sesame flavor and gave a little punch. A generous pinch of cinnamon and a whisper of cloves brought the granola squarely into fall's territory, which I suppose is appropriate, given that the weather is dreary and it's dark when I wake up these days.

I was still concerned that the tahini might overwhelm, but it totally doesn't: because the granola cooks until golden, the other flavors in there -- almonds, oats, ginger, cherries, raisins -- get a chance to toast and intensify, bringing the sesame flavor into balance. I LOVE this batch and plan on making another one, some other not-super-early morning.

Hope you all had great weekends, and I look forward to seeing you around here more regularly!

Granola with Tahini

2 1/2 cups oats 1/3 cup maple syrup 1/4 cup tahini 1 Tbsp walnut oil, optional 2/3 cup pepitas (pumpkin seeds), either salted or unsalted, depending on preference 2/3 cup sliced almonds 2/3 cup chopped pecans 2/3 cup raisins, cranberries, or other dried berry (I like half raisins, half cherries) 2 Tbsp chopped crystallized ginger 1/2 tsp salt 1 teaspoon cinnamon 1/8 teaspoon cloves

Preheat oven to 325.

In a small bowl, mix syrup, tahini, oil if using, salt, and cinnamon until incorporated. In a large bowl, mix all remaining ingredients until well-distributed. Drizzle the syrup-tahini mixture overtop, stirring with a fork until all dry bits are at least slightly wet and clumps have started to form.

Spread granola on a large rimmed baking sheet in a thin layer and bake at 325 for 10-12 minutes. Remove from oven, stir with a fork to move pieces from edge to center and from top to bottom. Make sure pieces that have started to brown are in the center and well-surrounded. Return to oven and bake 10-12 more minutes, until golden brown throughout. Granola will not be crunchy when it leaves the oven; don't worry -- it'll crisp up as it cools. Once cool, transfer to air-tight container; granola will keep this way for up to 1 month.

Sardine and Fava Bean Bruschetta

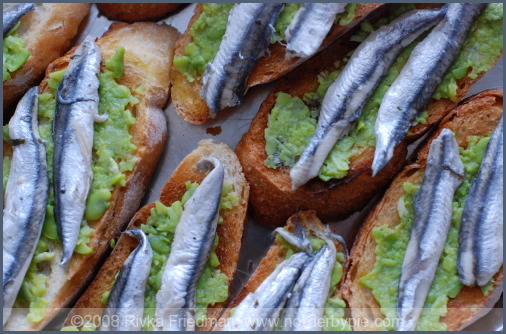
fava-sardine-1 I can't remember if I've ever written a love song to favas on this blog. I mean, I've written about them, but I probably haven't sung their praises as much as they deserve. Starting in late May, I bother the farmers at my local market every Sunday, trying to subtly nudge them to pick their favas as soon as they're ready so I can dig in. The first few weeks, I'm met with transparently frustrated replies of "they're not ready, lady!" but around the second week in June, out they come. From them on, you'll find me and my tote bags by the fava bin. That's right.
Favas come double-wrapped, so to speak; they're tucked in a waxy coating that's nestled inside a pod. To eat favas, you pop open the pods, scoop out and blanch the beans, and then remove the outer shell. Work intensive? Yea, but you won't find me complainin'. Favas are sweet and green and, with a little salt and not much else, the delicious essence of early summer.

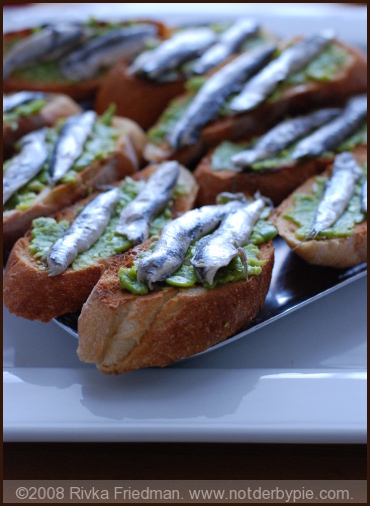
While I usually just toss my favas in a salad or mix them with some pasta and other vegetables, I also really like fava bean spread. Mine is smooth enough to spread but still quite chunky, and laced with a whole lot of garlic and a squeeze of lemon. If I don't finish it all before using it, I'll spread it on a baguette and eat it just so. Or, if I'm really feelin' it, I'll top my bruschetta with some vinegar-and-oil-cured sardine fillets. The idea came to me from an Epicurious recipe for cannellini and sardine bruschetta. I love cannellini, but I don't stock my pantry with dry or canned beans when fresh ones are so readily available during the summer, so I subbed in favas for the cannellini the recipe called for. The combination worked perfectly: the headiness of the garlicy fava spread stood up well to the sardines, which added just the right amount of richness and tang. Toasted baguette, more than a vehicle, was crunchy and light, a fine contrast for the favas and sardines perched atop it. I finished off the bruschetta simply, with a bit of olive oil and a grind of the pepper mill. It didn't need much else. fava-sardine-2

The fact that I've managed to get this far without begging ya'll not to hate sardines is a testament only to how silly I think sardine-squeamishness really is. Sardines are awesome; their flavor is strong and pungent, they're a bit oily and somewhat tangy, they're packed with omega-3s, and really, they're delicious. If you hate'em, be that way. If not, welcome to my club. Enjoy your stay. Want some sardine and fava bean bruschetta?

Sardine and Fava Bean Bruschetta inspired by a recipe from Gourmet

1/4 lb. sardines, oil-packed or salt-packed are fine (if salt packed, be sure to rinse thoroughly) (1 tin sardines will be plenty) 4 lbs. fava beans, shelled, blanched, and peeled (see here for instructions) 2 cloves garlic 2 Tbsp. lemon juice salt and pepper 1 baguette olive oil

Slice baguette on sharp bias into 1 3/4-inch slices and set aside. On a cutting board, chop garlic into small pieces. Add a sprinkle of salt; using a very sharp knife, drag the blade toward you across the garlic, mashing it and the salt with the side of your knife. Keep dragging and regathering the garlic until it resembles a pretty smooth paste. Add favas. Continue this motion until favas have been pretty mashed with the garlic, and the whole thing looks smooth enough to spread but still fairly chunky. Scoop up and put into a medium sized bowl. Add salt and lemon juice and mash up with a fork to incorporate. Add salt to taste.

Toast baguettes until golden. Cool five minutes on a rack, then plate and spread with some of the fava spread. Top with 2 fillets of sardines, a glug of olive oil, and a grind of the pepper mill. Serve just so.