Meal of the Century: Minibar

minibar1.jpg If I had my way, I'd have many more dinners like Thursday night's feast at Minibar; that said, it's safe to assume that food that memorable won't pass my lips again for quite a long time. I know it's not my usual tune to do restaurant reviews, but Thursday night was truly revolutionary, and I'd be remiss not to share it with my readers, who surely appreciate the value of a spectacular meal.

Two friends, E and J, recently celebrated their birthdays; E impressively convinced J and four other rational people to shell out an arm and a few legs to eat what rarely consisted in things we'd call "food." Main ingredients in many of the dishes included liquid nitrogen; agar agar; sodium alginate; calcium chloride; and other lip-smacking ingredients. Odd chemicals notwithstanding, each course was both tasty and fun to eat. In fact, fun was pretty much the theme of Thursday night's feast. Minibar is a restaurant that doesn't take itself too seriously; there's a fair amount of silliness involved when you're eating things that make you exhale smoke. Minibar is owned and run by the formidable DC restauranteur Jose Andres (also of Jaleo, Oyamel, Cafe Atlantico, and Zaytinya); it comprises -- yep, you guessed it -- a bar (and a short one at that) on the second-and-a-half floor of Cafe Atlantico. Six seats across, the "restaurant" is designed to serve three groups of two a 28-course dinner, spanning two hours, of "snacks," "savories," and "sweet endings." The chefs behind the bar (Brad and Ryan were ours, but the team is six in total) take great care in assembling each course, and the results are both whimsical and clever.

Over the next few posts, I'll provide some highlights of this meal, along with some tips for recreating the dishes in your own kitchen. I asked how to make almost all of the 28 courses we had on Thursday night; however, many of them required a pacojet, a cotton candy maker, and other kitchen tools and appliances whose names I don't even know. With that in mind, my caveat to providing some of their methods is that when you go home to make these dishes, aim to replicate the tastes, but accept that some of the textures will be impossible to recreate without some specialty kitchen items.

Ok, here we go: (SPOILER ALERT: if you're going to minibar sometime soon, do yourself the favor of refraining from reading this. Better to be surprised onsite!)

minibar1a.jpg

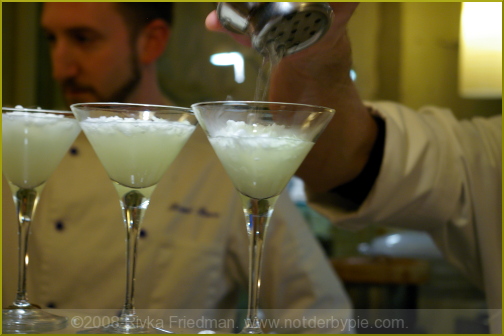
Course #1: Caipirinha "Nitro": picture a martini glass filled with a nice, strong caipirinha, and topped with what amounted to shards of caipirinha sorbet. I'm not 100% sure how they managed to freeze the alcohol, but I think dry ice may have been involved; in any event, the idea was that the "ice" in the drink was made of more drink, so that when it melted it didn't dilute the drink at all. Clever, but not one of my favorites. This was likely because at that point, we had glasses of champagne sent by a friend, and glasses of the white wine we had ordered, both in front of us already; it was a bit of alcohol overkill, especially on an empty stomach.

The idea of making drink flavored ice cubes is clever and useful; I often do it when making a pitcher of iced coffee, so that people can keep their coffee both cold and strong.

minibar2.jpg

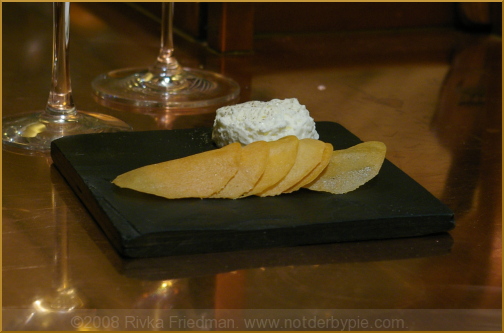
Course#2: Parmesan "Pringle" (yea, almost every course has at least one word in quotations): paper-thin sheets of toasted parmesan were shaped to resemble pringles, and were served with a delightful dip made of greek yogurt, lemon, and some herbs. This course was really delicious; the salty parmesan chips went perfectly with the creamy and acidic dip. Perhaps the best part was that while the so-called pringles were incredibly thin and delicate, the yogurt dip was so light and fluffy that you could scoop it onto a pringle without the chip breaking into a million shards the way you might expect it to. Very cool.

minibar3.jpg

When I was younger, I used to make pita pizza for dinner at least once a week. Parmesan was my preferred pizza cheese, and I'd always make sure to grate extra cheese onto the pan so that along with my pita pizza, I could eat small sheets of browned parmesan cheese. These days, I don't bother with the pita pizza; I just grate parmesan onto a baking sheet lined with foil in a 350-degree oven for 15 minutes or so, until the cheese is fully browned. I remove it from the oven, let it cool slightly, and then crack it into "chips," to be eaten with a dip of your choice, if not plain.

As for the dip, it is relatively easy to make a fluffy greek yogurt dip at home: simply whip the yogurt with a hand or stand mixer, and add salt, pepper, a few squeezes of lemon and some fresh parsley, mint, chili pepper, or other herbs and spices.

minibar4.jpg

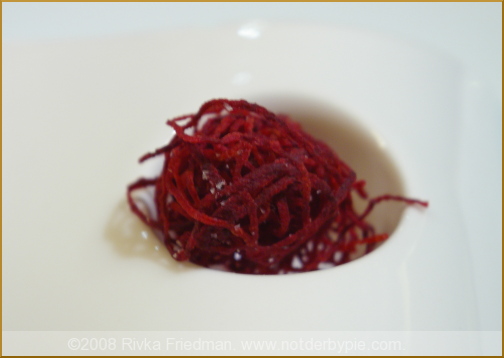
Course#3: Beet "Tumbleweed." If there was a throwaway course, this was it. The tumbleweed was essentially a bunch of terra sticks made into a tangled ball. It was good, but it tasted no more interesting or flavorful than terra chips. I suppose that to make these at home, you would slice a beet into matchsticks, season with salt and pepper, bake, and then fry. Or maybe just fry raw. Anyhow, buy Terra chips or sticks and avoid the hassle.

minibar5.jpg

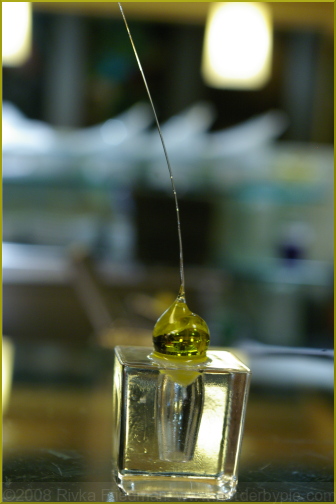
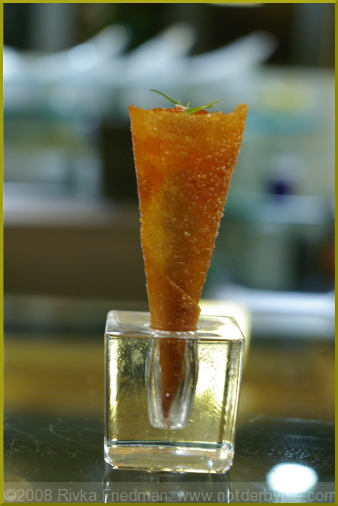
Course#4: Olive Oil "bon bon:" Do you watch Top Chef? If you recall the final episode of season 2, when Marcel and Ilan cooked in Hawaii, Marcel attempted making something just like this, but the humidity foiled his plans. Essentially, the olive oil bon bon consisted in a fantastic Spanish olive oil and a hit of salt held together with sodium alginate inside a thin layer of sugar, such that it formed a glassy marble-like bottom with a long, slender pipette at the top. We were instructed to lift by the bulb, as the shard of sugar was very delicate. Cracking the sugar released a small rush of wonderfully-flavored olive oil, which blended nicely with the salt and sugar.

Not surprisingly, I can't tell you how to make this at home.

minibar6.jpg

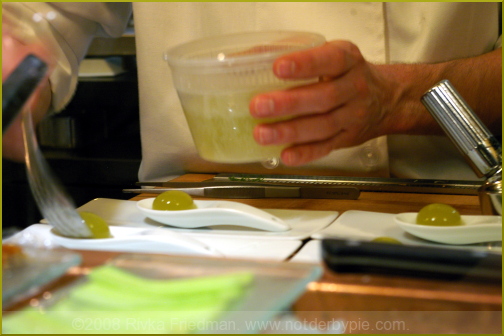
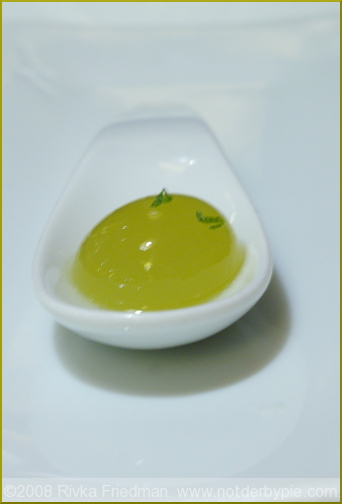
Course#5: "Mojito:" this was in quotations because it was prepared using some agar agar so that the outside gelled to resemble an egg yolk, with a thin mojito-flavored membrane surrounding the sweet, rum-y, limey innards. There was just a bit of lime zest on top. Once in your mouth, the membrane burst and the mojito went down easily; this mouthfeel would recur several times during the meal.

minibar7.jpg

No tips for this one, either -- sorry, folks.

minibar8.jpg

Course#6: "Bagles and Lox:" A clever twist on the original, this was deep-fried Greek pastry filled with tobiko ikura (salmon roe) and home-made (I think) herbed cream cheese. The bite contained perfect proportions of each (read: lots of roe, little cream cheese) and the crispy pastry, neither sweet nor salty, was the perfect vehicle for the creamy and salty filling. Most of us really enjoyed this.

minibar9.jpg

I actually plan on making this at home at some point, and here's how I'll be doing it: I'll buy wanton wrappers, and slice them into thin isosceles triangle, wrap them around themselves into a cone shape, stick together with a bit of water, and deep fry. You may have to set them around something structured so that they hold their shape. After they've been fried and cooled, make the cheese: mix equal parts cream cheese and either Alouette or Boursin cheese. You only need like 1/2 a tsp. total for each cone. Put half the cheese mix in; top with a couple tsp. of tobiko and a bit more cheese. And maybe a bit of lemon zest would go nicely with it as well.

That's enough for now, but hang around for more courses during the next couple weeks. What a meal this was!

No-knead Raisin Pecan Bread

*correction appendedraisinbread1.jpg

When it comes to bread, I'm a firm believer in the homemade variety. There's something so therapeutic about the process: in making bread, you create a dough from the humblest of ingredients. Using nothing more than your hands, you establish a complex web of gluten that gives the dough structure and texture; and with some patience, perhaps also a book to pass the hours, you give that dough the time it needs to grow in size and flavor. I'm no stranger to intense kneading and endless rises -- I think I've proven my willingness to hold out for a good loaf.

Good bread has always required a good knead and a good rise; not anymore. Jim Lahey, the genius baker behind Sullivan Street Bakery, developed a recipe for a crusty, flavorful loaf that requires no kneading whatsoever. The secret? Time, and lots of it. Oh yea, and almost no yeast. raisinbread2.jpg

Ever since Mark Bittman, aka the Minimalist, brought No-knead bread into the national spotlight last year, it has been blogged and baked many, many times over. Mix flour, water, the smallest little bit of yeast. Mix. Wait. Bake. Eat. Hard? I didn't think so. Here's why this seemingly odd recipe works (and works so well):

Typical bread recipes have at least a tsp, usually more, of yeast for the same amount of flour as this recipe lists. Their rising times, however, are far shorter; in other words, a lot of yeast has a couple hours to grow a dough. In Lahey's recipe, the dough has just a 1/4 tsp of yeast, but that yeast has a full 18 hours to work. In that time, not only does the yeast prime the dough for a doubling in size, it also ferments the dough, giving it a complex flavor not usually found in breads with shorter rising times. In those first 18 hours, the dough develops flavor; after that rise, you shape the dough (in just a few seconds) and allow it to sit again for a couple hours, during which it will double in size. The instructions are specific, but not at all complicated.

The last wonderful thing I'll mention is that you can add to the dough anything you'd like. Raisins and pecans were a fine choice; the tartness of the raisins and earthy butteriness of the pecans complimented the dough's fermented flavor. Some other flavoring possibilities:

  • cheddar and jalapeno peppers
  • caraway seeds
  • herbs and goat cheese
  • honey and cinnamon
  • gosh, lots lots more!

You should add any extra ingredients when you're first mixing the dough, as they're easier to incorporate that way. I added 2/3 cup of each, but any amount will do, depending on how loaded you like your loaf.

raisinbread3.jpg

Clearly, I need not plug this bread. Its publicity in the blogosphere and in kitchens everywhere speaks for itself. But in case you've managed to avoid hearing about it until now (which is almost impossible as I doubt my blog would be the first you'd find), do make it. The resulting loaf is truly unparalleled.

No-Knead Bread Adapted from Jim Lahey Time: About 1 1/2 hours plus 14 to 20 hours' rising

3 cups all-purpose or bread flour, more for dusting 1/4 teaspoon instant yeast 1 1/4 teaspoons salt Cornmeal or wheat bran as needed.

1. In a large bowl combine flour, yeast and salt. Add 1 5/8 cups water, and stir until blended; dough will be shaggy and sticky. Cover bowl with plastic wrap. Let dough rest at least 12 hours, preferably about 18, at warm room temperature, about 70 degrees. 2. Dough is ready when its surface is dotted with bubbles. Lightly flour a work surface and place dough on it; sprinkle it with a little more flour and fold it over on itself once or twice. Cover loosely with plastic wrap and let rest about 15 minutes. 3. Using just enough flour to keep dough from sticking to work surface or to your fingers, gently and quickly shape dough into a ball. Generously coat a cotton towel (not terry cloth) with flour, wheat bran or cornmeal; put dough seam side down on towel and dust with more flour, bran or cornmeal. Cover with another cotton towel and let rise for about 2 hours. When it is ready, dough will be more than double in size and will not readily spring back when poked with a finger. 4. At least a half-hour before dough is ready, heat oven to 450 degrees. Put a 6- to 8-quart heavy covered pot (cast iron, enamel, Pyrex or ceramic) in oven as it heats. When dough is ready, carefully remove pot from oven. Slide your hand under towel and turn dough over into pot, seam side up; it may look like a mess, but that is O.K. Shake pan once or twice if dough is unevenly distributed; it will straighten out as it bakes. Cover with lid and bake 30 minutes, then remove lid and bake another 15 to 30 minutes, until loaf is beautifully browned. Cool on a rack.

Nibbly Buckwheat Butter Cookies

buckwheat1.jpg I know, you don't have to tell me -- these look just like those whole wheat sables I posted in January. What can I say? I've fallen for nibbly sables and I can't get up.

This is all Alice Medrich's fault. I recently acquired her book, Pure Dessert, and ever since, I've been baking goodies non-stop. Her recipes are dead simple, and the sweets are addictive. Did I mention it's called "Pure Dessert?" Yea, it's pretty hard to go wrong there. These are slightly different than those sables, and, in D's opinion, slightly better. While the buckwheat flour makes'em quite delicate, it also imparts a sandy, earthy quality that whole wheat flour alone doesn't quite have. Admittedly, the buckwheat also makes greyish cookies, which aren't the easiest to photograph, but remember people, they're for eating, and eat them we did. All of them. Whoa.

buckwheat2.jpg

I can think of a couple nice variations that would suit these cookies nicely:

  • substitute nuts (walnuts, pine nuts or pecans) for some or all of the cocoa nibs
  • add a bit of orange or lemon zest and finely shave some very dark chocolate bits into the dough
  • add some dried black currants instead of the nibs (this would also go very nicely with the zest)

...the possibilities are endless.

buckwheat3.jpg

Nibbly Buckwheat Butter Cookies recipe by Alice Medrich; makes 48 2.5-inch cookies

  • 1 1/4 cups all-purpose flour
  • 3/4 cup buckwheat flour
  • 1/2 pound (2 sticks) unsalted butter, softened
  • 2/3 cup sugar
  • 1/4 tsp. salt
  • 1/3 cup cacao nibs
  • 1 1/2 tsp. vanilla
  1. Whisk the two flours together in a medium bowl. Set aside.
  2. With a hand or stand mixer, beat the butter, sugar, and salt for about 1 minute, until smooth and creamy but not fluffy. Mix in nibs and vanilla.
  3. Add the flours and mix just until incorporated.
  4. Scrape the dough into a mass and, if necessary, knead it a few times by hand.
  5. Form the smooth dough into a 12x2 inch log. Wrap and refrigerate at least two hours, preferably overnight.
  6. Position racks in the upper and lower thirds of the oven and preheat the oven to 350 degrees. Line the baking sheets with parchment paper.
  7. Use a sharp knife to cut the cold log into 1/4-inch slices. (I sliced mine about 1/2 an inch thick, and I enjoyed them that way.)
  8. Place them on baking sheets, about 1 1/2 inches apart.
  9. Bake just until the cookies begin to color at the edges, 12-14 minutes, rotating the sheets from top to bottom and front to back half way through baking. Cool completely on racks.
  10. Cookies should keep, stored in an airtight container, for at least 1 month.

Whole Wheat Leek and Onion Tart

leektart1.jpg File this under "unexpectedly delicious." When I developed the recipe for this tart, I purposefully avoided making the center quiche-like. I wanted a cheesy filling laced with caramelized leeks and onions; a quiche, eggy and milky, is a whole different thing. That said, eggs make things hold together and puff a bit in the oven, so I was concerned that my eggless tart filling would be dense and soggy, and might even disintegrate once sliced. Not so, my friends, not so. This was truly an unanticipated success, and perhaps the best thing on my dinner table last Friday night.

The key was caramelizing the hell out of onions and leeks; I'm talking half an hour over low heat, first covered, then uncovered, so that the onions shrunk into a big ole' pile of sweet brown goo (gosh, that sounds appetizing) and the leeks also emitted their natural sugar. This step was the longest and most annoying, as it essentially consisted of watching a pot, but I got to stir every once in a while to keep from falling asleep.

leektart3.jpg

After the onions and leeks were fully caramelized and cooled, I added them and a bunch of chopped herbs to 2 cups of soft, curded cheese. My preference is a mix of farmer cheese and ricotta (mostly farmer cheese). If you use ricotta, you may want to set it in a strainer lined with paper towels for 1/2 and hour or so, to let some of the moisture drain out. Since farmer cheese is essentially drained cottage cheese, it's relatively dry.

leektart2.jpg

As for the crust, I used a recipe for basic pie dough, and altered it so that 1/2 the flour was whole wheat. Overall, the crust tasted good and had the right flaky-crunchy consistency; however, even though I blind-baked it before adding the filling, the bottom of the crust got a bit, uh, less-than-crunchy by the time I served it. You'll be happiest with your results if you fill the crust just before baking and serving it. But do make this one, because it won a fan base quickly and I imagine I'll be making it again soon. Friday night guests, stay tuned.

leektartlast.jpg

Whole Wheat Leek and Onion Tart serves 8

For the crust(adapted from a recipe on chow.com):

  • 3/4 cup all-purpose flour
  • 3/4 cup whole wheat flour
  • 1/2 teaspoon kosher salt
  • 8 tablespoons cold unsalted butter (1 stick), cut into small pieces
  • 4 to 5 tablespoons ice water
    Combine flour and salt in a mixing bowl. Using a pastry blender, stand mixer, or your hands, cut butter into flour until the butter is dispersed throughout and the mixture is in pea-sized bits.
  1. Add 4 Tbsp. ice water and mix just until dough comes together; only add the 5th Tbsp. if you need to, and do not overwork the dough or it will become tough.
  2. Shape the dough into a disk, wrap with plastic, and refrigerate at least 30 minutes.

For the Filling:

  • 2 medium white onions, chopped
  • 2 medium leeks, white and light green parts only, sliced lengthwise and chopped into half-moons
  • 1 tsp. fresh thyme (or half tsp. dried)
  • 2 tsp. fresh marjoram (1 tsp. dried)
  • 1 Tbsp. fresh parsley (1/2 Tbsp. dried)
  • 2 cups soft curded cheese, drained if necessary
  • salt and pepper
  1. Caramelize onions and leeks in a fair amount of olive oil (enough to generously coat a heavy-bottomed skillet) and a bit of salt, over low heat for at least 1/2 an hour. Start with them covered, which allows them to soften from the steam; after 20 minutes or so, uncover them and stir regularly, until they have shrunk considerably and have turned caramel-brown.
  2. After cooling the onions and leeks, add them and all the herbs to the 2 cups of cheese. Salt and season to taste.
  3. Meanwhile, prepare the crust: remove from the refrigerator, and roll on a floured surface until the dough is about 1 1/2 inches wider than your tart pan.
  4. Wrap the dough over the rolling pin, transfer to the tart pan, and carefully lay it inside.
  5. Delicately press the dough into the crevices of the pan, and use a knife to trim the edges of the crust.
  6. Fill the crust with uncooked rice or beans, pie weights, or another pie dish, and bake in a 350-degree oven for 20 minutes.
  7. Set out on a counter, uncovered, to cool completely.
  8. Before serving, fill the crust with your cheese mixture, bake at 350 for 15 minutes, and serve immediately.