• Home
  • About
  • Recipe Index
  • Contact
Menu

Rivka Friedman

Street Address
City, State, Zip
Phone Number

Your Custom Text Here

Rivka Friedman

  • Home
  • About
  • Recipe Index
  • Contact

Sour Cherry Rosemary Focaccia

June 27, 2012 Rivka
sour cherry focaccia cut

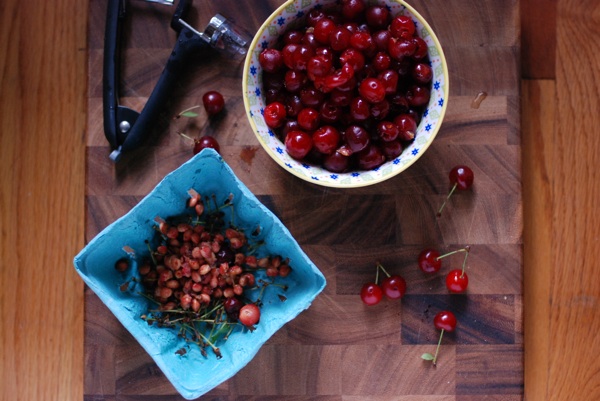
Yes, I could write a book on sour cherries. Perhaps I will one day. I love them, I love them so much. When buying my 15th and 16th quarts of the season at the Foggy Bottom market last week, it dawned on me: Internet, sour cherries are my favorite fruit.

sour cherries
sour cherries

Back at the homestead, I searched the interwebs for other people’s odes to sour cherries. Sadly, most people seem to enjoy them just fine, but no one has gone on the record as the crazy obsessive I seem to be. It’s fine, though: if you’re not in the sour cherry camp yet, I’d bet a Hamilton this focaccia has the power to convert.

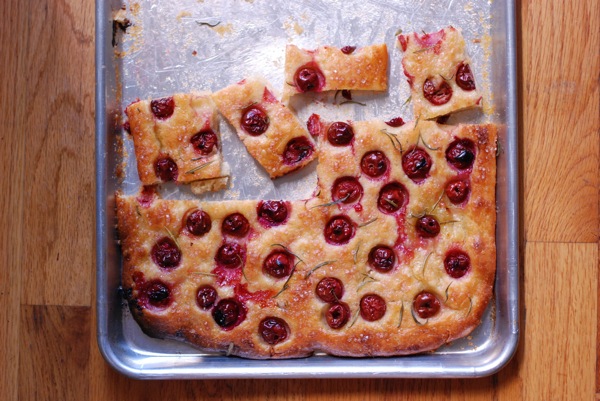
My friend Jana introduced me to this recipe a couple years ago. Here’s what’s great about it: first, it’s not too sweet. The sour cherries are allowed, for once, to be…sour. And there’s plenty of salt on this focaccia. Sour cherries and salt don’t meet often enough (and if you’re looking for another way to use them in a savory dish, I’d highly recommend this one.) It’s funny—and probably no accident—how much the cherries look like cherry tomatoes, nestled into the dough and sprinkled with fresh rosemary. The aesthetics play with your senses.  The rosemary definitely would be great on a traditional tomato focaccia, but it might surprise you how well it pairs with cherries.

pitted sour cherries

Another thing sets this recipe apart. As much as I love sour cherry pie and crisp, the corn starch and the flour from the crust can make the cherries a bit sludgy. Here, each cherry has its own little bed of dough. No clumping, no sludge. Just perfectly plump, roasty cherries, waiting to burst when you bite into them. The focaccia itself also has this fantastic contrast thing going on: juicy, moist spots under the cherries, crisp outer edges and bottom. It's a perfect recipe, and now that sour cherries have hit the market, you shouldn't miss it.

sour cherry focaccia unbaked

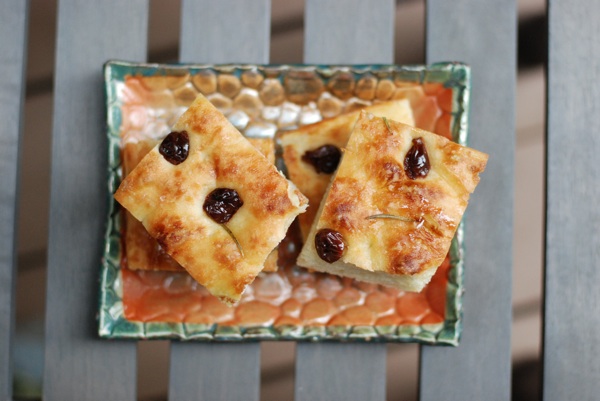
For some of you, sour cherries still aren't out. Fret not: there's a recipe here for you, too. You see, thanks to my wonderful Michigander in-laws, I've got a never-ending supply of perfectly plump, wine-colored dried cherries. My mother-in-law reads my mind, replenishing them just as I run low. Back in May, before sour cherry season, Jana invited us to dinner. When she asked us to bring focaccia, I turned to that same recipe she'd given me -- and then began to play.

dried cherry focaccia 2

I was a bit wary of making Martha's dough recipe again, since it was so wet when I first made it and I wanted something slightly more manageable. So I turned instead to beloved Gourmet for my go-to focaccia recipe, which is easier make and easier to handle. The crust isn't as crackly-crisp as Martha's, but it's a fair amount less greasy. I preferred it overall; Jana prefers Martha's. I've provided the Gourmet one below, but if you'd like to try the original, you can find it here.

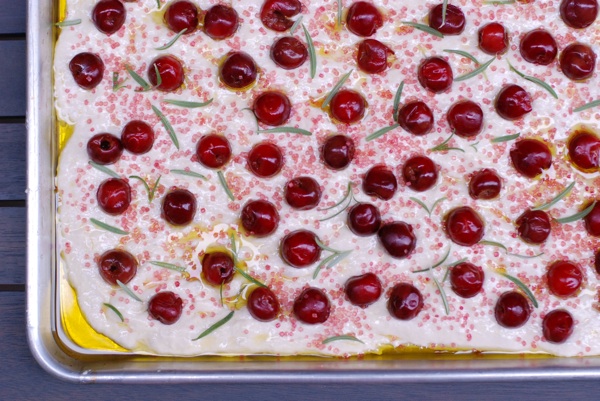
I knew I didn't want to lose that juicy-crunchy interplay that makes the original so fantastic, so I soaked the dried cherries to plump them up. Another thing that makes the original recipe unforgettable? Instead of flaky salt, it gets topped with sanding sugar. I did the same, but I made sure not to skimp on the salt in the bread itself - makes for a nice contrast.

dried cherry focaccia

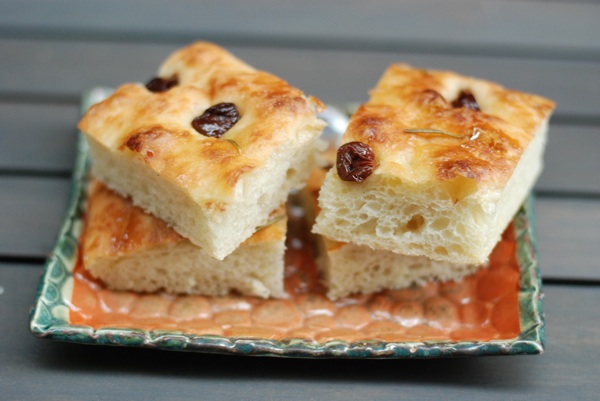
The result was definitely more muted than the original, but lovely in its own rite. Those plumped up cherries got richer and more concentrated in the oven, and the rosemary still got nice and crisp. All told, it's a bread I'd happily make again, even now that sour cherries are back in season.

Cherry and Rosemary FocacciaAdapted from Gourmet and Martha Stewart

1 2/3 cups lukewarm water 1 (1/4-ounce) package active dry yeast 5 cups unbleached all-purpose flour plus additional for kneading 1/4 cup plus 3 tablespoons extra-virgin olive oil, divided 1 tablespoon coarse sea salt 12 ounces fresh sour (tart) cherries (or drained thawed frozen), pitted (2 cups); OR 10 oz. dried cherries (see instructions below) 2 tablespoons coarse sanding sugar 2 tablespoons fresh rosemary

Combine water and yeast in a large bowl or the bowl of a stand mixer for 5 minutes, until creamy. Add flour, 1/4 cup of the olive oil, and the sea salt to the bowl, and mix with paddle attachment or a wooden spoon until a dough forms. At this point, either switch to the dough hook and mix at high speed, or turn out onto the counter and knead by hand, until dough is soft, smooth, and still sticky. This will take 3-4 minutes with a dough hook, but when I've done it by hand, it's taken more like 6-8 minutes. If kneading by hand, you'll need to sprinkle flour on the workspace and probably add as you go. Only add as much flour as you absolutely need to knead the dough; you don't want dry focaccia.

At this stage, if you've been using the dough hook, turn the dough onto a floured workbench and knead in 1-2 tablespoons more flour. Knead for 1 more minute. Then lightly oil a large bowl, transfer dough to bowl, and let rise, covered with plastic wrap, at warm room temperature, until dough has doubled, 1 to 1 1/2 hours.

Generously oil a large (13"x17") rimmed baking sheet (or, if you don't want to worry at all about dough sticking, lightly oil a silpat-lined sheet. Less oil, less sticking. Your choice.) Turn dough onto baking sheet, and use your fingertips to spread dough to fill the sheet. You may need to take a break halfway through to let dough relax; you'll find it spreads more easily after a 5-minute rest. Once dough fills nearly the whole baking sheet, let dough rise, covered completely with a couple kitchen towels, until doubled in bulk, about 1 hour.

At this point, if using dried cherries, reconstitute them in 1 cup of boiling water for about 30 minutes. They will soften and plump up. Drain after 30 minutes, and set aside.

Preheat oven to 425°F.

Drizzle dough with remaining 3 tablespooons olive oil. Scatter cherries overtop, and sprinkle with sugar and rosemary.

Bake in the middle of the oven for 25-30 minutes, until golden and cherries are bubbling. Immediately slide focaccia from baking sheet onto a cooling rack. Cool slightly; serve warm or at room temperature.

In bread
5 Comments

Serious Cold Brew Coffee

June 22, 2012 Rivka
Cold Brew Coffee

I somehow tricked myself into thinking that DC wouldn't show its true colors this summer. We've been coasting on 75-degree days these past few weeks, toasting the end of the workday with glasses of Lillet on the deck. All along, I've wondered whether real DC summer weather -- think swampy, sticky, hot mayhem -- might just pass us by. Of course, that was silly. It's 7:30 am and already 92 degrees outside. We'll be hitting 100 today. The chard and lettuce are doing great on the deck, but if I went out there, I'd wilt.

That's why I'm sitting inside, in cutoffs and a tank, doing not much of anything. On days like this, there's nowhere else to be.

And then there's this coffee. This coffee, which requires not a single appliance, not even a second's worth of a lit stove. On days like today, it's a godsend.

Cold Brew Coffee 2
Cold Brew Coffee 2

If what you're seeking is a cold beverage to take the edge off the heat, look no further. Below, you'll learn how to "brew" coffee in cold water overnight. The result has all the complexity of regular coffee, but with much less acidity, if any. It's smooth as a baby's bottom.

Cold Brew Coffee 3
Cold Brew Coffee 3

But if you're a serious coffee drinker, the type who likes to be challenged by your morning beverage, well - I've got just the thing.

Salt.

Would you believe me if I told you I salted my coffee this morning? Not only did I skip the milk (I'm turning more and more into my grandmother every day), but I actually added a pinch of salt to this morning's cup. Dan Souza, over at Test Kitchen, is apparently the boss of cold brew coffee, and he told me to add salt, so I did. He didn't even explain why, but he told me to "just trust" him, and I did. And my coffee is pretty delicious.

I guess salting coffee is sort of like salting food. It awakens your palate to the flavor. Tomatoes taste much better with a pinch of salt, so it's no surprise that coffee does, too.

DSC_0514
DSC_0514

So...am I converted? Not sure. I'm sure there's regular coffee with milk in my future. But this whole black coffee with salt feels pretty badass. And on a day like today, when my clothes stick to my skin and I can barely muster the energy to turn on the stove, feeling badass is a very good thing, indeed.

Serious Cold Brew CoffeeAdapted from Dan Souza at America's Test Kitchen

8 oz. coffee, ground fine 1 1/2 quarts room temperature water

Add water and coffee to a large pitcher (preferably one with a cover), and give a stir until the two are combined. You'll see some of the coffee immediately float to the top; stir this back into the water.

Now, cover the pitcher and leave it alone. No more stirring. Let the mixture sit on the counter for 24 hours.

Put a coffee filter in a strainer or funnel, and set over the container in which you plan to store the coffee. (If you want to store it in the same pitcher in which you steeped it, just strain the coffee into a bowl, and then pour it back into the pitcher once you've cleaned it.)

Pour the coffee concentrate through the filter slowly; it may take a while to drain. Store the filtered concentrate in the fridge until you need it.

To drink, pour equal amounts concentrate and water into a glass with plenty of ice. Add a pinch of salt, stir to combine, and drink up.

In drinks
5 Comments

Chive Compound Butter

June 18, 2012 Rivka
chive butter13
chive butter13

Some people burn everything. Others forget to add salt. Me? My pasta water always boils over. But my biggest achilles heel in cooking is the constant temptation to add too many ingredients.

It starts simply enough: asparagus with miso. But then I shake in a few dashes of soy sauce, and maybe some mirin, and wouldn't some rice vinegar be nice? Oh, and sesame oil too. Before I know it, I've created a murky mess.

I didn't make a list of kitchen resolutions this year. At least not formally. But one commitment I made a while back that I've been trying to keep is to stay simple whenever possible. If I can make something delicious with five ingredients instead of seven, or three instead of five, I do. Especially now that summer has rolled around and the farmers' markets are juicily bursting with fresh favas and eggplants and peas and peaches and oh, tomatoes, I'm trying to celebrate these ingredients more simply. Tomatoes, salt, olive oil. No kitchen sink.

It was this impulse that led me to the garden last week to pick some chives. The chives are doing beautifully, by the way; they started as two little bunches of skinny green spears, but now those spears are plump, and there are many more of them. Enough that you can't even tell where I snipped a few off the bunch.

chive butter17
chive butter17

I had a few chives with flowers attached leftover from my CSA, and I wanted to find a way to celebrate my most favorite herb. Typically, I dice chives finely and sprinkle them onto eggs, toast, and fresh chevre. Simple enough. But this time, I went for something even simpler, and I fell hard. Chive butter.

It's simple. Really, dead simple. Chives, butter, salt. That's it. If you're feeling the urge to make things more complicated, you might grate some parmesan cheese into the mix. I sat on my hands and resisted that urge, and friends, I have absolutely no regrets about the decision. Chives and butter are a match made in heaven. Aside from a little salt to wake up the palate, they need absolutely nothing else.

chive butter05
chive butter05

The tricky thing about recipes as simple as this one is that the quality of each ingredient really matters. In a sauce with 18 ingredients, you'd hardly notice. But here, you need good butter, fresh chives, quality salt. Trust me: you'll taste the difference.

So what should you do with this magical butter you've just made? First, before you do anything else: spread it on warm bread. Faint from happiness.

Now compose yourself: there's more to do. You might finish a piece of grilled or roasted salmon with it. Or brush it on asparagus before broiling or grilling them. I bet it would be wonderful on halved, grilled or roasted tomatoes as well. And if finishing a steak or roasting a chicken with butter is your thing, well - don't let me stop you here.

To serve the compound butter as a condiment, you've got a couple options. The first is to pack it into a pretty cup or dish and put it on the table, just so. If you've made a small batch, that should work perfectly.

If you want to serve the butter on two or more separate occasions, I've provided instructions below. Just be sure to bring butter back to room temperature before serving.

Simplicity at its best: that's pretty much the story.

chive butter02
chive butter02

Chive Compound Butter

4 tablespoons unsalted butter, softened 3 tablespoons finely chopped chives 1/2 teaspoon big, flaky salt

Combine all ingredients in a medium bowl and mix together with a fork until fully incorporated.

Pack into a small dish or cup, and either serve immediately, or wrap in plastic and refrigerate for up to 1 week. To store for longer, wrap cup or dish tightly in plastic and freeze. Butter will keep this way for a couple months.

Alternatively, butter can be refrigerated or frozen in smaller servings for use as needed. To do this, refrigerate butter for about 30 minutes - maybe less - until it's stiff enough to hold its shape. Then, set out a piece of wax or parchment paper on a flat surface, spoon the butter in a big clump onto the paper, and wrap the long edge of the paper around the butter, gently rolling it into a log. Use the short edges of the paper to pack in the ends of the log, and then wrap it up and stick it back in the fridge until completely solid. At this point, you can slice it into two shorter logs, or you can make individual disks of butter to use or serve whenever you feel the urge. Just be sure to let the butter come to room temperature before serving if you intend to spread it on bread.

In condiments
4 Comments

Sour Cherry Vanilla Jam

June 12, 2012 Rivka
cherry vanilla jam
cherry vanilla jam

This was one busy weekend. Saturday, D and I drove down to Charlottesville for a R. and S.'s wedding. The couple are Indian, and their wedding officiant said theirs was the most traditional South-Indian wedding he'd ever done. Everything - from the chairs, to the umbrellas protecting against the sun, to the guests' saris - was vibrantly colorful. The bride, decked in red, gold, and loaded with jewelry, henna, and fresh flowers, was breathtaking. Between various prayers, customs, and games (yes, games! Like, see how quickly the bride and groom can throw rice on each other...beyond fun), the ceremony alone was over three hours; fortunately, it's customary to mill about. Guests roamed the grounds, and eventually moved their chairs to the shade on the periphery of the ceremony. The whole thing was wonderfully informal. Plus, there was an endless supply of fresh juice set up in back - we're talking guava, mango and spicy green mango, watermelon, you name it - and, of course, plenty of chai tea. The wedding took place at Castle Hill Cider, a winery with a gorgeous barn overlooking hills and a pond. There are many worse things to do than roam those beautiful grounds, drink fresh juice and chai, and watch a happy couple get married. It was a memorable day.

Sunday morning, bright and early, I headed out to the 'burbs with my dad and our friends J. and B.'s kid A. to pick some berries. It was sweltering - especially in those strawberry fields, which get absolutely no shade - but we stuck it out, and I came home with 3 pounds of sour cherries, 3 of strawberries, and a big tupperware of beautiful, sweet blueberries.

The blueberries were the easiest to pick by far. There were plenty of them, and they grew on bushes about waist height. Every bush was loaded with plump, ripe specimens, which we happily popped into our buckets.

Cherries were harder: most of the trees were picked over. Fortunately, they had a ladder in one of the fields, so we climbed into the trees and picked beautiful, gem-red cherries from the top branches.

By the time we rolled around to strawberries, we were pretty beat. But the berries - wow. They tasted like hot jam. We nibbled a couple, drank a lot of water, and soldiered on. The spoils were worth every minute.

iphone 904
iphone 904

The produce are well on their way to deliciousness. I did manage to keep a few strawberries and a few cherries for pie, but that's it. Between 8 jars of various jams and plenty of nibbles while I was cooking, most of the berries have been used. Over the next couple weeks, I'll be sharing a few of my favorite recipes from this round of preserving. First up: cherry vanilla jam.

I think this jam is my favorite of today's projects. I've been folding it into yogurt, shmearing it on toast, and -- let's be honest - eating it with a spoon. Just three ingredients produce a jam with surprising complexity, and the whole thing is done in under an hour.

cherry vanilla jam 2
cherry vanilla jam 3

Now that the day is done, the A/C is high, and I'm showered and clean, I'm so thankful to have all those jars popping away on the counter. They'll be a welcome burst of summer sunshine when it gets cold again.

Sour Cherry Vanilla Jam

Note: The recipe here is scaled for an urban kitchen: 2 pints of cherries yield roughly 1 1/2 pints of jam, which I preserve in three half-pint jars. Perfect for a small household. If your jam doesn't quite fill that third jar, that's okay. Don't process it; just stick it in the fridge and use it first.

2 pounds (2 pints) sour cherries, rinsed and pitted 2 vanilla beans 1 1/4 cups sugar

Put the cherries in a medium-large pot (stainless steel, cast iron, and enamel all work). Use your hands to mash and squish the cherries, breaking up the fruit and releasing their juice.

Slit vanilla beans lengthwise and use the back of a knife to scrape the vanilla seeds out of the beans. Put the seeds into the pot with the cherries. Halve the beans crosswise (so they fit in the half-pint jars) and add them as well.

Add the sugar to the cherries, stir to combine, and set over medium-high heat. When the cherries begin to bubble, reduce heat to medium low. Cook until jam reaches 220 degrees. If you don't have a thermometer, you're looking for big, syrupy bubbles and for most of the liquid to have evaporated. If you want to be sure you've achieved the proper texture, tuck a plate into the freezer when you start the jam. To check for doneness, put a few drops of the jam onto the plate, wait 1 minute, and taste. If the jam has firmed up somewhat, it's done.

At this point, you can transfer the finished jam into jars and refrigerate them, or you can process them for shelf storage. To process jam, sterilize your jars and lids in a large pot of boiling water for 10 minutes. Remove with tongs. Use a funnel to fill the jars most of the way with jam, leaving at least 1/4 inch of headspace. Top with the lids and a screw cap. Return to the pot of boiling water, making sure jars are completely submerged with water when standing upright. When water returns to a boil after jars are added, set a timer for 10 minutes. After 10 minutes, jars are finished processing. Turn off heat, let cool for about 10 minutes more, then carefully remove jars with tongs. Set on the countertop and leave untouched until all jars' lids have snapped into a vacuum seal (you'll hear a little "pop!" when that happens). If any jars didn't seal, you can either reprocess them within 24 hours, or store in the fridge and eat first.

In condiments Tags summer
3 Comments
← Newer Posts Older Posts →

Subscribe by email:

  • books (1)
  • crisps and crumbles (1)
  • frozen (1)
  • toys (2)
  • gifts (3)
  • egg whites (5)
  • fried (5)
  • how to use--- (6)
  • drinks (10)
  • menus (11)
  • travel (11)
  • fish (12)
  • kosher for passover (14)
  • thanksgiving (14)
  • vegan (20)
  • snacks (21)
  • techniques (21)
  • soup (26)
  • bread (28)
  • pies and tarts (28)
  • cake (33)
  • events (34)
  • condiments (36)
  • various and sundry (39)
  • uncategorized (42)
  • cookies and bars (46)
  • weekday lunch (47)
  • appetizers (48)
  • salad (51)
  • gluten-free (56)
  • comfort food (61)
  • breakfast and brunch (77)
  • sides (81)
  • dessert (90)
  • main dishes (100)
  • healthy (139)
  • easy (155)
  • vegetarian (180)

| LATEST |

Featured
Blue Chair Fruit's Black Raspberry Jam
Thai Grapefruit Salad
Mango Sticky Rice
Winter 2016: Odds and Ends
Povitica: The Best Babka Ever
Persimmon Walnut Bread
Sprout Chaat Salad + New Site!
Maple Walnut Squares
How to Give Thanks
Croissants (really, I made croissants) + other croissant-ish things

| hEALTHY |

Featured
Sprout Chaat Salad + New Site!
Fennel frond pesto + what to do with those pesky stalks
Asparagus Toasts with Pistachios and Mint
Eggplant-Walnut Pâté + Passover Ideas
1-DSC_0861-600x401.jpg
Lentils and Rice with Tamarind Sauce and Dukkah
Big Kale Salad with Pomegranate and Feta
Punchy Crunchy Ginger Salad

| BreakfAST |

Featured
Povitica: The Best Babka Ever
Croissants (really, I made croissants) + other croissant-ish things
Mushroom and Kale Breakfast Strata
Barley Porridge with Orange and Black Sesame
Ramps 'n' Eggs Biscuit Sandwiches
Asparagus Toasts with Pistachios and Mint
Apple-Cheddar Scones with Sage
Menemen - Turkish Eggs with Tomatoes and Peppers
You must select a collection to display.

© 2016 Rivka Friedman. All Rights Reserved.