Initially posted on The Jew and the Carrot: www.jcarrot.org.
Walk into any Jewish household on a Friday night, and you'll have an instant window into that family's food legacy. The Syrian table is piled high with ka'aks, zucchinis and eggplants stuffed with lamb and beef, beautiful molded rice with blanched almonds, and my favorite, lahmacun, those wonderful flatbreads topped with tamarind-and-tomato drenched ground meat. The Eastern Europeans have lokshen and cabbage, noodle kugel, gefilte fish, and of course, cholent. But come over to my house, and you might be confused: we'll start with, say, a Moroccan soup called harira. The pièce de résistance, if I'm lucky, is huachinango a la Veracruzana, my favorite preparation of red snapper in a Mexican tomato sauce with onions, olives, currants, hot peppers, and cinnamon. A side of the Indian eggplant curry baingan bartha might round out the meal, and for dessert, my mother's homemade chocolate croissants. If you're following along, that makes one American Jew, born and raised in Washington, DC, with relatives from across Eastern Europe, who, along with her mother, is building a cooking legacy on Indian curry, Mexican fish, Moroccan soup, and French pastry.
I don't come from a strong cooking tradition. It's possible my great grandmothers slaved over some top-notch borscht, or -- in the case of the piece of my family that's been in the US for seven generations -- some excellent apple pie. But I wouldn't know. My grandmother, who grew up in Chicago, didn't cook much at all. My Bubby, who grew up in New York and has spent most of her life in Richmond, VA, used to make an excellent Thanksgiving dinner, but her cooking didn't have a particular perspective or core list of key ingredients.
Color me jealous: I've always wanted to come from one of those families with a strong culinary tradition. I've longed for native staples - the sorts of ingredients you always have on hand in multiple forms and in massive quantities, that find their way into everything: the Italians' olive oil and tomatoes; the Indians' garlic, ginger, and chilies; and so on.
So we weren't bequeathed a strong culinary heritage by our relatives or our culture; that hasn't stopped us from building our own. My mother has spent years accruing knowledge of different cultures' cuisines, acquiring a taste for spice, learning to achieve that balance of spicy, sour, salty, and sweet that makes food -- of any origin -- great. And ever since I learned to cook, I've been trying to follow in her footsteps. Yes, we're creating our own culinary legacy. Our legacy uses lemon in copious quantities; it doesn't skimp on the chile; it favors things with pools of zesty tomato-based sauces to be sopped up with good bread; and it always includes something sweet to finish things off.


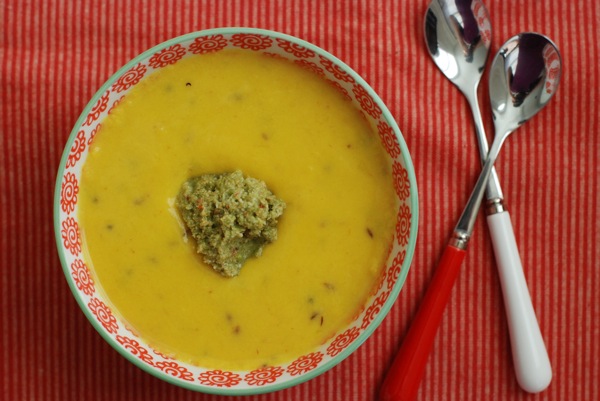
But there's more. We love olives, capers, and anchovies, individually or all together in a tapenade that'd make a cook in Provence swoon. And we love Indian flavors; we've spent many a meal tasting curries two, three, four times in a row, to decipher their ingredients one by one. As I served an Indian-spiced chilled mango soup to my guests on Friday night -- its pale orange surface flecked with black mustard seeds and buoying a dollop of spicy green chutney -- I felt connected to a cooking heritage. The people may not be my own people, but the legacy of Indian cooking -- the boldness with flavors, the embrace of real, sweat-inducing spice, the mixing of hot and cold together in the same dish -- is one I have come to love, and to take as my own. Not being born into a strong cooking tradition may be a blessing in disguise, after all.

Gujarati Mango Soup with Green Chutney Adapted from a recipe in Amanda Hesser's The New York Times Essential Cookbook
After initially making this soup, I was concerned it would be cloying, even in small doses. I'd added some lime juice, but it still tasted quite sweet. On a whim, I made this green chutney (below), and its fresh, green heat complements the soup perfectly.
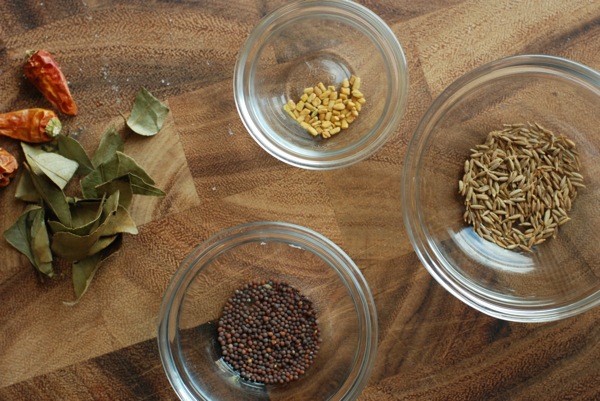
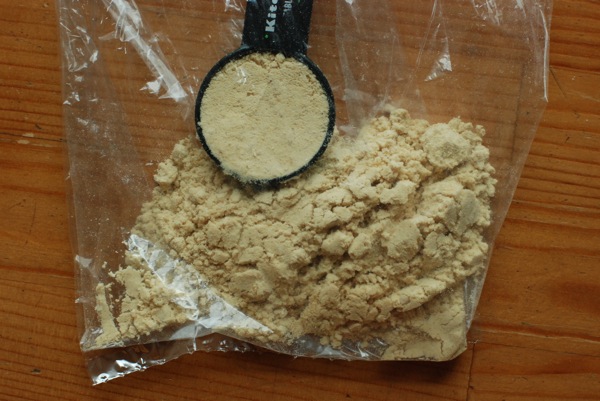
2 tablespoons chickpea flour 1/8 teaspoon ground turmeric 3/4 teaspoon ground cumin 3/4 teaspoon ground coriander 1/2 cup plain whole milk yogurt (Greek is best) 3 cups canned mango pulp or mashed fresh mango pulp (1 mango yields between 3/4 and 1 cup of pulp) 1 1/4 teaspoons salt 1/2 teaspoon sugar (may need more if using fresh mangos) 1 jalapeno pepper, chopped (I used all the seeds. If you prefer less spice, omit seeds and membrane) 2 tablespoons peanut or corn oil Generous pinch ground asafoetida 1/2 teaspoon whole brown mustard seeds 1/2 teaspoon whole cumin seeds 2 whole hot dried red chilies 1/8 teaspoon whole fenugreek seeds 10 fresh curry leaves (optional) Juice of 1 lime
Put the chickpea flour, turmeric, and ground cumin in a bowl. Fill a measuring cup with 1/2 cup of water, and add a couple tablespoons to the flour mixture, stirring carefully until the flour is a smooth paste with no clumps.
Add more water very slowly, ensuring an even consistency as you stir.
Once enough water has been added that the chickpea flour has been fully incorporated into the liquid with no lumps, add the rest of the water and stir to combine. Whisk in yogurt, mango, and 2 more cups water. Add salt, sugar, and fresh chilies. Mix well.
Put oil in a heavy-bottomed medium pot over medium heat. When oil is very hot, add the asafoetida, and then — in quick succession — the mustard seeds, cumin seeds, dried chilies, fenugreek seeds, and curry leaves (if using). Have a splatter screen on hand: the mustard seeds will pop almost immediately after being added.
As soon as you have added the above ingredients, remove from heat and add mango mixture. Stir to combine, return to medium heat, and simmer for 5 minutes, stirring. Then remove from heat, cover, and allow to steep for 30 minutes.
At this point, you can either reheat the soup to serve warm, or do as I did, and refrigerate it to be served cold. Either way, strain the soup through a coarse sieve, then spoon some of the smaller seeds from the strainer back into the soup. Immediately before serving, stir the lime juice into the soup.
Serve soup in small bowls, with a spoonful of the chutney in each.
Spicy Green ChutneyAdapted from a recipe by Madhur Jaffrey
2 tablespoons lemon or lime juice (lime is preferable) 1 small tomato, diced 3/4 teaspoon salt 3 fresh hot green chilies, such as bird’s eye or jalapeno (can start with 2 and add to taste) 2/3 cup fresh chopped cilantro 1/3 cup fresh chopped mint 1/2 cup grated coconut, fresh or frozen and defrosted
This chutney can be made rustic in a mortar and pestle, or smooth in a blender.
Combine 3 tablespoons water, lime juice, tomatoes, salt, and chilies. Mash or blend until combined or smooth.
Add cilantro and mint; mash together or blend until smooth.
Finally, add coconut and blend or mix more, until chutney is fully mixed or completely smooth. Serve cold.
Chutney will keep in the refrigerator for a few days, but will keep for months in the freezer.
Many of the ingredients in each of these recipes are available online at Kalustyans.com.

 The last in a series of posts on great side dishes for Tday. Happy Holidays to everyone!

